This fast and easy 2-Minute Microwave Onsen Tamago is a brilliant, time-saving hack to make a silky and creamy Japanese-style poached egg! I‘ll show you how to cook it in a fraction of the time it takes to slow-poach it the traditional way.
Have you tried poaching eggs before? I’ve seen different methods out there, but I typically use the Japanese egg poaching method known as onsen tamago, which involves cooking the egg slowly in the shell in hot water (see my original recipe).
This method gives me the most magnificent poached eggs, with the whites perfectly set and the golden yolks deliciously oozy. However, egg poaching can be finicky, so today, I wanted to show you the easiest way to make onsen tamago, or Japanese-style poached egg, in the microwave.
You might call this cheating, but the result is still excellent, and it certainly saves a lot of time on busy days. With this convenient microwave-method, you can poach onsen tamago in less than 2 minutes!
Table of Contents
What is Onsen Tamago?
You might already know that ‘onsen’ refers to a hot spring, so it’s easy to put together that ‘onsen tamago’ translates to ‘hot spring eggs’ in Japanese. When we say ‘onsen tamago,’ you can refer to it as both a dish and an egg poaching technique.
It is true that the Japanese slow-cooked the eggs in hot spring water back in the day. Charming as this may sound, the ultimate goal of this traditional method of poaching eggs is to create silky egg whites and custard-like yolks, so creamy and dreamy that the egg melts right in your mouth.
While cooking eggs in a hot spring is certainly not a common practice anymore, nor do we have an onsen in our backyard, we now make onsen tamago in a regular pot over the stove, just like you would with a regular poached egg.
I’ve shared the original technique here, but this method still requires time. Since we all can take some shortcuts in our busy schedules, this super easy microwave method is a light-bulb moment for preparing onsen tamago at home!
Why You’ll Love This Recipe
- Absolutely foolproof! Compared to the regular stove-top egg poaching method, this is no-brainer even for beginner cooks.
- Makes for a quick add-on protein anytime you need it.
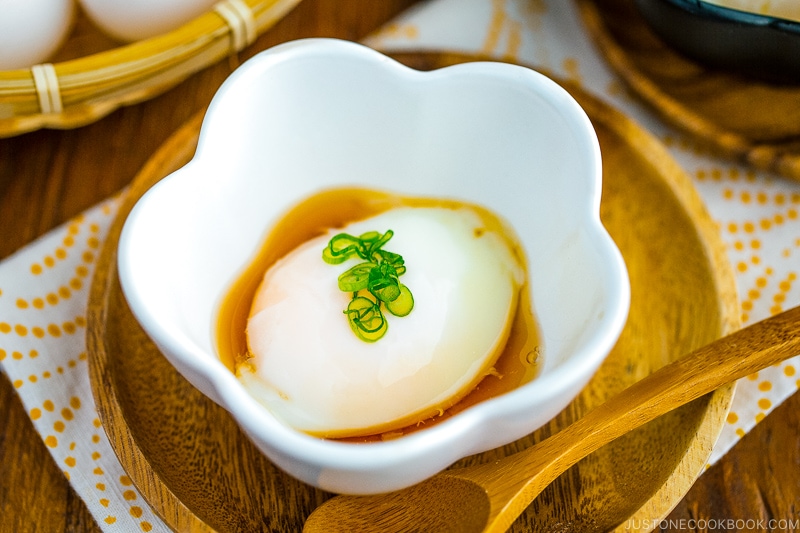
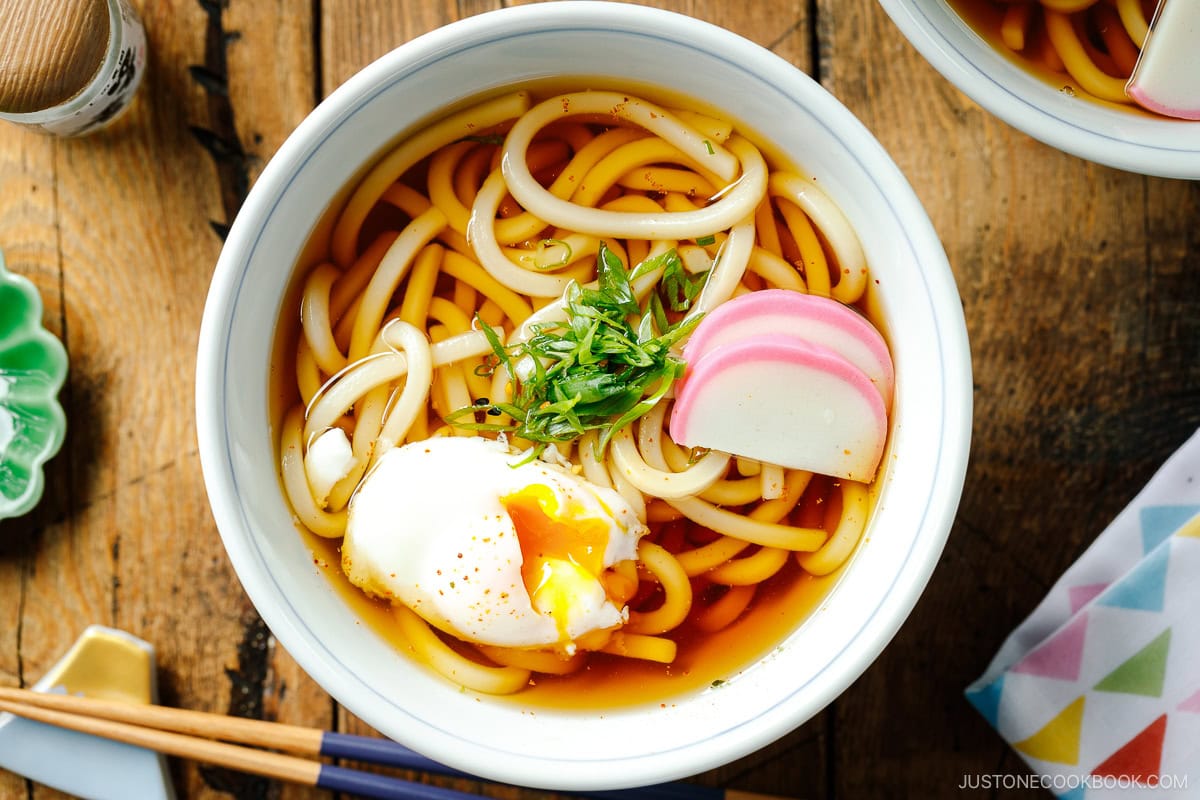
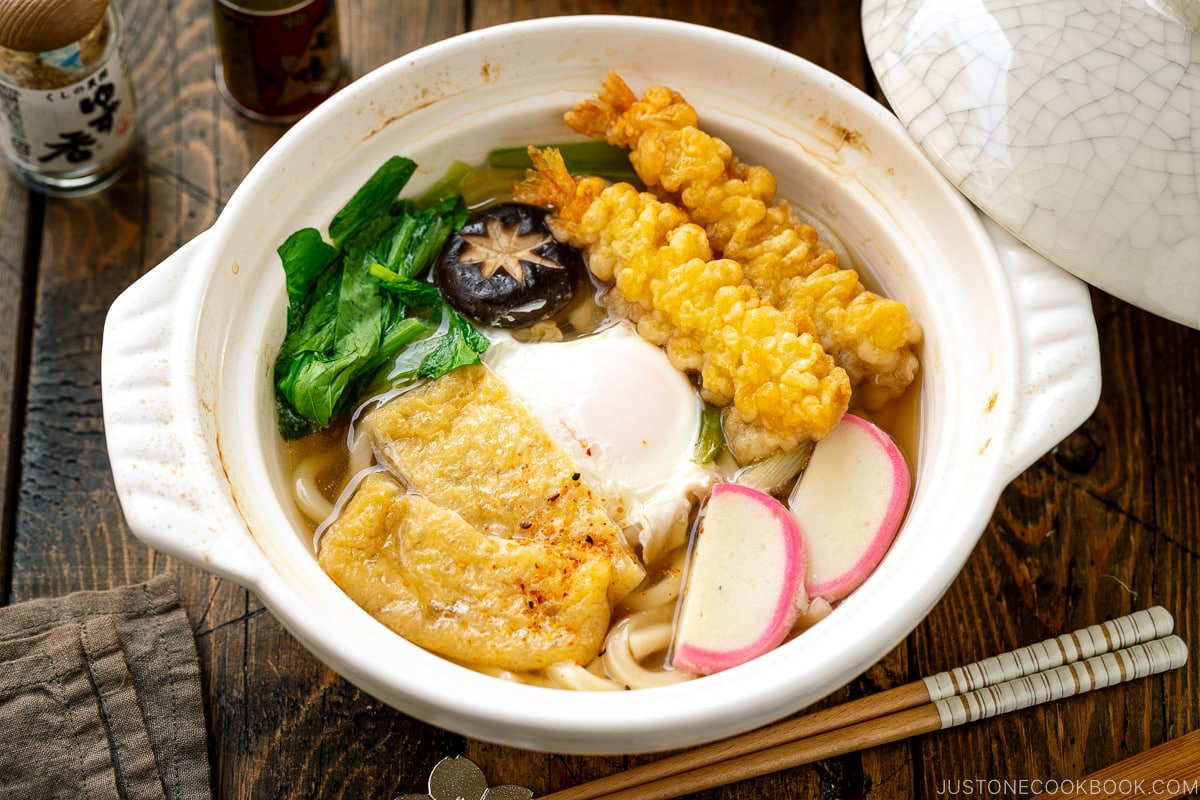
- So many dishes to use it for! Onsen tamago is usually enjoyed with a dashi-based sauce as part of a traditional Japanese breakfast, but we also like to add the poached egg on top of dishes such as Gyudon, Hambagu, Japanese Curry, and more!
Ingredients for Microwave Onsen Tamago
You’ll need only two ingredients to make onsen tamago.
- a refrigerated large egg (50 g each, without shell)
- Water
How to Make Microwave Onsen Tamago
Poaching eggs in the microwave is literally as easy as a-b-c. The detailed recipe is on the recipe card below.
Jump to Recipe- Crack an egg into a microwave-safe glass bowl. Pour water around the edges so the egg stays in the middle.
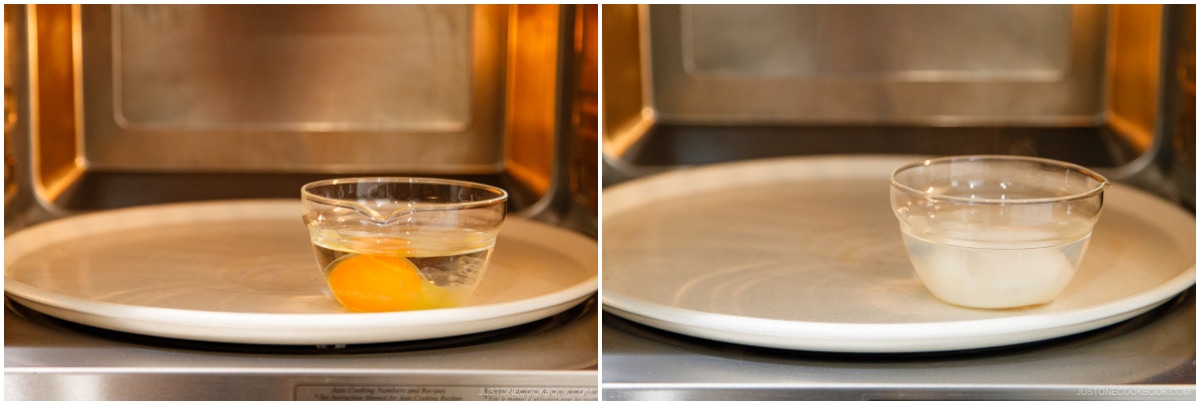
- Microwave the egg until the egg white just solidifies and turns white.
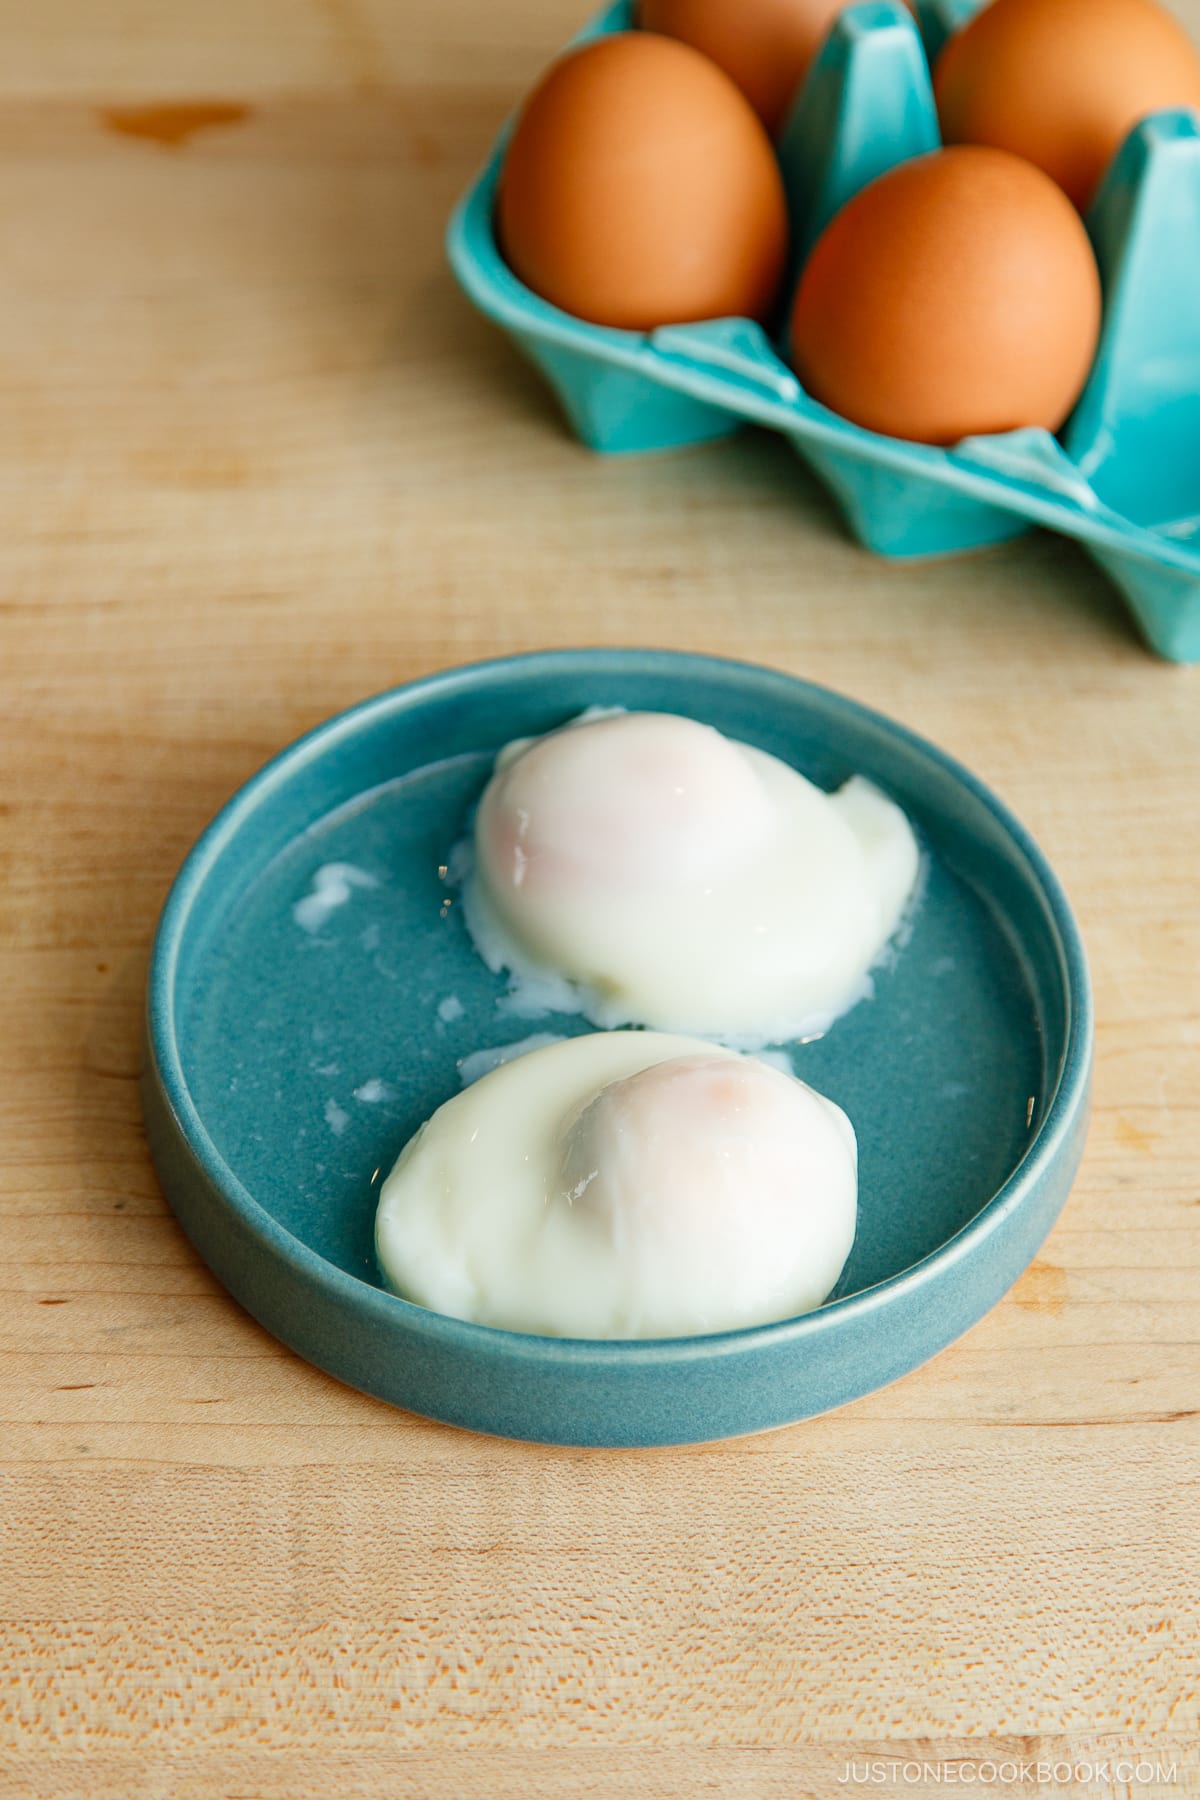
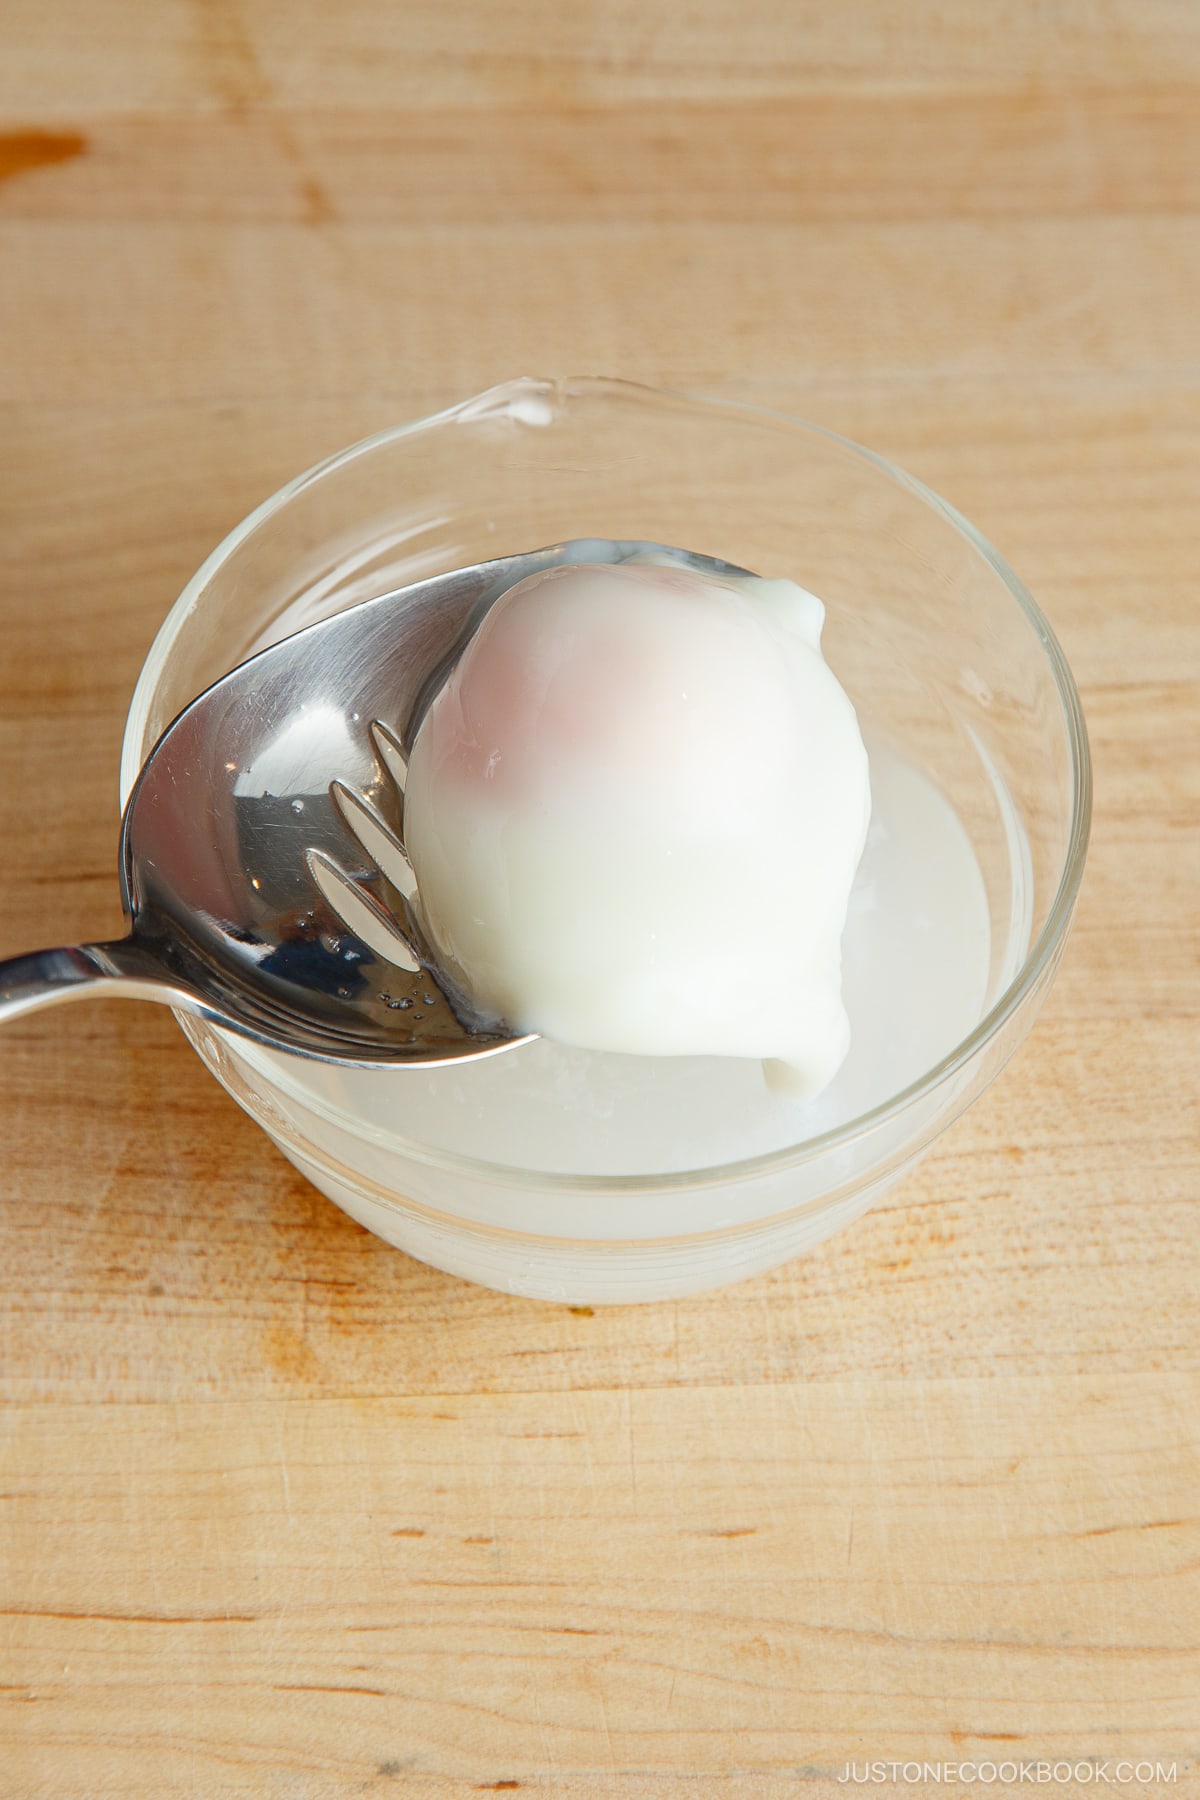
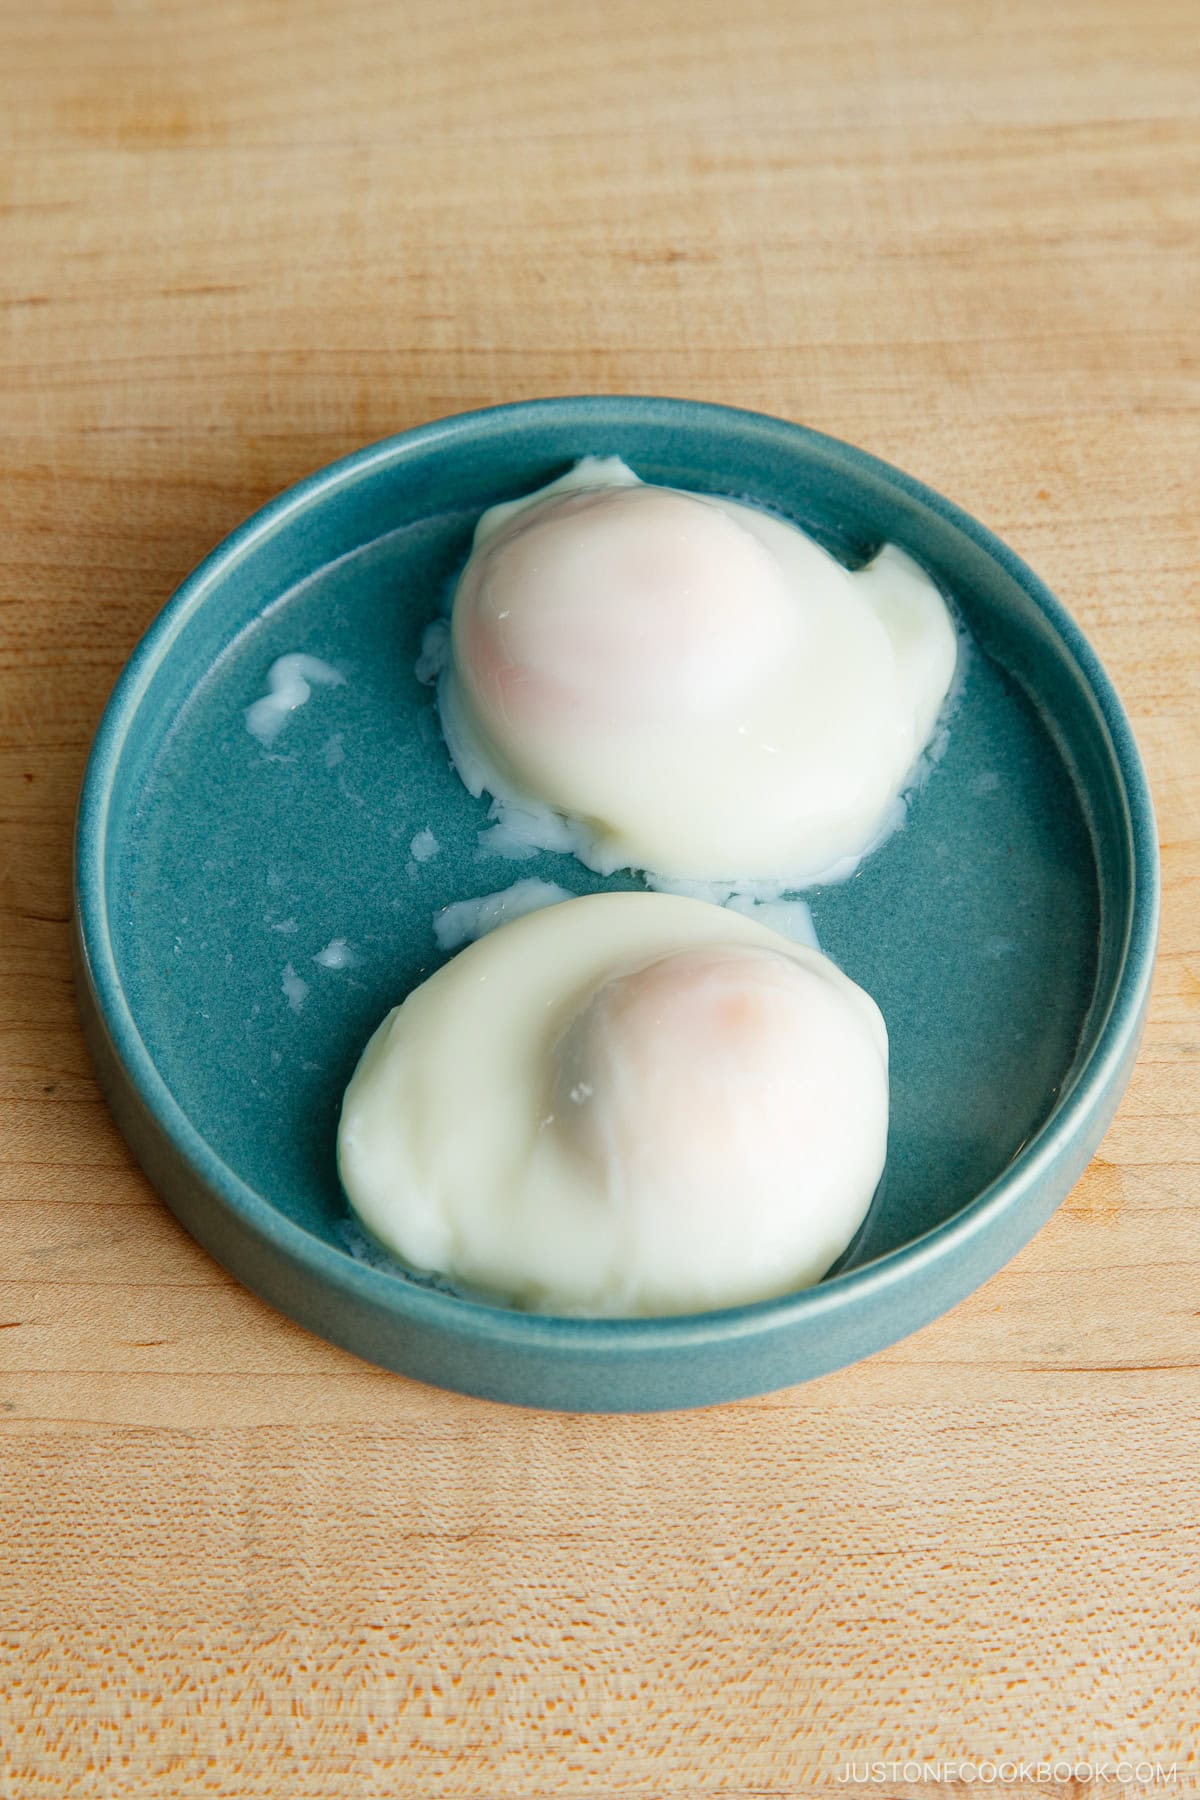
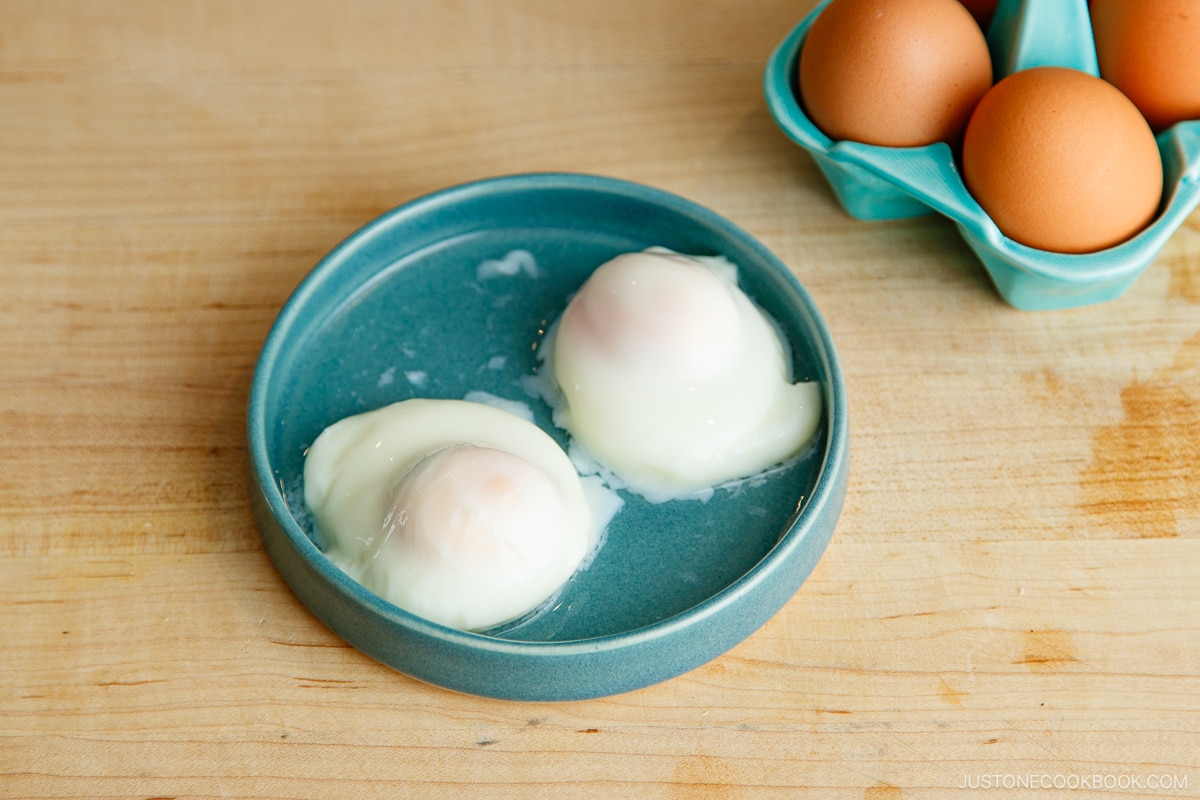
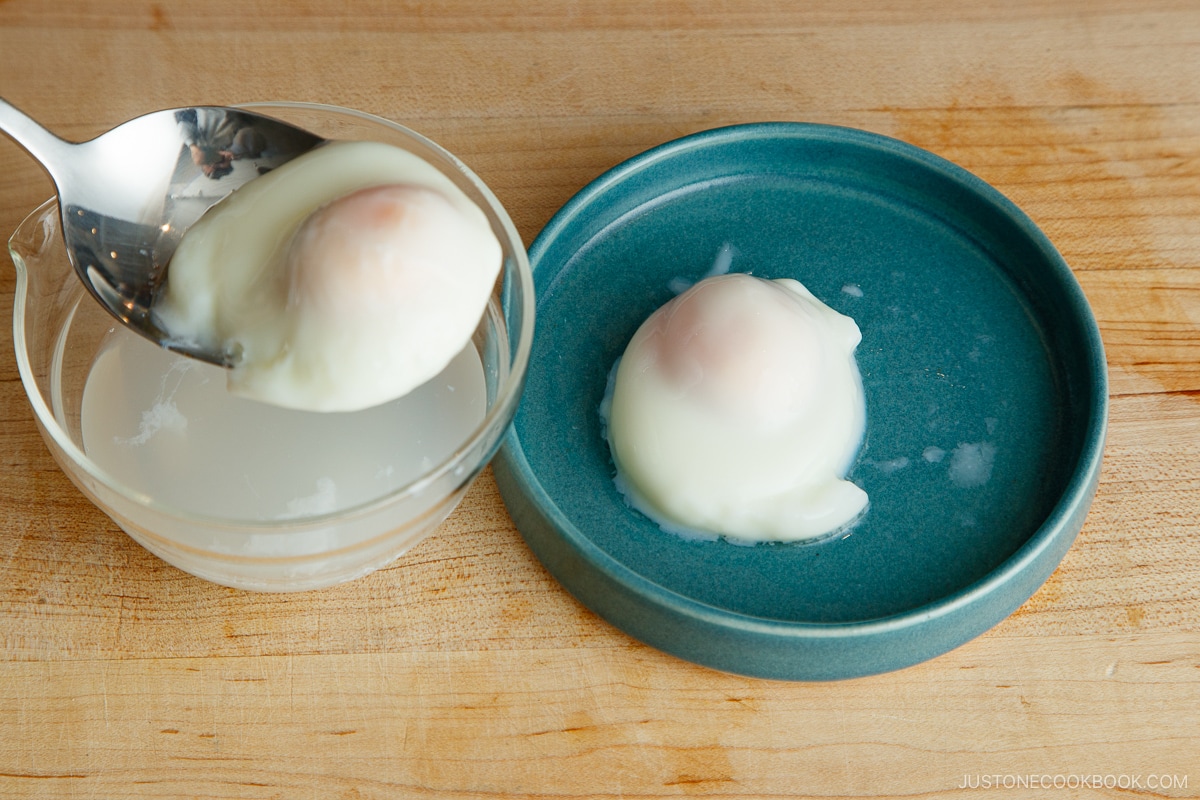
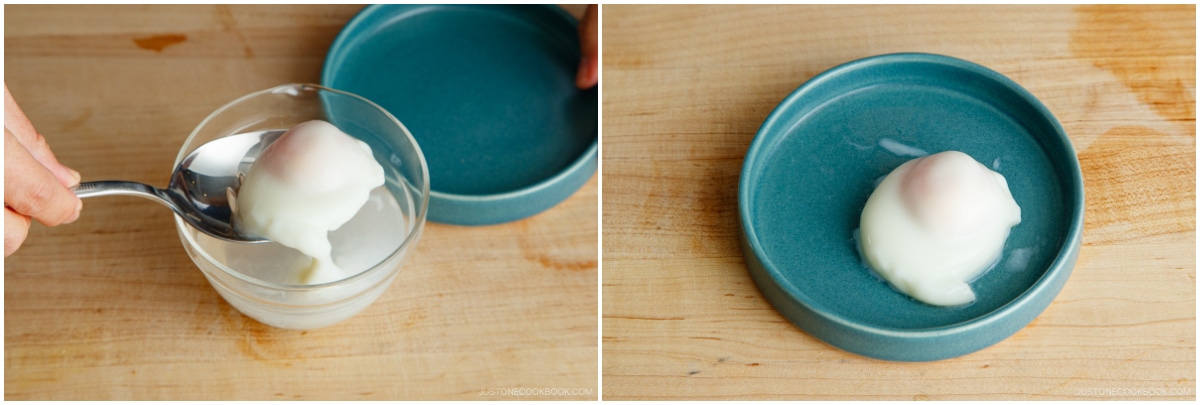
- Scoop out the onsen tamago, drain the cooking water, and serve!
Recipe Tips and Techniques
- Pick the microwave-safe bowl that is the right shape. Use a bowl similar in shape to a standard rice bowl or miso soup bowl that‘s rounded and somewhat deep, with sides that go straight up. This way, the egg will be submerged and wrapped in water nicely needing too much water.
- Add water around the edges and on top of the egg. As you gently pour water around and over the egg, it will submerge under the water. This is why it’s important to use a bowl that is rounded and goes straight up. When the bowl’s opening is too wide, you need more water to submerge the egg.
- Puncture the yolk with a toothpick to keep it from exploding during cooking.
- Test and figure out the cooking time. Microwave the egg using 500W (for my 1000W microwave, I use half power or P5). After testing several times, my microwave and the amount of water I used took exactly 90 seconds to get perfect onsen tamago. When the egg white solidifies and turns white, it’s ready to take it out.
- Remove the onsen tamago from the hot water immediately so the remaining heat does not overcook the egg yolk.
How to Store
As it takes only 90 seconds to make onsen tamago in the microwave, I highly recommend making it right before you need it. But for some reason, if you need to make it ahead of time or have leftovers, then this is what you can do:
- To Refrigerate: Once the onsen tamago is cooled to room temperature, refrigerate immediately in an airtight container for 3-4 days.
- To Reheat. For the best results, gently reheat leftover onsen tamago in the microwave until warm.
How to Serve Onsen Tamago
- Put it over fried rice: Kimchi Fried Rice, Garlic Fried Rice
- Top your Japanese curry rice: Japanese Dry Curry, Keema Curry, Chicken Curry, Vegetarian Curry, Beef Curry
- Add it to a rice bowl: Gyudon, Yakiniku Don, Tamago Kake Gohan
- Put it in noodle soup: Kake Udon, Cold Tanuki Udon, Vegetarian Udon, Soba Noodle Soup, Miso Ramen, Vegetarian Ramen, Shoyu Ramen, Mazesoba (brothless ramen)
- Top a main dish: Hambagu (Japanese hamburger steak), Nikomi Hambagu (stewed hamburger steak), Loco Moco, spaghetti carbonara (my favorite), Avocado Toast
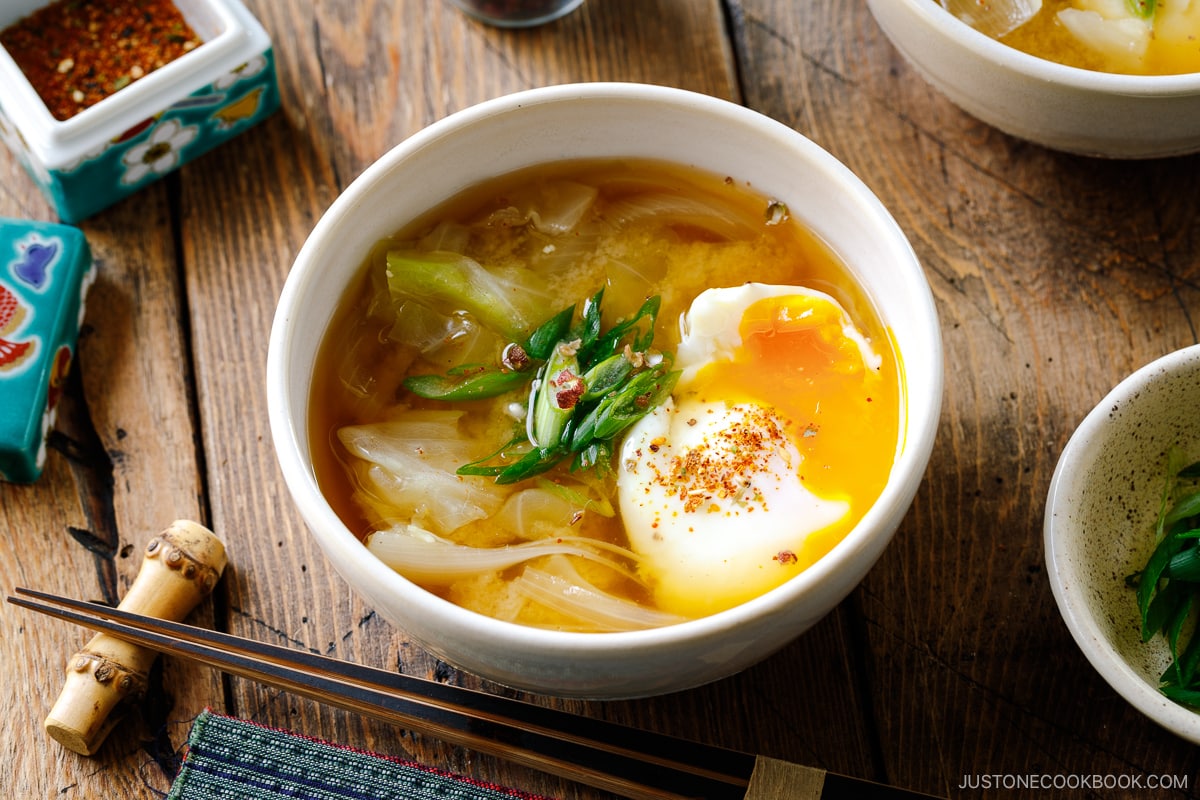
- Put it in your soup and hot pot: Classic Miso Soup, Cabbage and Onsen Tamago Miso Soup, Cold Miso Soup (Hiyajiru), Zosui (Japanese rice soup), Nabeyaki Udon, Miso Nikomi Udon
Wish to learn more about Japanese cooking? Sign up for our free newsletter to receive cooking tips & recipe updates! And stay in touch with me on Facebook, Pinterest, YouTube, and Instagram.

2-Minute Microwave Onsen Tamago
Ingredients
- 1 large egg (50 g each w/o shell) (refrigerated)
- 6 Tbsp water (for poaching)
Instructions
- Crack 1 large egg (50 g each w/o shell) in a small, microwave-safe glass bowl. Use a bowl similar in shape to a standard rice bowl or miso soup bowl that‘s rounded and somewhat deep with sides that go straight up. Next, pour some water into the bowl around the edges, pushing the egg to the center.
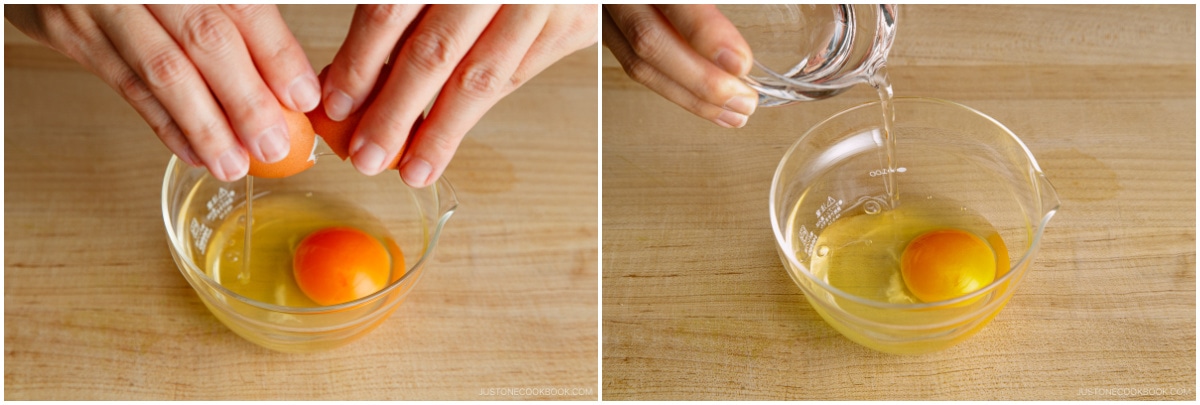
- Pour enough water on top of the egg yolk to submerge it completely. I usually use 6 Tbsp water for this particular bowl. Then, gently puncture the yolk with a toothpick to keep it from exploding during cooking. DO NOT FORGET THIS!

- Place the bowl at the edge of the microwave tray. Microwave at 500W (I use half power or P5) for 90 seconds, or until the egg white JUST solidifies and turns white. The egg yolk should be pinkish and runny at this stage since it takes longer to solidify than the egg white. DO NOT OVERCOOK. If your egg white is still transparent, microwave for 5 seconds more and check again. The poached eggs should have silky egg whites and custard-like yolks.
- Immediately scoop out the onsen tamago with a slotted spoon, drain the cooking water, and transfer it to a small plate or bowl. Don‘t keep the egg in the cooking water, as the remaining heat will continue to cook it. Now, it‘s ready to use!
To Serve Onsen Tamago
- Top a rice dish: Onsen Tamago is a protein-rich topping for fried rice like Kimchi Fried Rice and Garlic Fried Rice. Try adding one to finish a Japanese curry rice plate like Japanese Dry Curry, Keema Curry, Chicken Curry, Vegetarian Curry, and Beef Curry.
- Add it to a rice bowl: It‘s a silky and rich topping for Gyudon (simmered beef bowl) and Yakiniku Don (grilled beef bowl). It also works beautifully in a poached-egg version of Tamago Kake Gohan.
- Put it in noodle soup: Up the protein and add one to your Kake Udon (classic udon noodle soup), Cold Tanuki Udon, Vegetarian Udon, and classic Soba Noodle Soup. It‘s also great in Shio Ramen, Miso Ramen, Vegetarian Ramen, Shoyu Ramen, and Mazesoba (Japanese brothless ramen).
- Top a main dish: Add one to your Hambagu (Japanese hamburger steak), Nikomi Hambagu (stewed hamburger steak), Loco Moco, and spaghetti carbonara (my favorite). It also works well on Avocado Toast.
- Put it in your soup and hot pot: Bulk up your Japanese soups by adding one to classic Miso Soup, Cabbage and Onsen Tamago Miso Soup, Cold Miso Soup (Hiyajiru), and Zosui (Japanese rice soup). It‘s delicious in Nabeyaki Udon, Miso Nikomi Udon, and Hot Pot for One, too.
To Store
- Cool the Onsen Tamago to room temperature and refrigerate immediately in an airtight container for 3–4 days. To reheat, place the leftover poached egg and some water in a bowl and gently heat it in the microwave until just warm.


First time trying this, and it worked so well! I was hesitant because I wanted to try 2 eggs in one bowl with slightly increased times. Thankfully, all went well. Thank you for the great recipe and toothpick tip!
Hi Alanna! Thank you for trying Nami’s recipe!
We are so happy to hear this method worked well for you too. Happy Cooking!🤗
I personally know 2 people that have been severely scalded by microwaving poached eggs. The water super heats and explodes as soon as you touch it. It is very dangerous, please Google microwaved poached egg injuries. It might be fine most of the time but you can’t predict the time it is not ok. This is not a safe way to cook eggs and should not be promoted.
You should google no injury in microwaved poached eggs as well.
Poached eggs are onsen tamago are similar but different. But thank you for your service Kathryn
Thank you for your feedback, Kathryn! We’re uncertain which approach they chose, but the method outlined here has been popular in Japan for years. No one should be hurt if they follow the recipe guidelines carefully. As Nami stated in the blog post and recipe card, it is important to follow every detail, particularly these two points: 1) Puncture the yolk with a toothpick, and 2) Use low microwave power (gentle power) to cook the egg. The egg should also be soaked in water. These little things are crucial to success, especially when taking a shortcut.
For anyone interested in making this dish, please read the instructions carefully.🙂
Perfect egg! Don’t forget the toothpick thing! Thanks, Nami!
Hi AliceK! We are so happy to hear you enjoyed Nami’s recipe!
Thank you for your kind feedback!
I’ve been doing this method for many years. I’ve found it helps to heat the water for about 30 seconds before adding the egg, then microwaving it in 30 second increments. Until it’s done the way I like it. Since each egg size is still a little different (not every large or medium egg contains the exact same content weight), this prevents me from overcooking them. And sometimes I want a runny yolk while sometimes I want a jammy yolk.
Hi Mea! Thank you so much for sharing your tip! 🥰
Spot on and so easy.
Hi Rhonda! Thank you for your kind feedback!
We are glad to hear you enjoyed Nami’s recipe! 🥰
Can you use an egg right from the refrigerator or should it be room temperature? This technique is something I will try either way.
Hi, Theresa! Thank you for trying Nami’s recipe.
Nami used eggs straight from the fridge for this recipe. We hope this helped!🙂
I have kept a classic old coffee cup (not the monster mugs used now) to make these eggs in. it works so well!
Hello, Vel! Awesome! We’re glad that this method worked for you, especially with your coffee cup! 🤩
Thank you for trying Nami’s recipe and sharing your experience with us.