A classic street vendor snack in Japan, Crispy Taiyaki is a warm, fish-shaped pastry filled with sweet red bean paste. With an eggless batter, my authentic recipe yields a supercrisp and less cakey texture. Follow my tips to make this fresh, waffle-like treat at home anytime! {Vegan Adaptable}
Famously known for its endearing fish shape, taiyaki (たい焼き) is a classic waffle-style street snack sold at festivals, fairs, and specialty shops all over Japan. Traditionally, fresh and warm taiyaki is stuffed with anko (sweet red bean paste), but these days the fillings come in a plethora of fun flavors.
Everyone in Japan, including me, grew up with taiyaki. It’s a nostalgic food—a beloved treat that brings a happy smile and pure joy. If it’s a new food for you, I know it’s going to be love at first bite.
Table of Contents
What is Taiyaki?
Taiyaki (たい焼き) is a popular Japanese pastry that originated in Tokyo in 1909. Initially, this fish-shaped pastry with intricate fins and scales was a creative take on Imagawayaki, a similar but round pastry that has been around since the Edo period. Instead of a round shape, taiyaki was crafted to resemble a sea bream, which is a symbol of prosperity in Japan. Its name comes from tai, meaning sea bream (鯛, たい), and yaki, meaning to bake or grill (焼き).
Traditionally, taiyaki and Imagawayaki are both filled with anko, Japanese sweet red bean paste. However, throughout the years, their fillings have evolved to include vanilla pastry custard, matcha custard cream, chocolate custard cream, sweet potato, and so on.
In recent years, its popularity has expanded beyond Japan’s shores. We’re seeing taiyaki shops popping up everywhere in the US, in Asian countries like Singapore, Malaysia, and the Philippines, and even in South America, like Peru! It makes me so happy that the love for taiyaki has transcended borders.
Two Types of Taiyaki
Did you know there are two types of taiyaki in Japan? They are made differently.
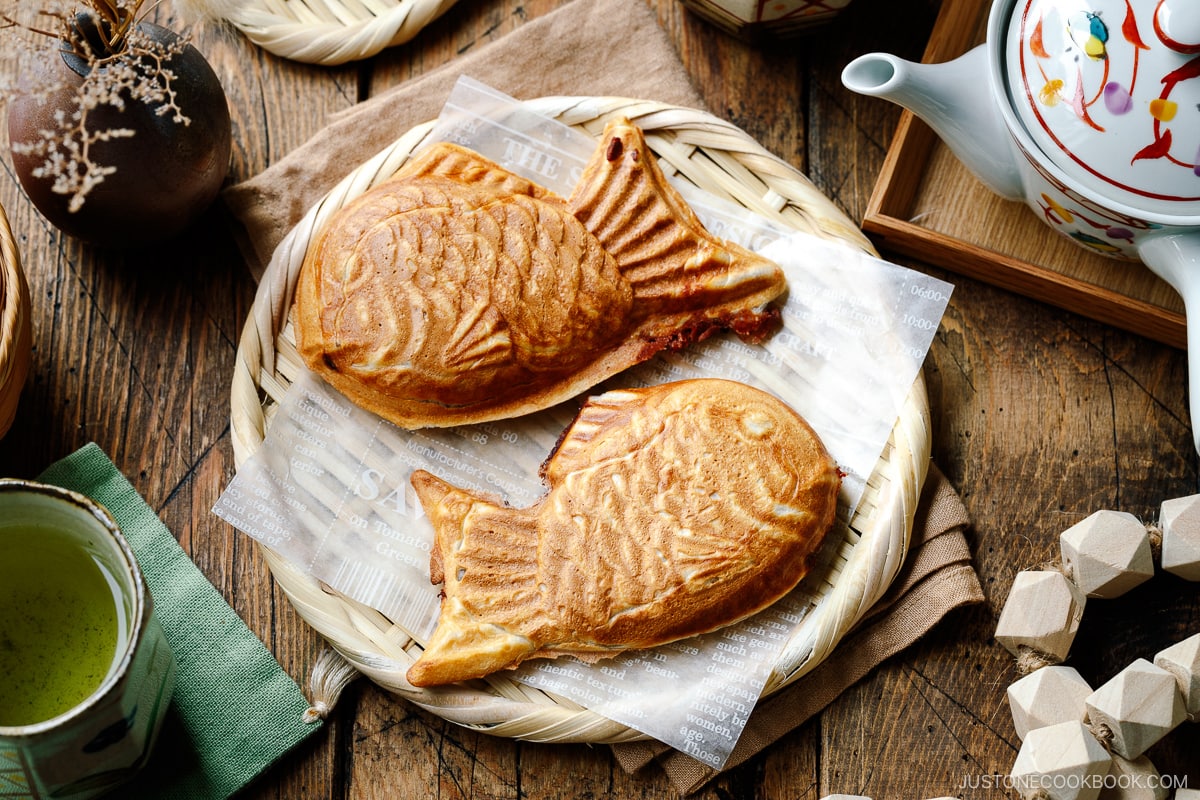
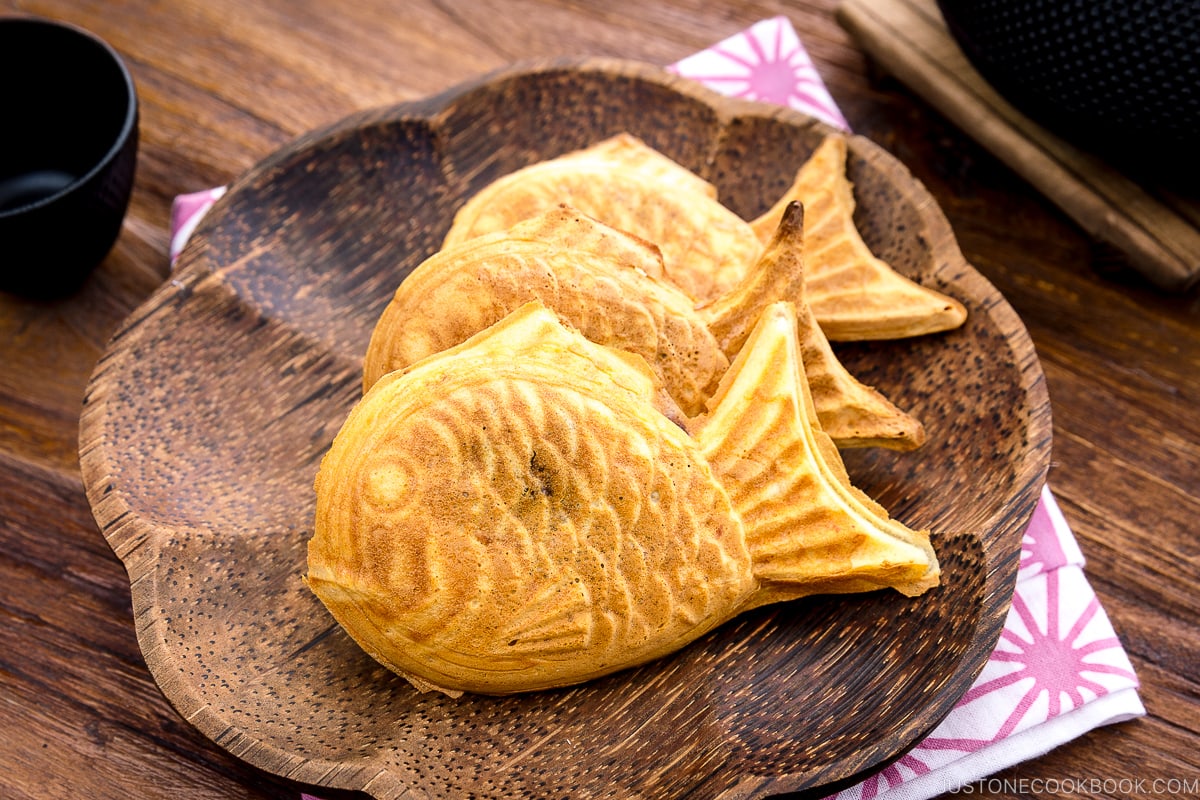
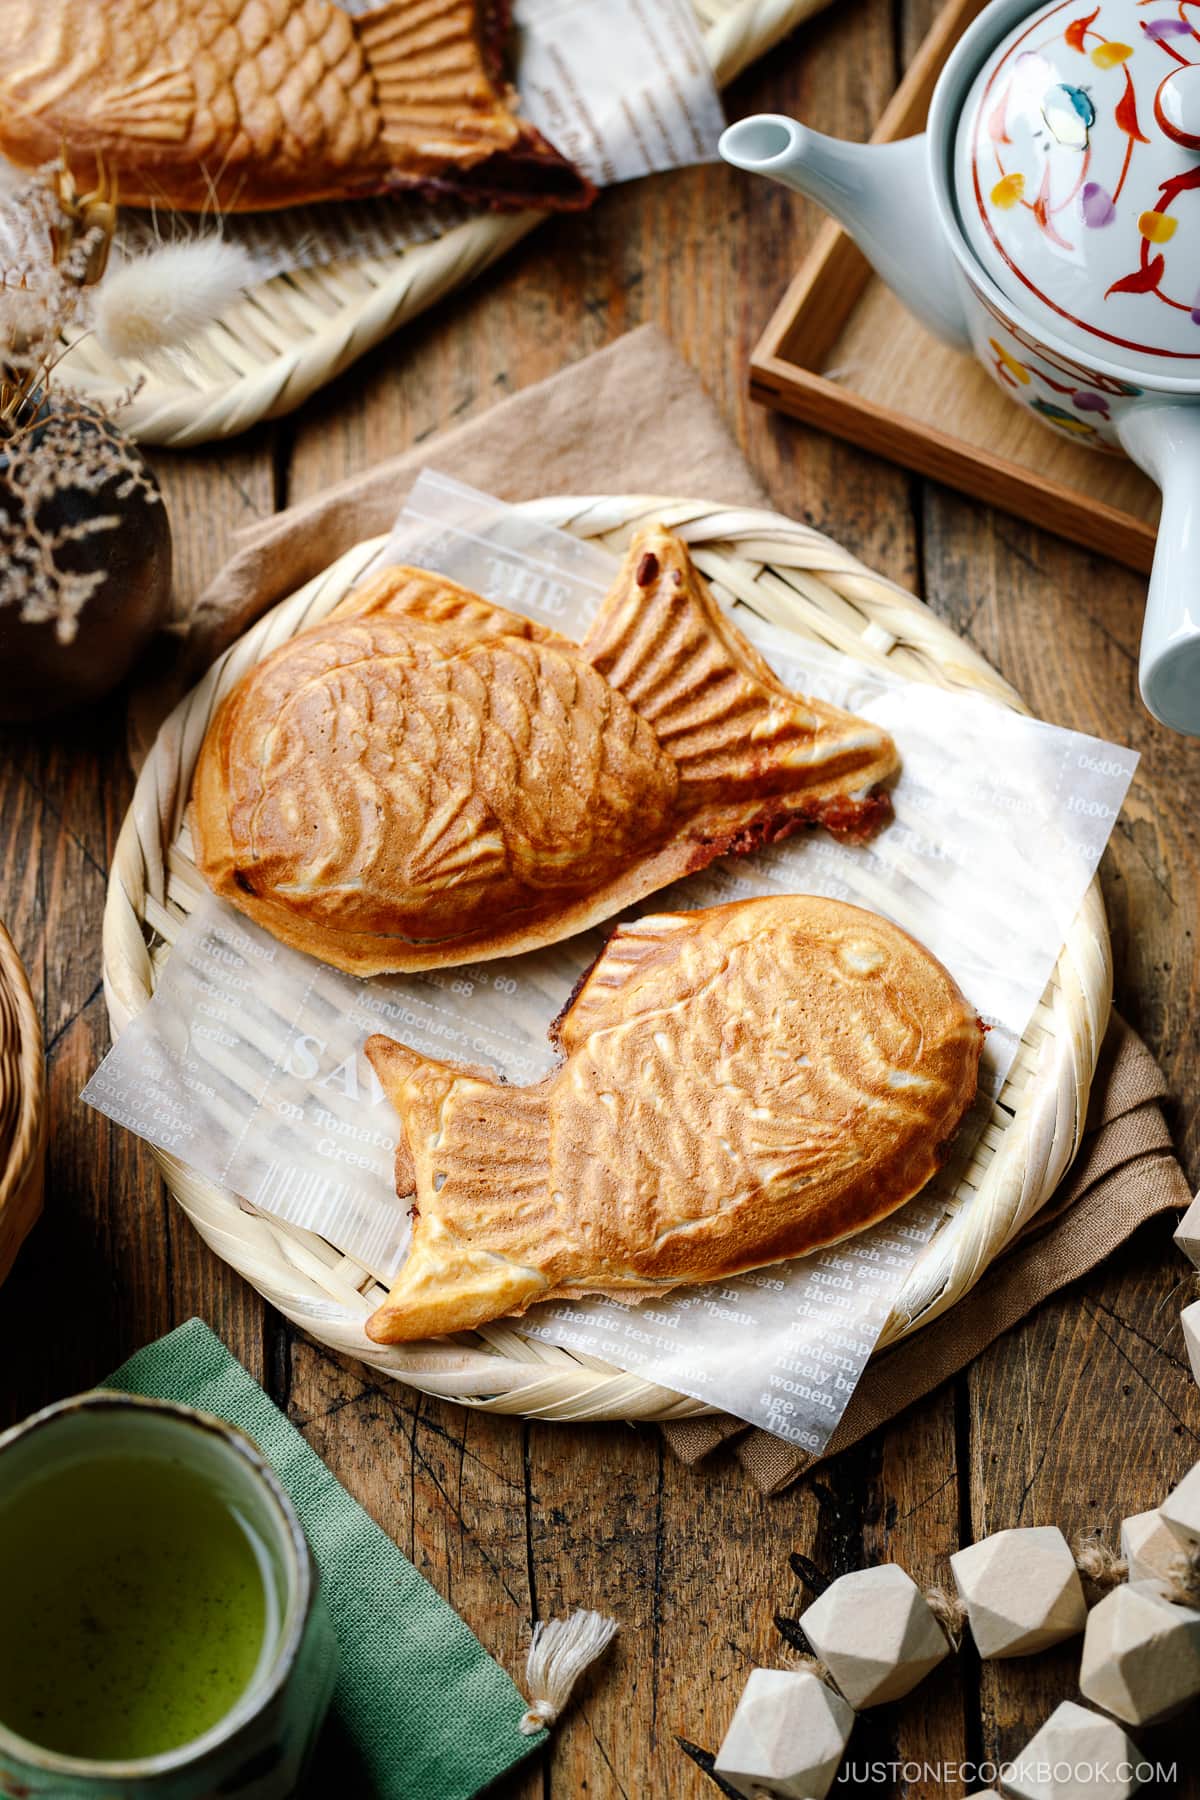
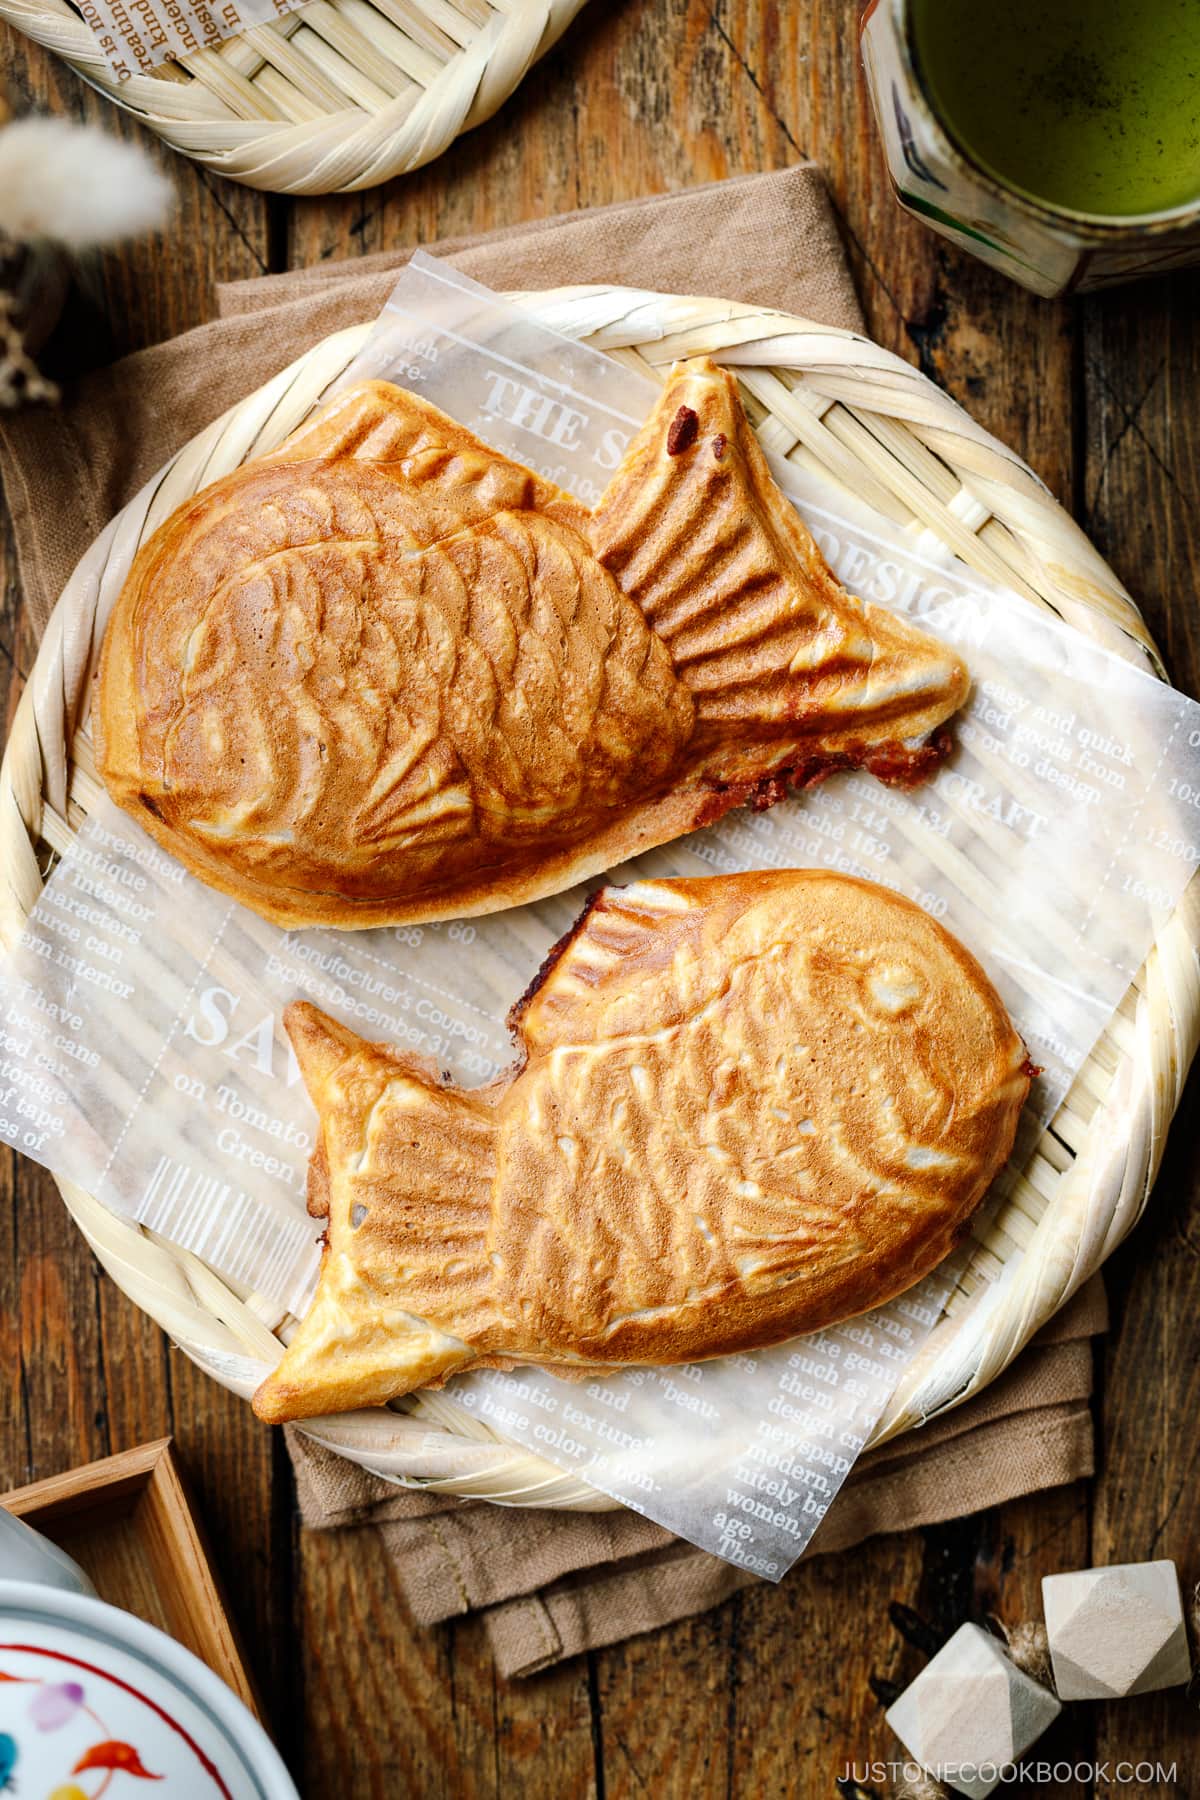
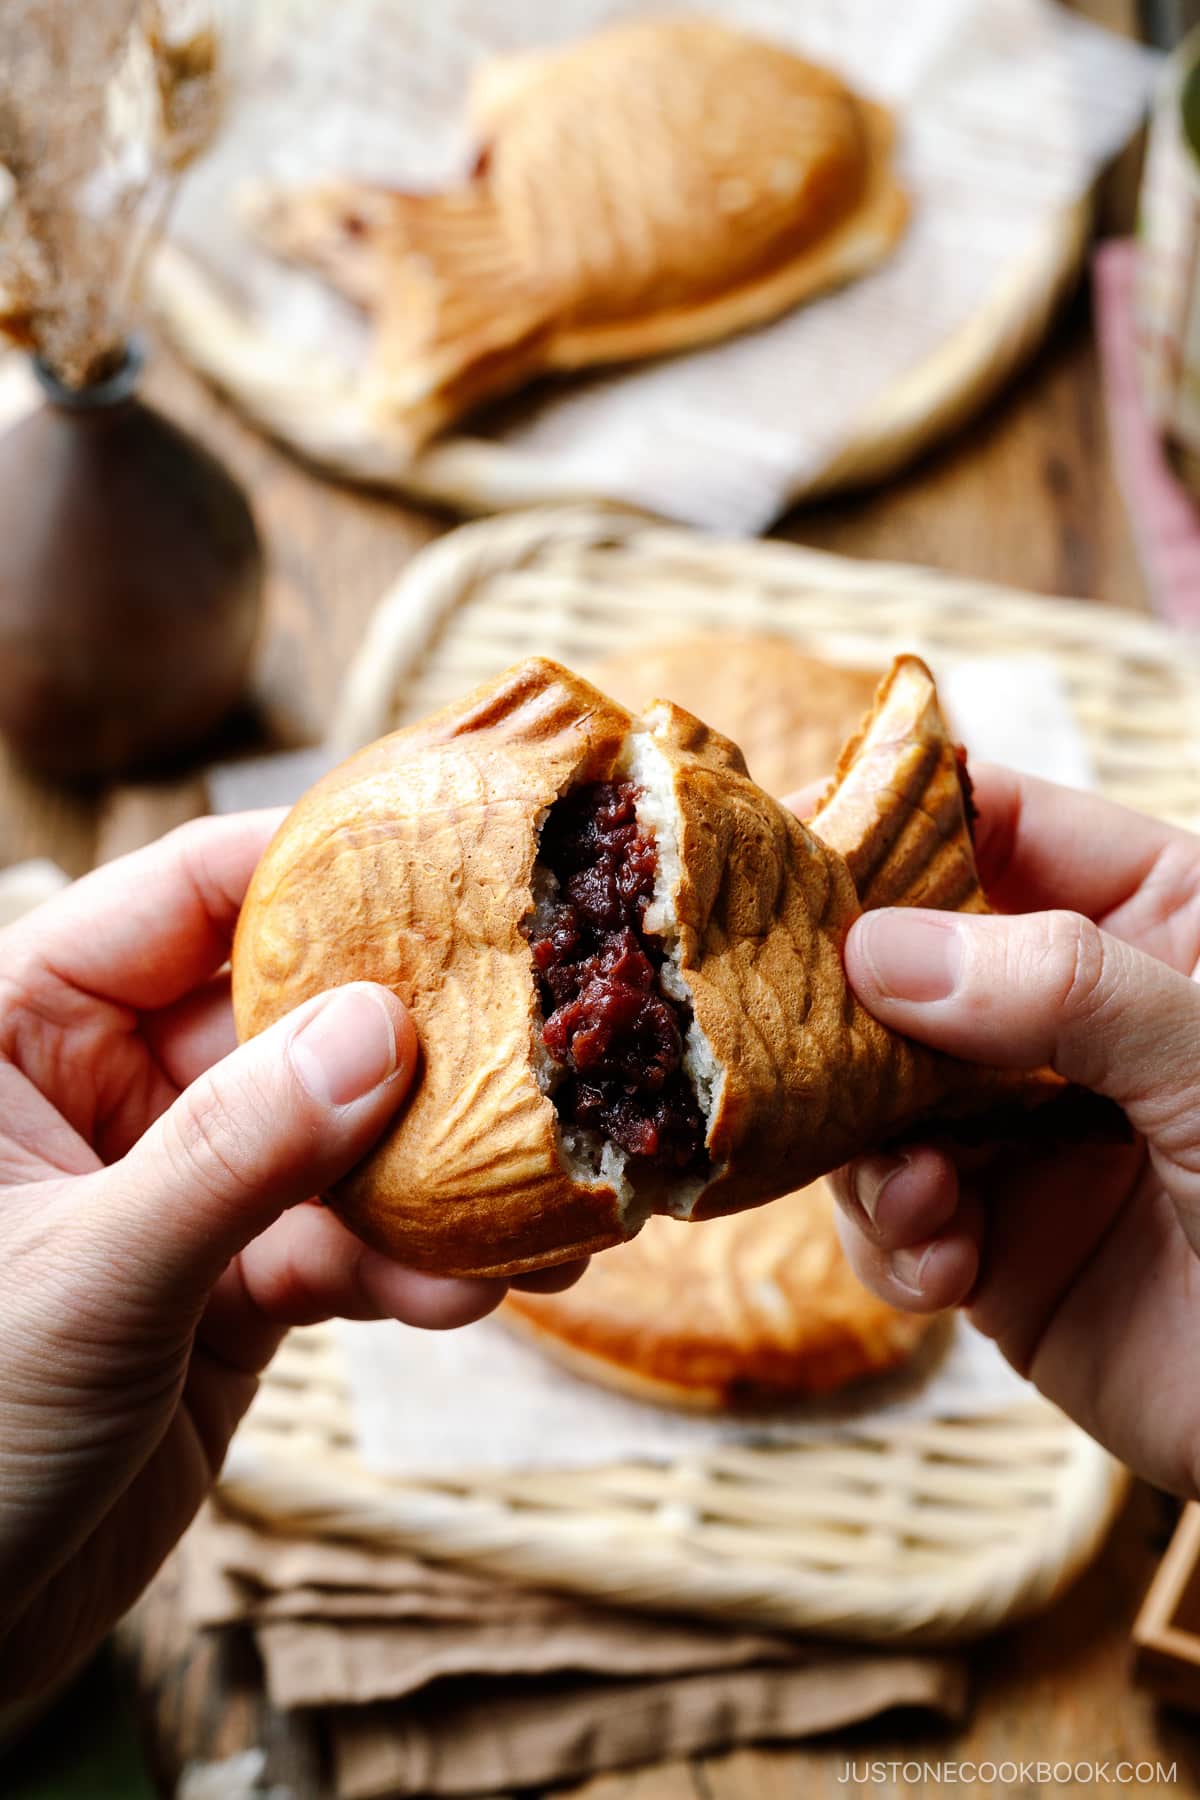
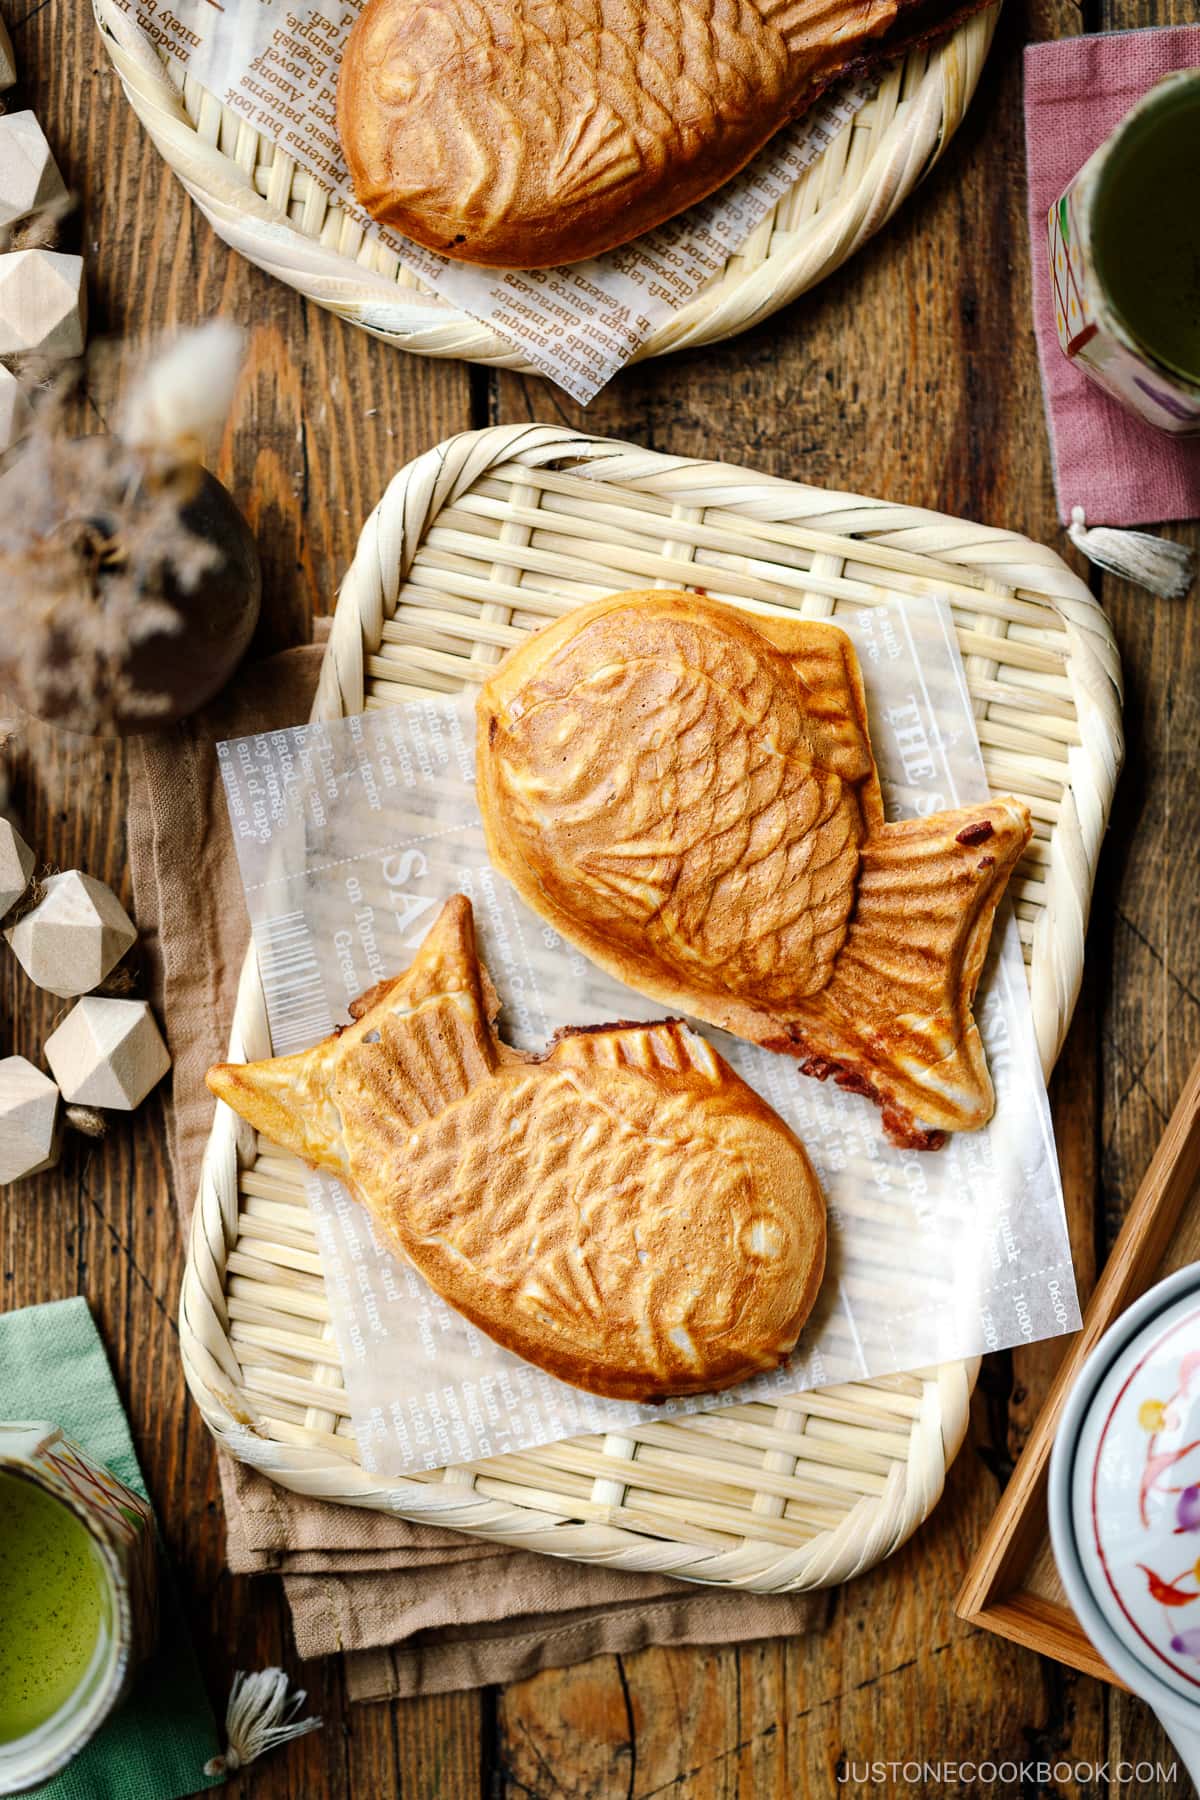
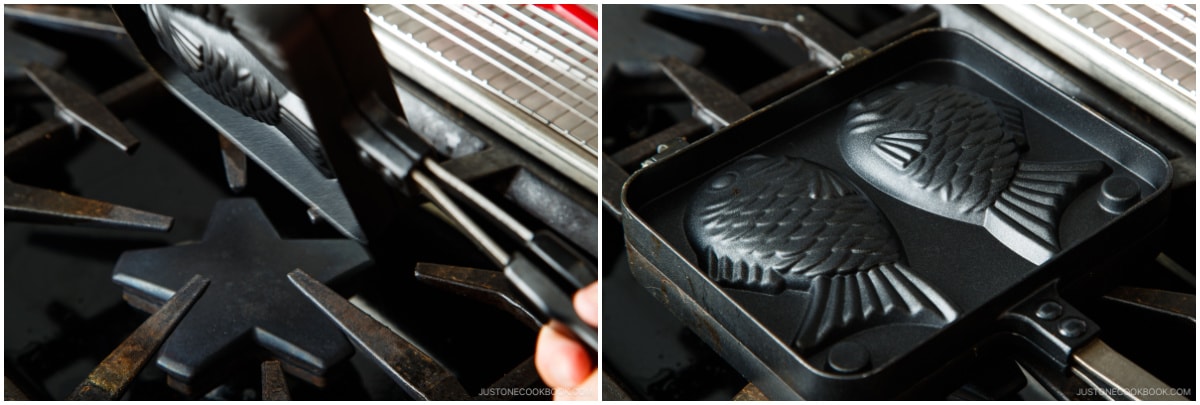
- Crispy Taiyaki—Called Tennenmono (天然物), this traditional-style taiyaki is made in an individual cast iron fish-shaped maker. It’s called one-stick grilling or Ippon-yaki (一本焼き) or Itcho-yaki (一丁焼き) in Japanese. As you can see in the video, this method is more time-consuming and labor-intensive. Therefore, there are fewer taiyaki shops that offer this traditional style of taiyaki. The hot cast iron mold can make a waffle-like taiyaki with a nice supercrisp crust. You’ll find my authentic recipe below.
- Cakey Taiyaki—On the other hand, the more modern-style taiyaki is made on a large hot plate that has multiple fish-cake molds. As you can see in this video, multiple taiyaki can be made easily at one time. This is called Yoshoku-mono (養殖物) or Renshiki (連式). It has a more cakey and fluffy interior with a crispy shell. I have shared this modern-style Taiyaki recipe previously.
Ingredients for Crispy Taiyaki
As long as you have a taiyaki pan, you can make taiyaki with just a few simple pantry ingredients!
- Cake flour—Cake flour has the least gluten, yielding the lightest, crispiest texture. Note that the texture will be slightly different if you use all-purpose flour, which has more gluten.
- Baking powder—It helps make the batter light and airy.
- Sugar—I find that the batter tastes better with a little bit of sugar, even if you’re stuffing the pastry with sweet fillings. Sugar also helps the batter turn a more golden color.
- Milk—I used 2% reduced-fat milk, but you can use whole or nonfat. Alternatively, you can use the plant-based milk of your choice. I’ve tried it with water, but I didn’t like that the batter doesn’t have much taste.
- Filling of your choice—The traditional filling is anko (red bean paste) and it’s my favorite, so I use it here. Alternatively, you can use custard cream (pastry cream), Nutella, matcha custard cream, or chocolate custard cream.
How to Make the Best Taiyaki
The cooking process is rather simple, but it requires patience, care for details, and practice.
- Make the batter. Whisk all the ingredients together and set aside to rest the batter.
- Pour the batter into the molds, add the fillings on top of the batter, and cover the fillings completely with more batter.
- Close the lid and cook on medium-low to medium heat for 2.5 to 3 minutes on each side or until golden and crispy.
- Carefully remove from the molds and transfer to the wire rack to cool.
- Enjoy while it’s warm!
Recipe Tips for Taiyaki
Here are some of my cooking tips to succeed in making taiyaki:
- Don’t overmix the batter, which will activate the gluten and result in a chewy texture. If you have time, rest the batter for one hour.
- Preshape the anko filling. As soon as the batter goes into the mold, you have to quickly place the filling on top. There’s no time to form the anko or else the batter will dry out.
- Thoroughly warm up and grease the taiyaki pan. When the batter hits the pan, it should make a sizzling sound.
- Don’t overfill the molds or else the batter will bleed out of the taiyaki pan.
- The batter must cover the anko filling or else the sweet bean paste will heat up, explode, and burn.
- Don’t cook for too long. Being afraid of burning my taiyaki, I’ve tried cooking the batter on low heat. However, I realized that the thick bean paste tends to explode when it’s heated thoroughly…so be careful!
How to Store and Reheat Taiyaki
- To Store: Keep the leftover taiyaki in an airtight container and store it in the refrigerator for up to 2 days or in the freezer for up to a month.
- To Reheat: For the best results, reheat in the oven or toaster oven at 350ºF (180ºC) until they‘re crispy on the outside.
FAQs
Can I make Taiyaki without a special pan?
Unfortunately, no. You will need a taiyaki pan to make this recipe. If you already have an Imagawayaki (obanyaki) pan, you can use it.
Can I make Taiyaki ahead of time?
For optimal flavor and texture, make it right before serving. Alternatively, you can always reheat it in the oven or toaster oven until it is warm inside and has a crispy exterior. As it cools, the exterior will become less crispy.
More Japanese Street Snacks You’ll Love
- Dorayaki (Japanese Red Bean Pancake)
- Imagawayaki (Obanyaki)
- Yaki Imo (Baked Japanese Sweet Potatoes)
- Mitarashi Dango
Wish to learn more about Japanese cooking? Sign up for our free newsletter to receive cooking tips & recipe updates! And stay in touch with me on Facebook, Pinterest, YouTube, and Instagram.

Crispy Taiyaki
Ingredients
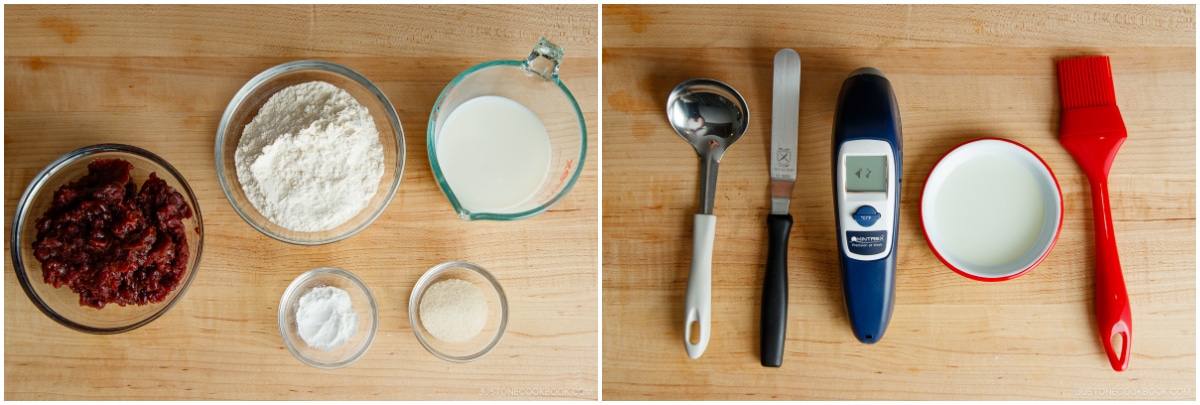
- 1 cup cake flour (weigh your flour; for weights, click the Metric button; or use the “fluff and sprinkle“ method and level it off)
- ⅔ cup milk (I used lactose-free 2% reduced fat milk, but you can also use whole or nonfat; use plant-based milk for vegan)
- 1 tsp baking powder
- 1 Tbsp sugar
- sweet red bean paste (anko) (you can make my homemade Anko or Pressure Cooker Anko recipe; or substitute Nutella, custard, or your favorite filling)
Instructions
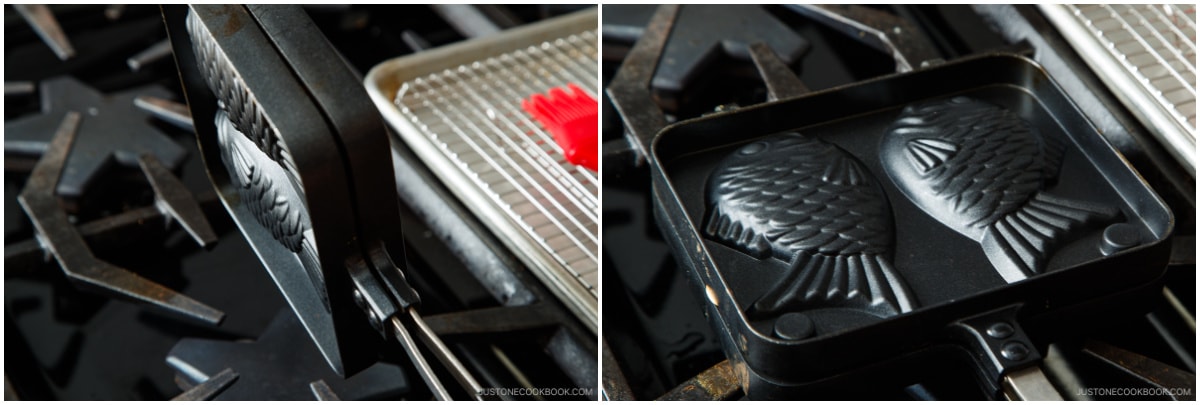
- Before You Start: Please note that I recommend a batter resting time of 1 hour (optional). You will need a taiyaki pan for this recipe. To get the right batter consistency, I highly encourage you to weigh your ingredients using a kitchen scale. For weights, click the Metric button above. If you‘re using a cup measure, please follow the “fluff and sprinkle“ method: Fluff your flour with a spoon, sprinkle it into your measuring cup, and level it off. Otherwise, you may scoop more than you need. Now, gather all the ingredients. I also use a small ladle, a small offset spatula, a thermometer gun, cooking oil, and a silicone brush.
To Prepare the Batter
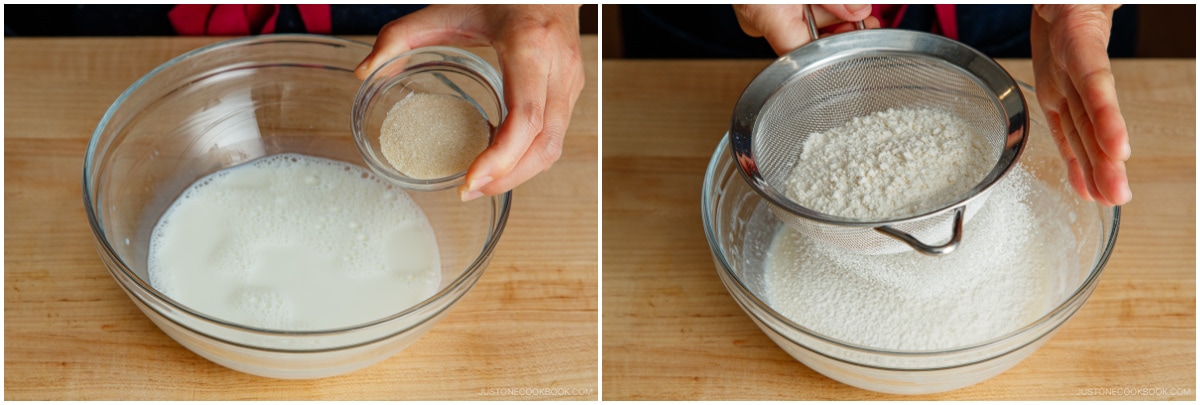
- In a medium bowl, add ⅔ cup milk and 1 tsp baking powder and whisk together thoroughly.
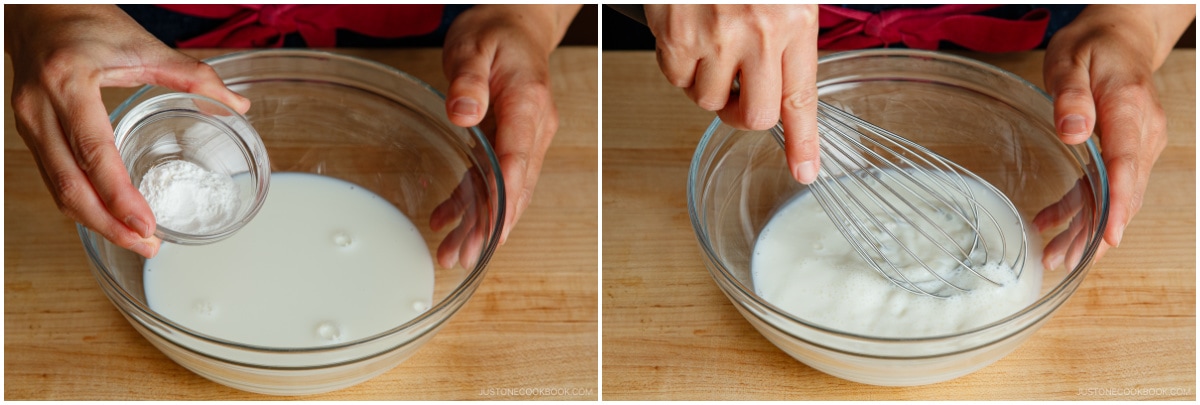
- Add 1 Tbsp sugar. Then, sift 1 cup cake flour into the mixture using a fine-mesh sieve.
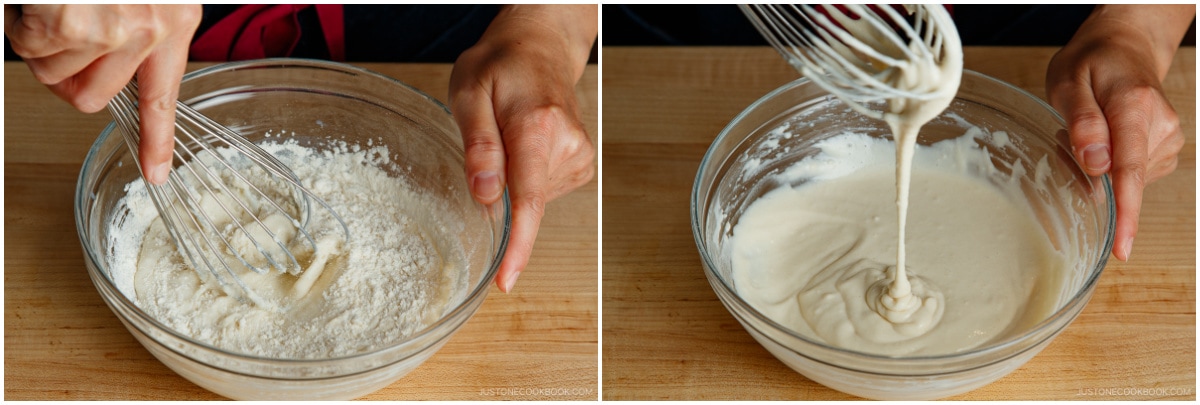
- Combine all the ingredients just until incorporated. Do not overmix the batter. If you have time, cover and rest the batter for one hour (optional). Tip: Set aside to relax the gluten in the batter while you prepare the filling, or else the pastry will have a chewy texture.
To Prepare the Filling
- Pre-measure and pre-shape the sweet red bean paste (anko) filling so you can transfer the filling quickly and easily. I found it‘s easier to work with 2 tablespoons (40 g) of filling. You can use a 1.5-tablespoon cookie scoop and measure one heaping scoop for each filling. Using wet hands, form each filling into a long oval shape, with its length slightly shorter than the length of a taiyaki mold. Place on a tray or plate near your cooktop.

To Cook the Taiyaki
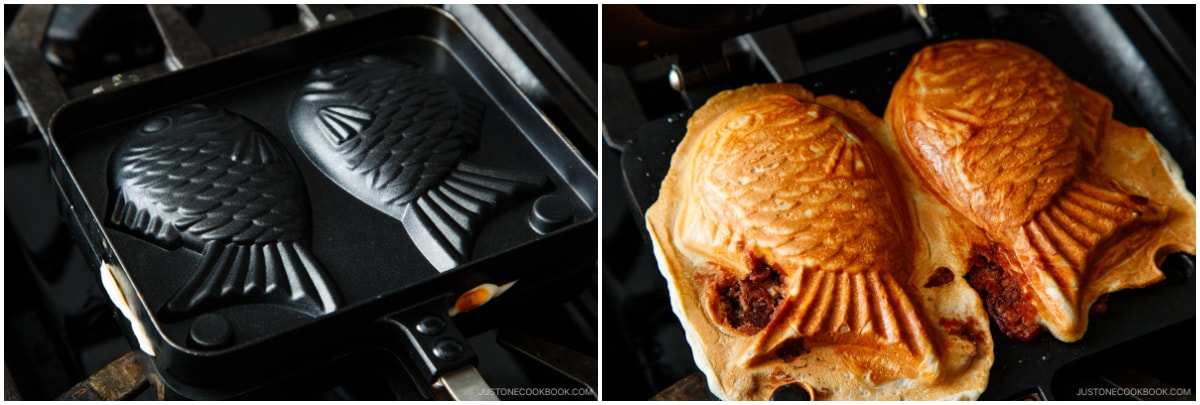
- Heat the taiyaki pan thoroughly on low heat while you set up the work station. You‘ll need a dish with cooking oil, a pastry brush, a ladle (if you have a small one), an offset spatula (or knife), and a wire rack set over a baking sheet. Once the pan is warmed up thoroughly, turn up the stove‘s heat to medium-low to medium. Brush the oil inside and around the mold of the taiyaki pan. Stir the batter one last time. It should be a thick paste.
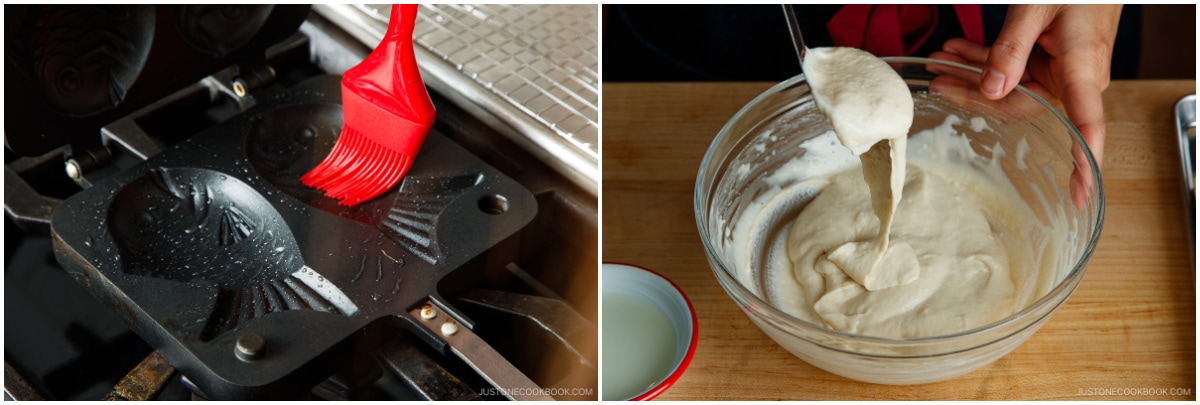
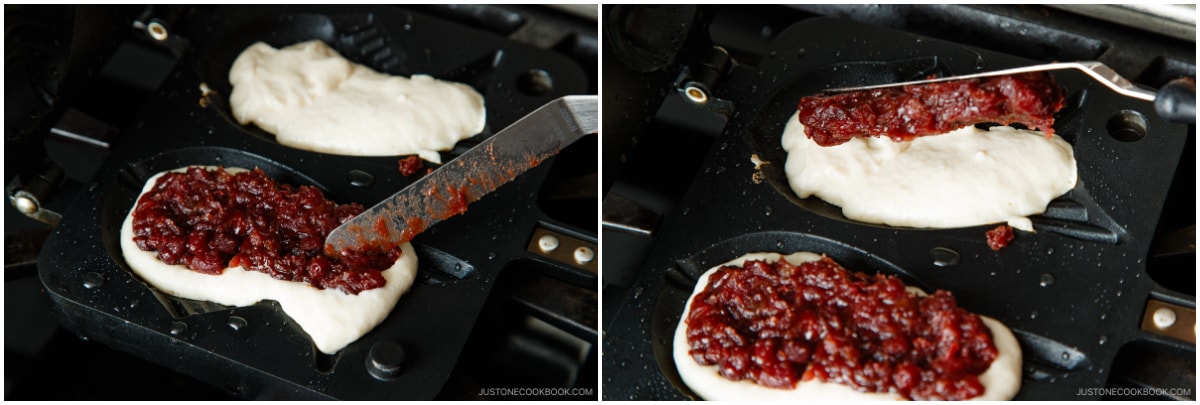
- The 1st Round: When the taiyaki pan is thoroughly heated, spread the batter from the tail to the head in each mold. Fill it about one-third full. When you add the filling in the next step, it will push up the batter to fill the mold halfway.
- Using the offset spatula (or knife), scoop up the anko filling, keeping its shape, and place it on top of the batter. Work quickly so the batter does not dry out.
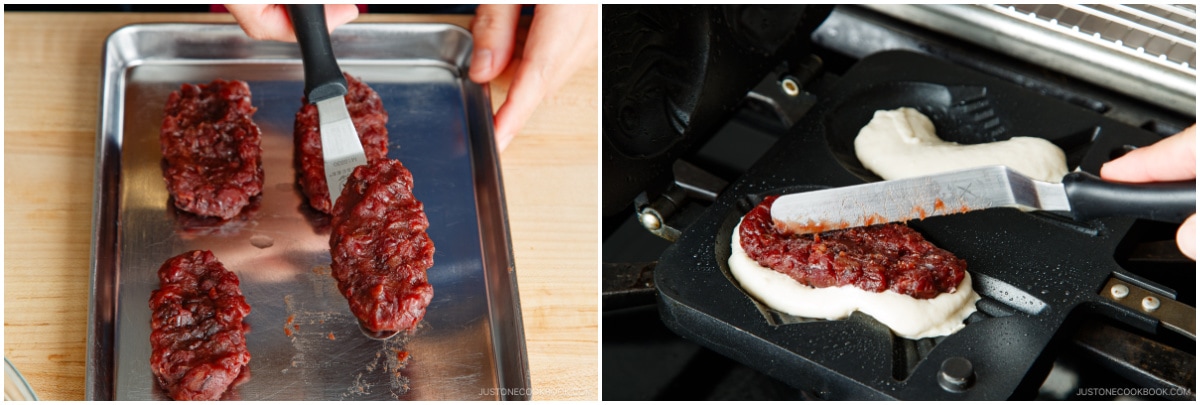
- Repeat for the next mold. Gently press down the fillings to flatten them and spread evenly into the empty spots of the mold.
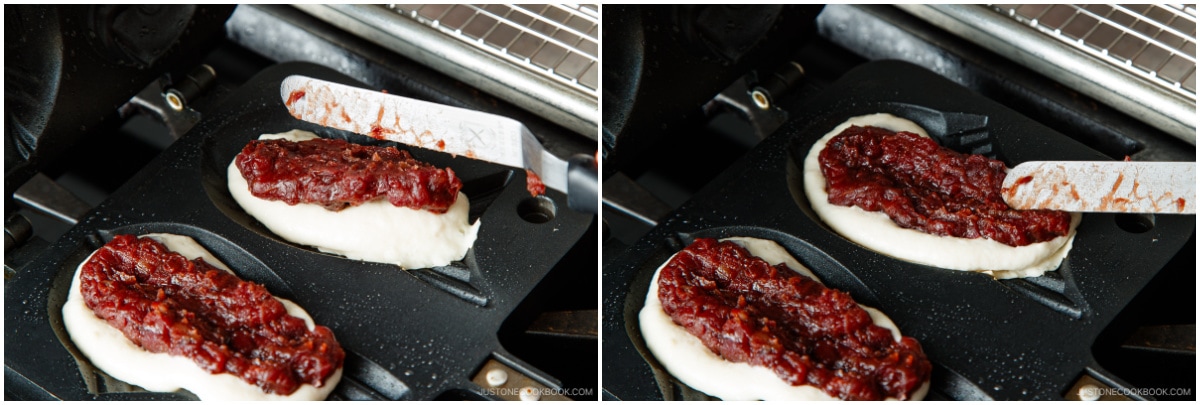
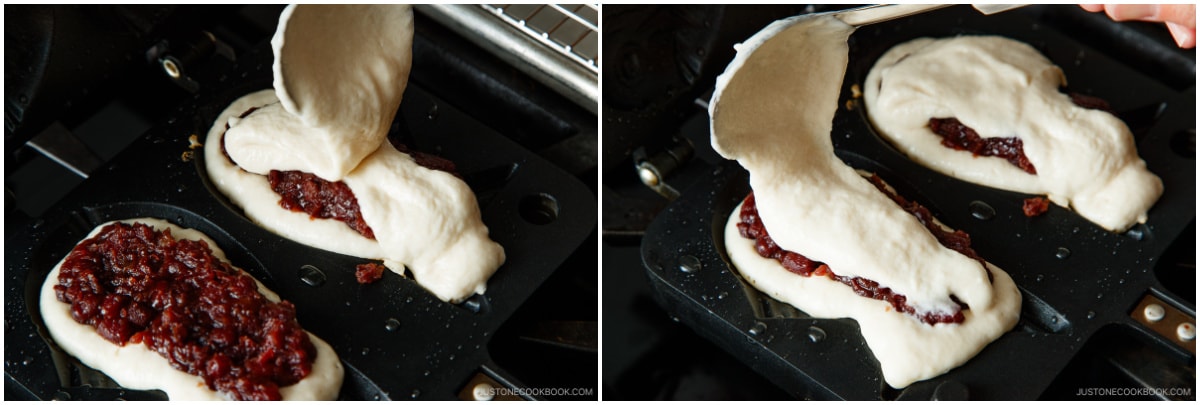
- Spoon a small portion of batter over the anko filling to cover it completely. If you see a spot that‘s not covered, spread the surrounding batter to cover it up without pouring more. The mold should be about three-quarters full of batter and filling. Tip: The key is to use less batter here to avoid overflow.
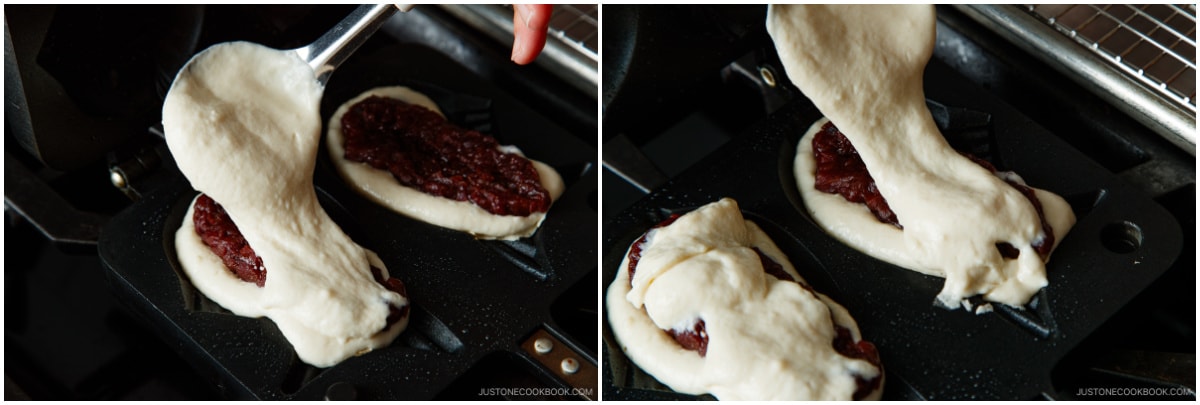
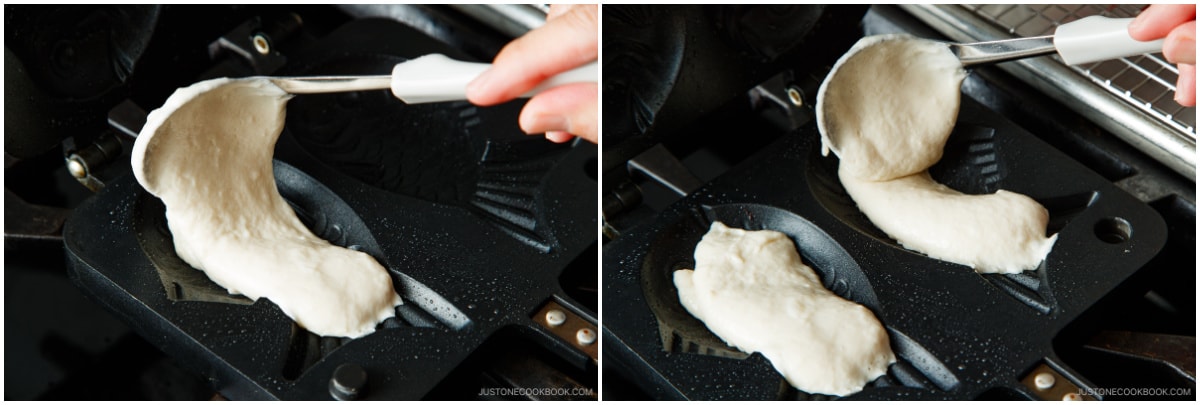
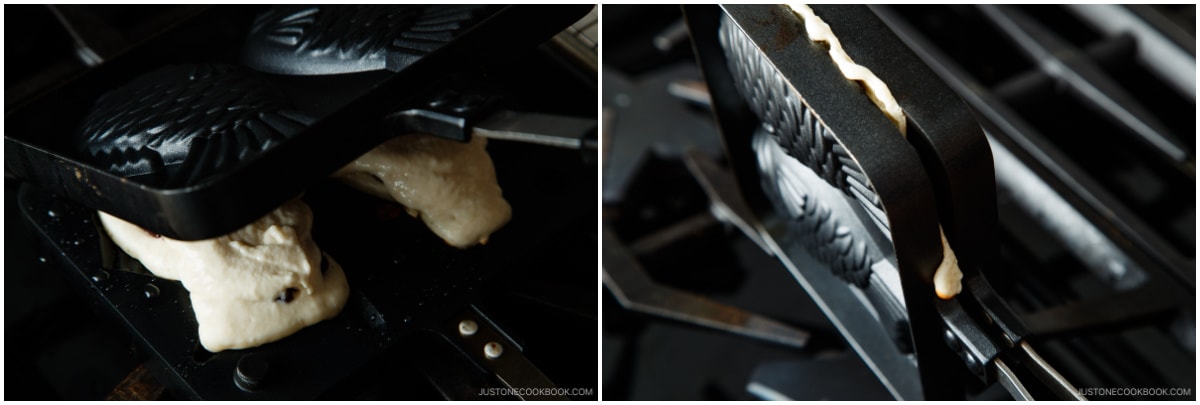
- Close the lid and immediately flip the pan. Cook for 2½ to 3 minutes on that side.
- Then, flip the pan again and cook for another 2½ to 3 minutes.
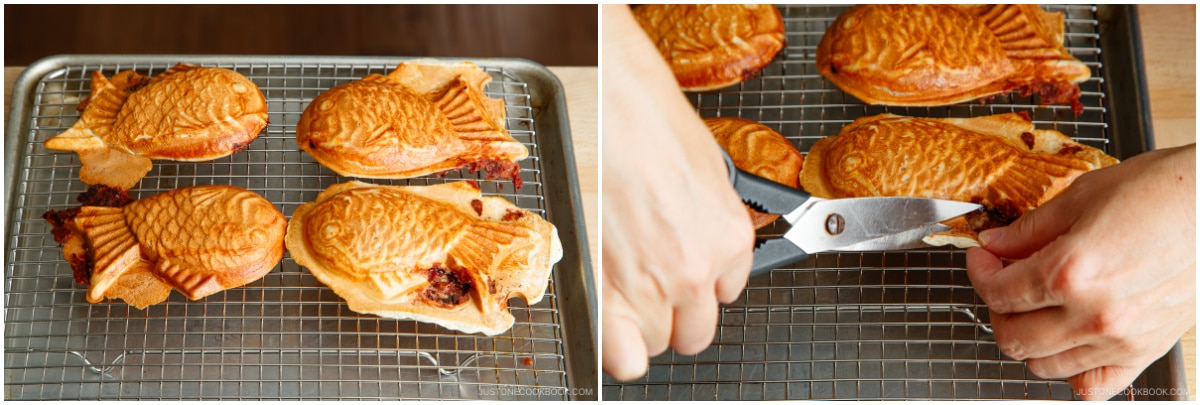
- Open the pan and check if the taiyaki is cooked; it‘s done when the pastry is golden brown. Remove from the pan and cool on a wire rack. I used a wooden skewer to loosen the pastry from the mold. Tip: If your batter overflowed a bit, don‘t worry. You will trim the edges later.
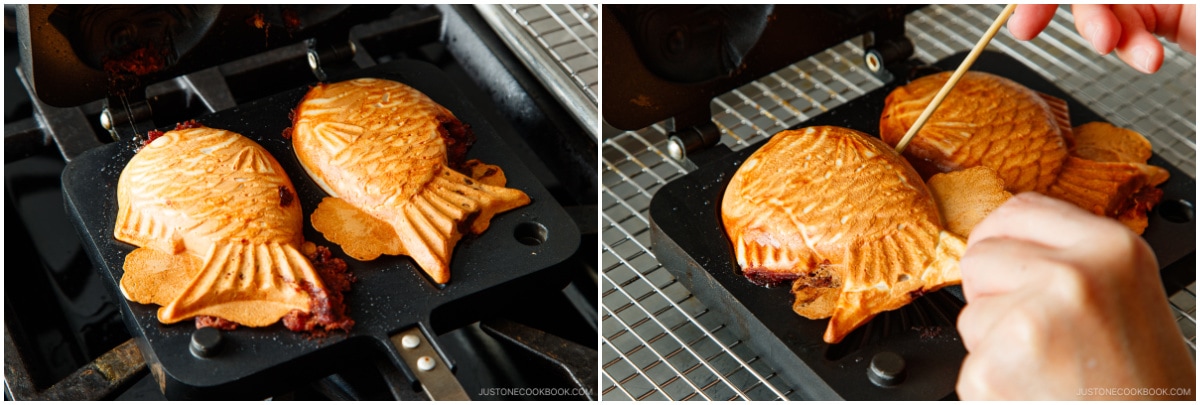
- The Next Round: Cook the remaining taiyaki. If the mold has some burnt spots, typically from the sweet red bean paste sticking to the pan and burning, wipe it off with a paper towel or simply wash it off and start clean. This way, your next taiyaki will have a clean crust. Now, I‘ll show you what happens when I pour too much batter and don‘t cover the filling completely.

- As soon as I placed the anko filling, the batter rose to the edge of the mold.
- I still had to cover the filling, so I added more batter. Luckily, the batter is thick so it stayed in place rather than sliding down. See the amount of batter here.
- When I closed the pan, there was too much batter in each mold, so it spread to the sides.
- Despite the overflow, you can continue to cook it. When it‘s done, your taiyaki will have extra crispy edges around the pastry. Some prefer this style of taiyaki, but my recipe doesn‘t include enough batter to do that. Also, note that the red bean paste filling squeezed out of the pastry. This happened because I did not cover the filling completely, so the hot pan heated the bean paste, which exploded and burned.
To Trim the Pastry
- Let the taiyaki cool on the wire rack. Cut off any excess pastry around the edges of the taiyaki with a pair of kitchen scissors.
To Serve
- Serve the Crispy Taiyaki warm. If the taiyaki get cold, you can toast them in the toaster oven or oven until they‘re crispy on the outside.
To Store
- You can keep the taiyaki in an airtight container and store in the refrigerator for up to 2 days or in the freezer for up to a month. To reheat, toast them in the toaster oven or heat in the oven at 350ºF (180ºC) until they‘re crispy on the outside.


Where do I find the measurements for the recipe
Hello, James. Thank you for trying Nami’s recipe.
If you are looking for the Taiyaki pan, there is a link in the recipe card.
Taiyaki Maker Dimensions: Pan: 5-3/4 inch x 7 inch x 1-1/2 inch; each fish-shaped mold: 5 inch x 3 inch; overall length: 15 inches.
We hope this helps!😃
I made these a few times recently and wow! I used Bobs red mill One to one gluten free flour and they were FABULOUS! Vegan AND gluten free bliss! So glad I stumbled onto this recipe on Pinterest! The crispiness is to die for and the left overs crisp right up in the air fryer…if there ARE any left overs.
Hi Pam! Thank you for trying Nami’s recipe and sharing your experience with us!
We are so happy to know that gluten-free flour worked so well with this recipe!
This recipe is so good!! I specially bought a taiyaki pan to make this since prices are getting more expensive now, and my kids love this with a Nutella or chocolate chip filling. Our leisure weekend breakfast options include this recipe (the more cake type) and the mochi version of it. Thank you for all your hard work and the very clear instructions!
Hi, Eunice! Wow! The mochi version also sounds delicious. Thank you for trying Nami’s recipe and sharing your experience!
Wow, I would love to try the mochi version! Guess I’ll have to google that.
I made tai yaki for my birthday in February, we celebrated during the Super Bowl, and also LNY, so I made a pot of chili, and also steamed dim sum from Koi Palace. Instead of a whole fish, I made your recipe for anko and this recipe instead. They both came out great, and I used an electric tai yaki maker to make them. Kudos and thanks for making it so easy to make.
Hi Matthew! Thank you so much for trying Nami’s recipe and for your kind feedback!
That electric Taiyaki maker sounds fantastic!
I had adult guests visiting for Easter. We had great fun coloring Easter eggs and making taiyaki ! Everyone had a chance to cook their own little fish shaped treats. Yummy 😋
Hi Celeste! Aww. We are so happy to hear everyone enjoyed making their own Taiyaki.
Thank you for trying Nami’s recipe and for your kind feedback!
Can I use the taiyaki pan with an electric stove or does it need to be a gas stove? Thanks.
Hi Erika! Using it over a gas stove (or portable gas stove that we use for a hot pot at the table) is recommended.
I use electric. I’ve made taiyaki a few times like this with no issues.
I just made taiyaki a few minutes ago! Such a fun and tasty food. I made a simple filling with cocoa powder mixed with peanut powder, and a little water. A couple of them I filled with segments of string cheese. I love anko but didn’t have any to hand so these were just as tasty. Thanks for sharing this more traditional variant of taiyaki!
Hi Rohvannyn! Thank you so much for your kind feedback! I’m so glad to hear you enjoyed this recipe. I love the cheese filling too (great savory snack!).