With their signature shell shape, Madeleines are bite-sized French butter cakes with a hint of lemon. The Japanese have long enjoyed Madeleines for their light, fluffy, and moist texture. They are a perfect treat for afternoon tea!
I love madeleines growing up and still enjoy these mini butter cakes. They are the little things that bring you the most joy. I previously made Matcha Madeleines and Cherry Blossom Madeleines and I am going to share the classic version today.
Before we jump straight to the recipe, I must admit that I’ve consumed a copious amount of butter in my pursuit of the best madeleines. As a result, you can trust that this recipe will yield you some fluffy, perfectly shaped, and truly delicious butter cakes. Read below for all the helpful tips!
Table of Contents
What Are Madeleines?
Madeleines are French butter cakes or bite-size sponge cakes made with eggs, sugar, butter, flour, baking powder, vanilla, and lemon zest.
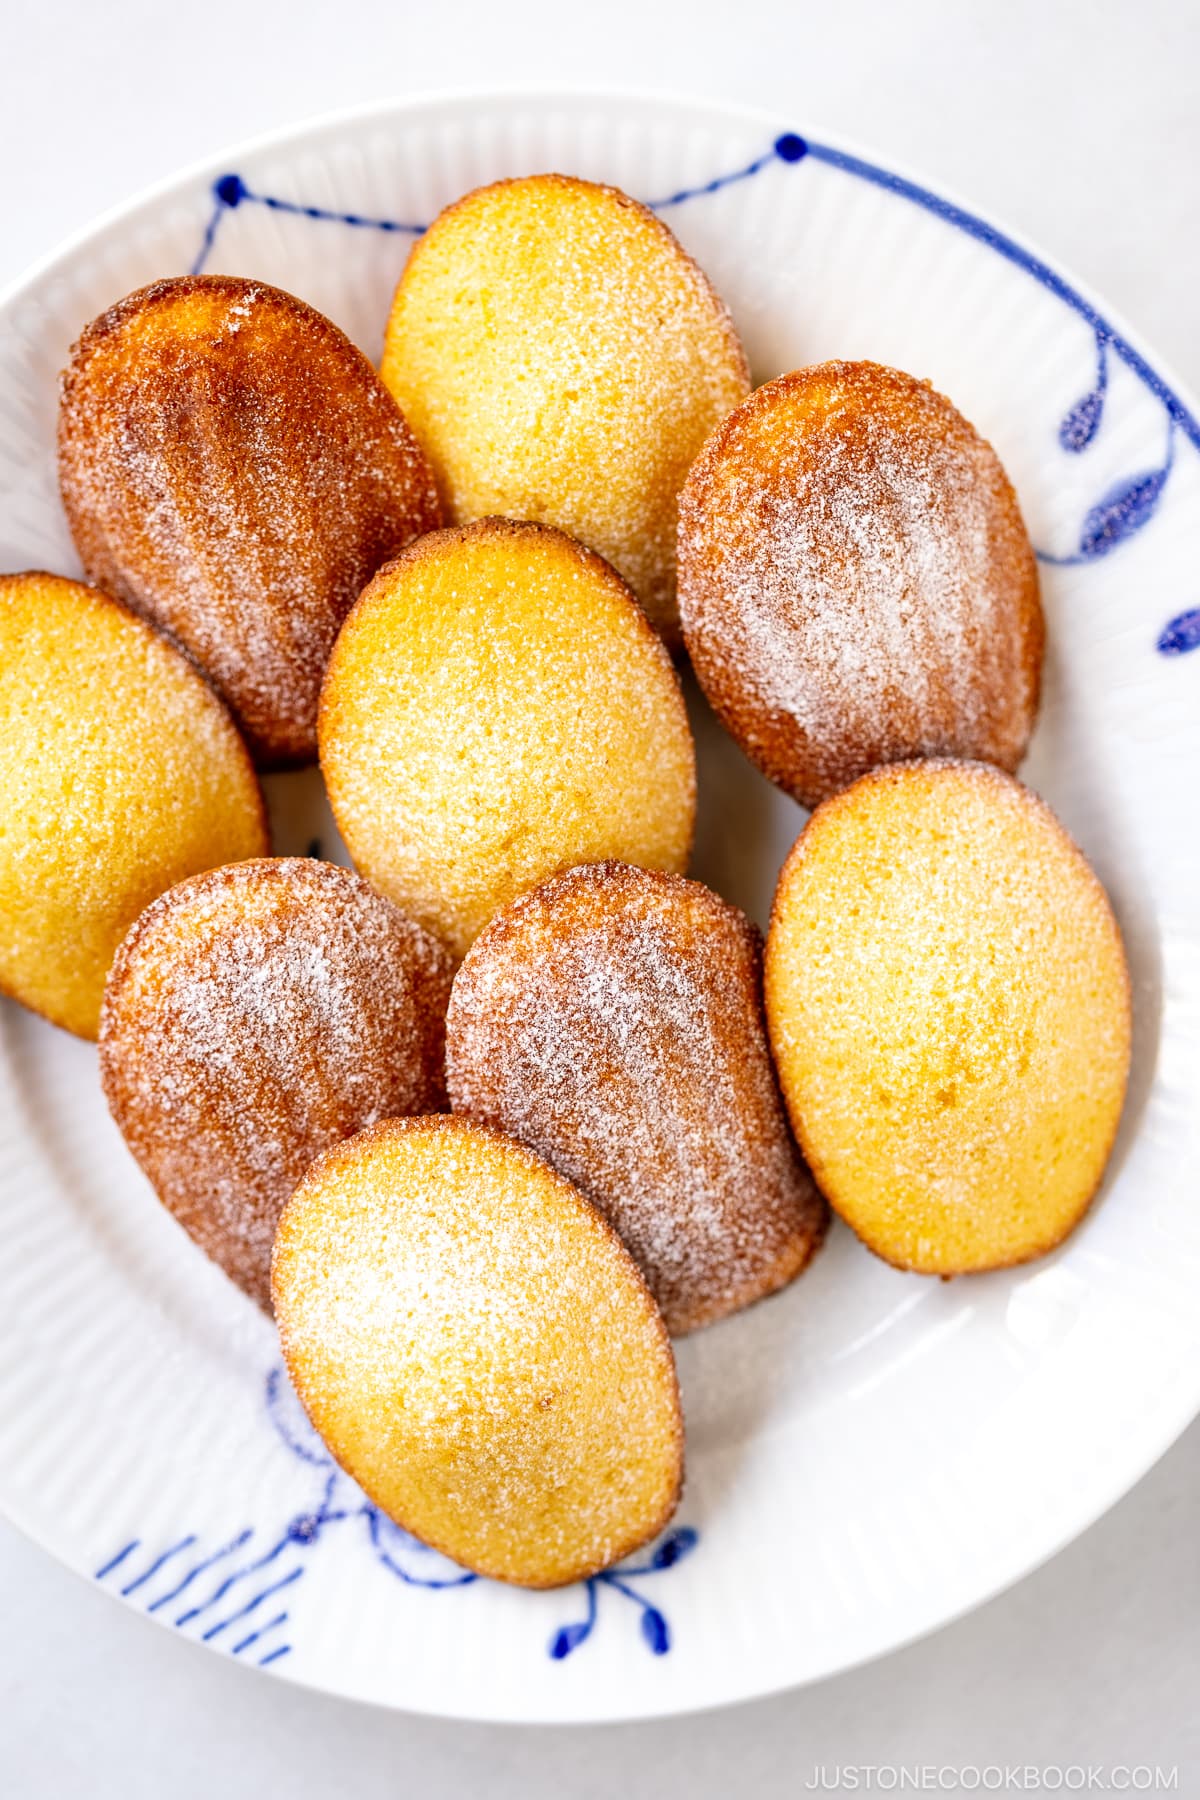
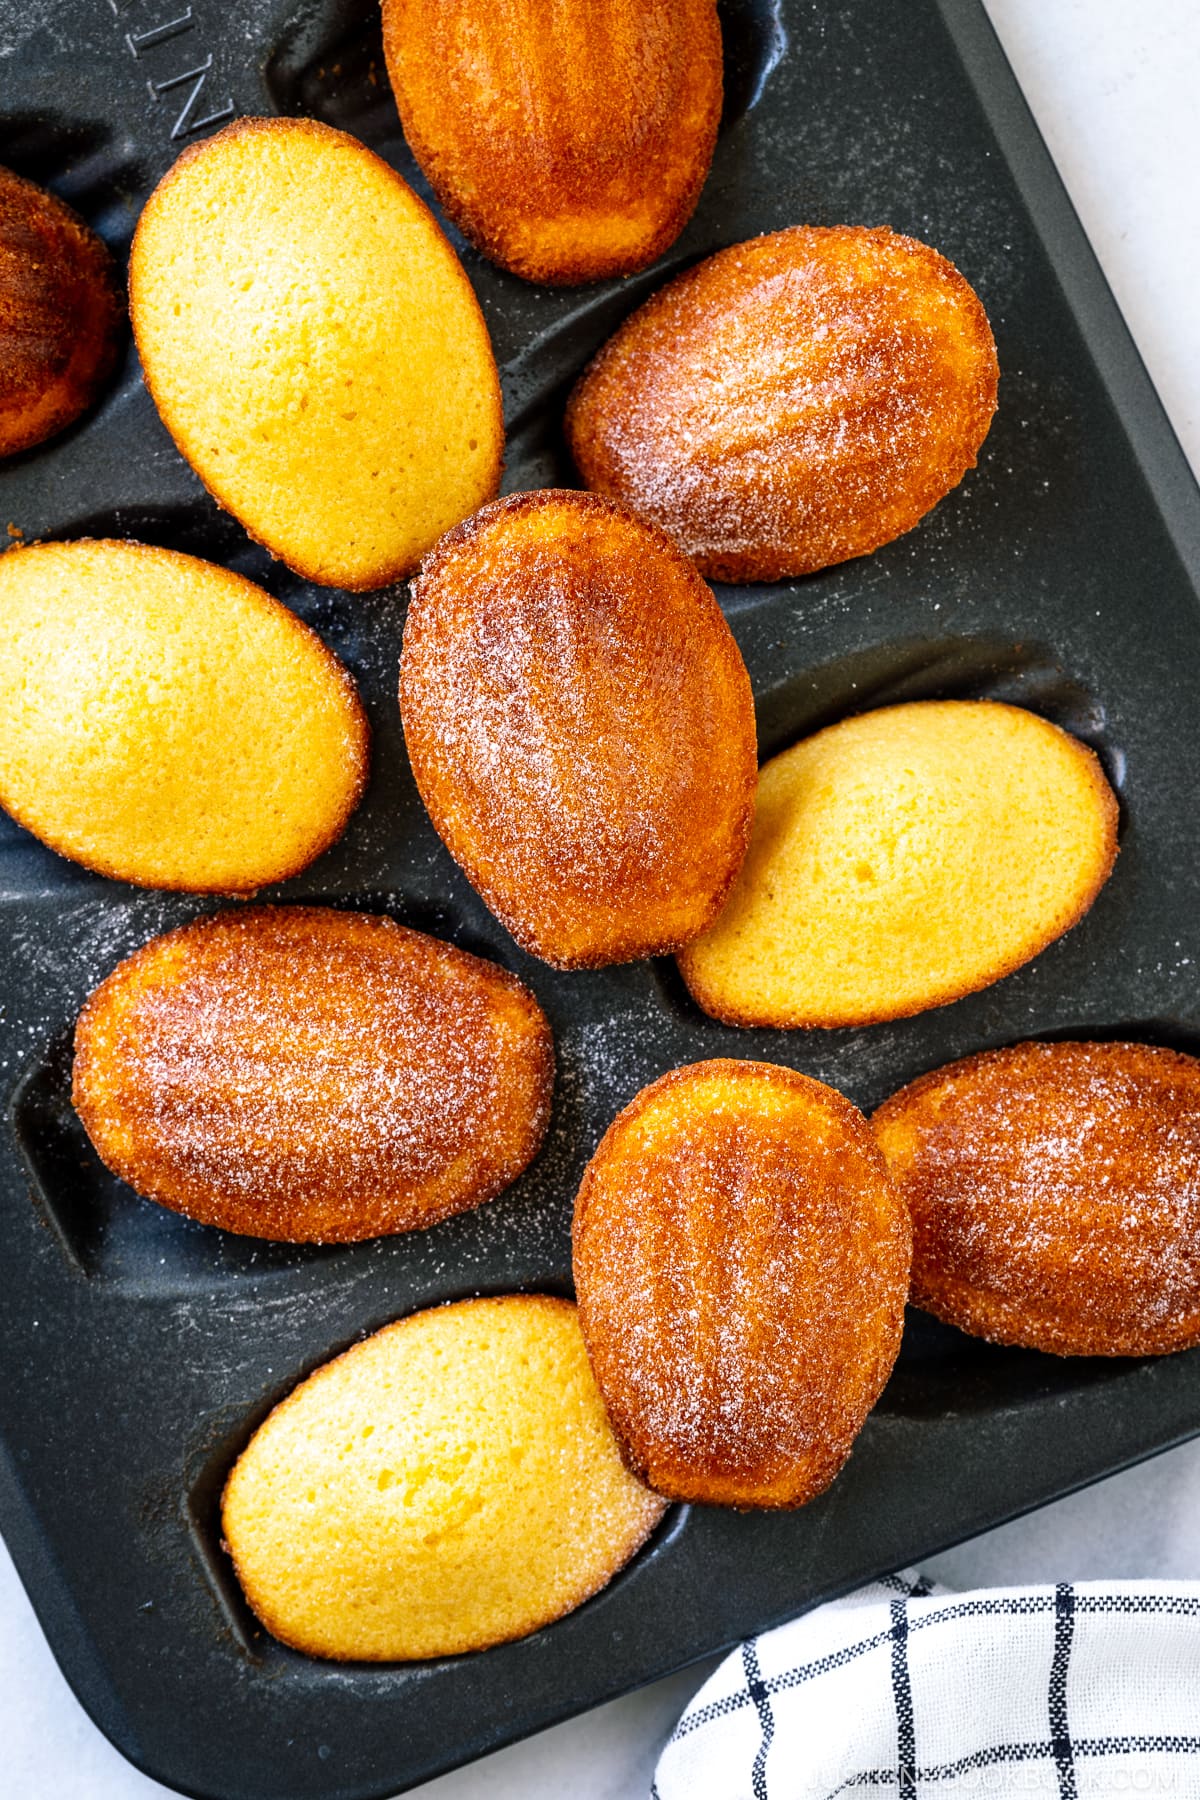
These mini butter cakes are sweet, but not overly sweet, with a hint of lemon. They are moist on the inside with a tender fine crumb and have a deeper golden crust on the edges and underside of the cake. For me, the best madeleines should also be plush yet light and fluffy.
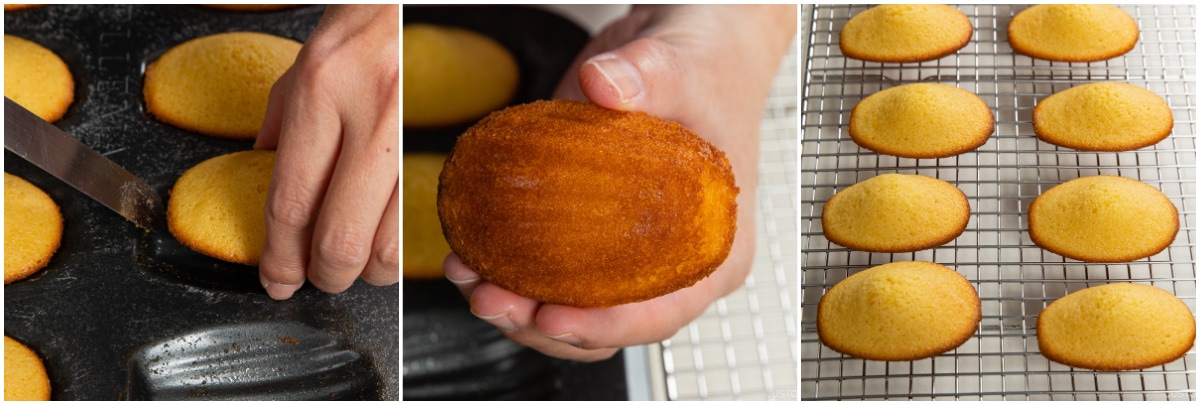
The plump, light-golden-colored dome shape in the middle is the distinctive look of madeleine. The opposite side of the cake has the famous signature shell groves.

How to Make Madeleines
Ingredients You’ll Need
- Eggs – I’ve tested this recipe with both two large eggs (100 g) and three eggs (150 g) multiple times. In the end, I picked three eggs for a more flavorful cake, but 2.5 eggs (125 g) or two jumbo eggs might be in a good spot. You can use two eggs without any issues. It comes down to the preference of the taste. If you are going to double the recipe (48 madeleines), I recommend five eggs instead of six eggs. It’s very important that the eggs are at room temperature. More about this later.
- Sugar – I used organic granulated sugar.
- Vanilla extract– Use good vanilla extract.
- Salt – A little bit of salt in sweets is always good! Just like in savory dishes, salt helps bring out the flavor.
- Lemon zest – I use one lemon, which yields 1 tablespoon (= 3 tsp). Two to three teaspoons are a good amount. Zest only the yellow part and avoid the white pith that tastes bitter.
- All-purpose flour (plain flour) – I tried this recipe with cake flour, it was very light, almost too light. I prefer all-purpose flour for this recipe. We need bounce for the texture.
- Baking powder – Get the aluminum-free BP. It’s a necessary ingredient for the batter to rise properly to make the beautiful hump in the middle. It also makes the cake light and fluffy. Make sure to check the expiration date on your BP if you haven’t used it for a while. To test if it’s still active, follow this quick method to find out!
- Unsalted butter – Use high-quality butter if possible. Melt the butter in the microwave or on the stove.
Baking Tools You’ll Need
- Two 12-well madeleine molds. I have both non-stick pans and heavy tinned steel pans. If you’re new to making madeleine, get non-stick pans for easy use. I prefer using a metal pan over a silicone pan as metal conducts heat much better than silicone.
- A Microplane is the easiest and best way to zest a lemon.
- A fine-mesh strainer for sifting the flour and baking powder.
- A pastry brush for greasing the pans.
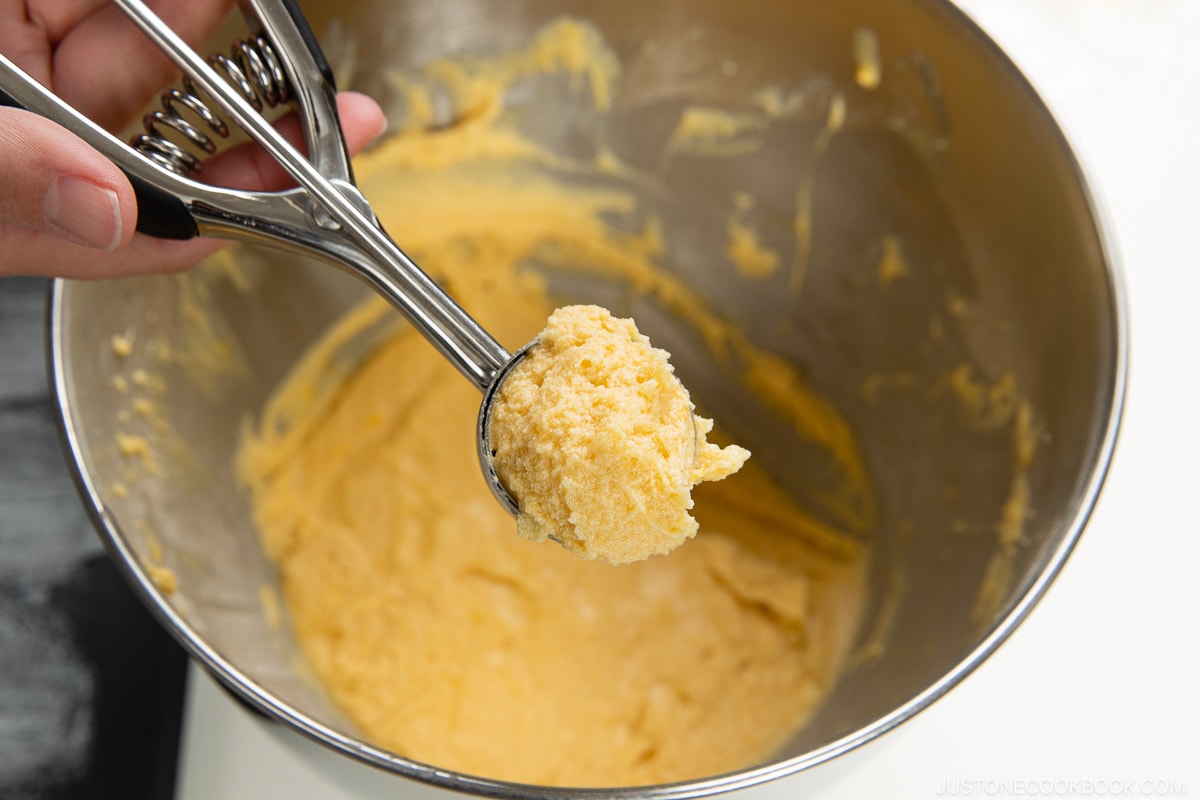
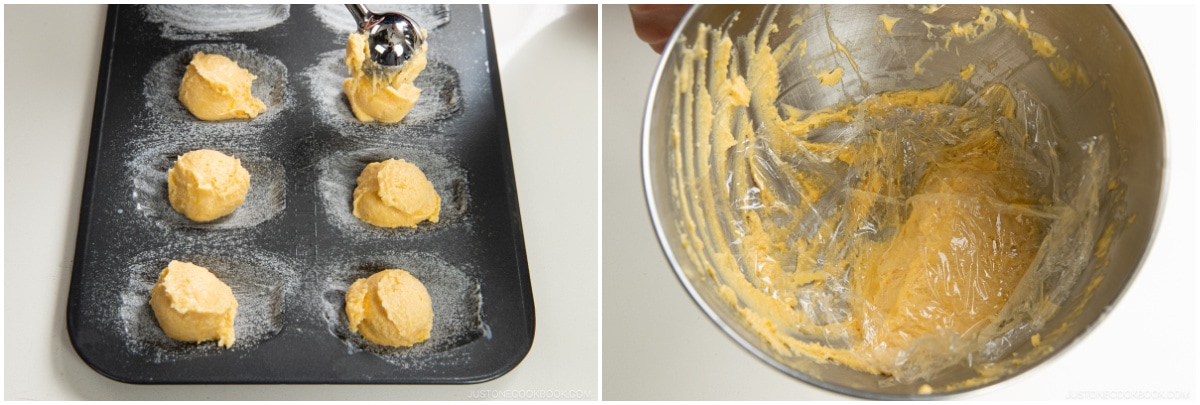
- An OXO small (1-Tbsp) cookie scoop makes it easy to portion the batter and transfer.
Overview: Cooking Steps
- Make the batter by mixing all the ingredients.
- Chill the batter and madeleine pans for at least 2 hours.
- Add the batter to the pans and bake.
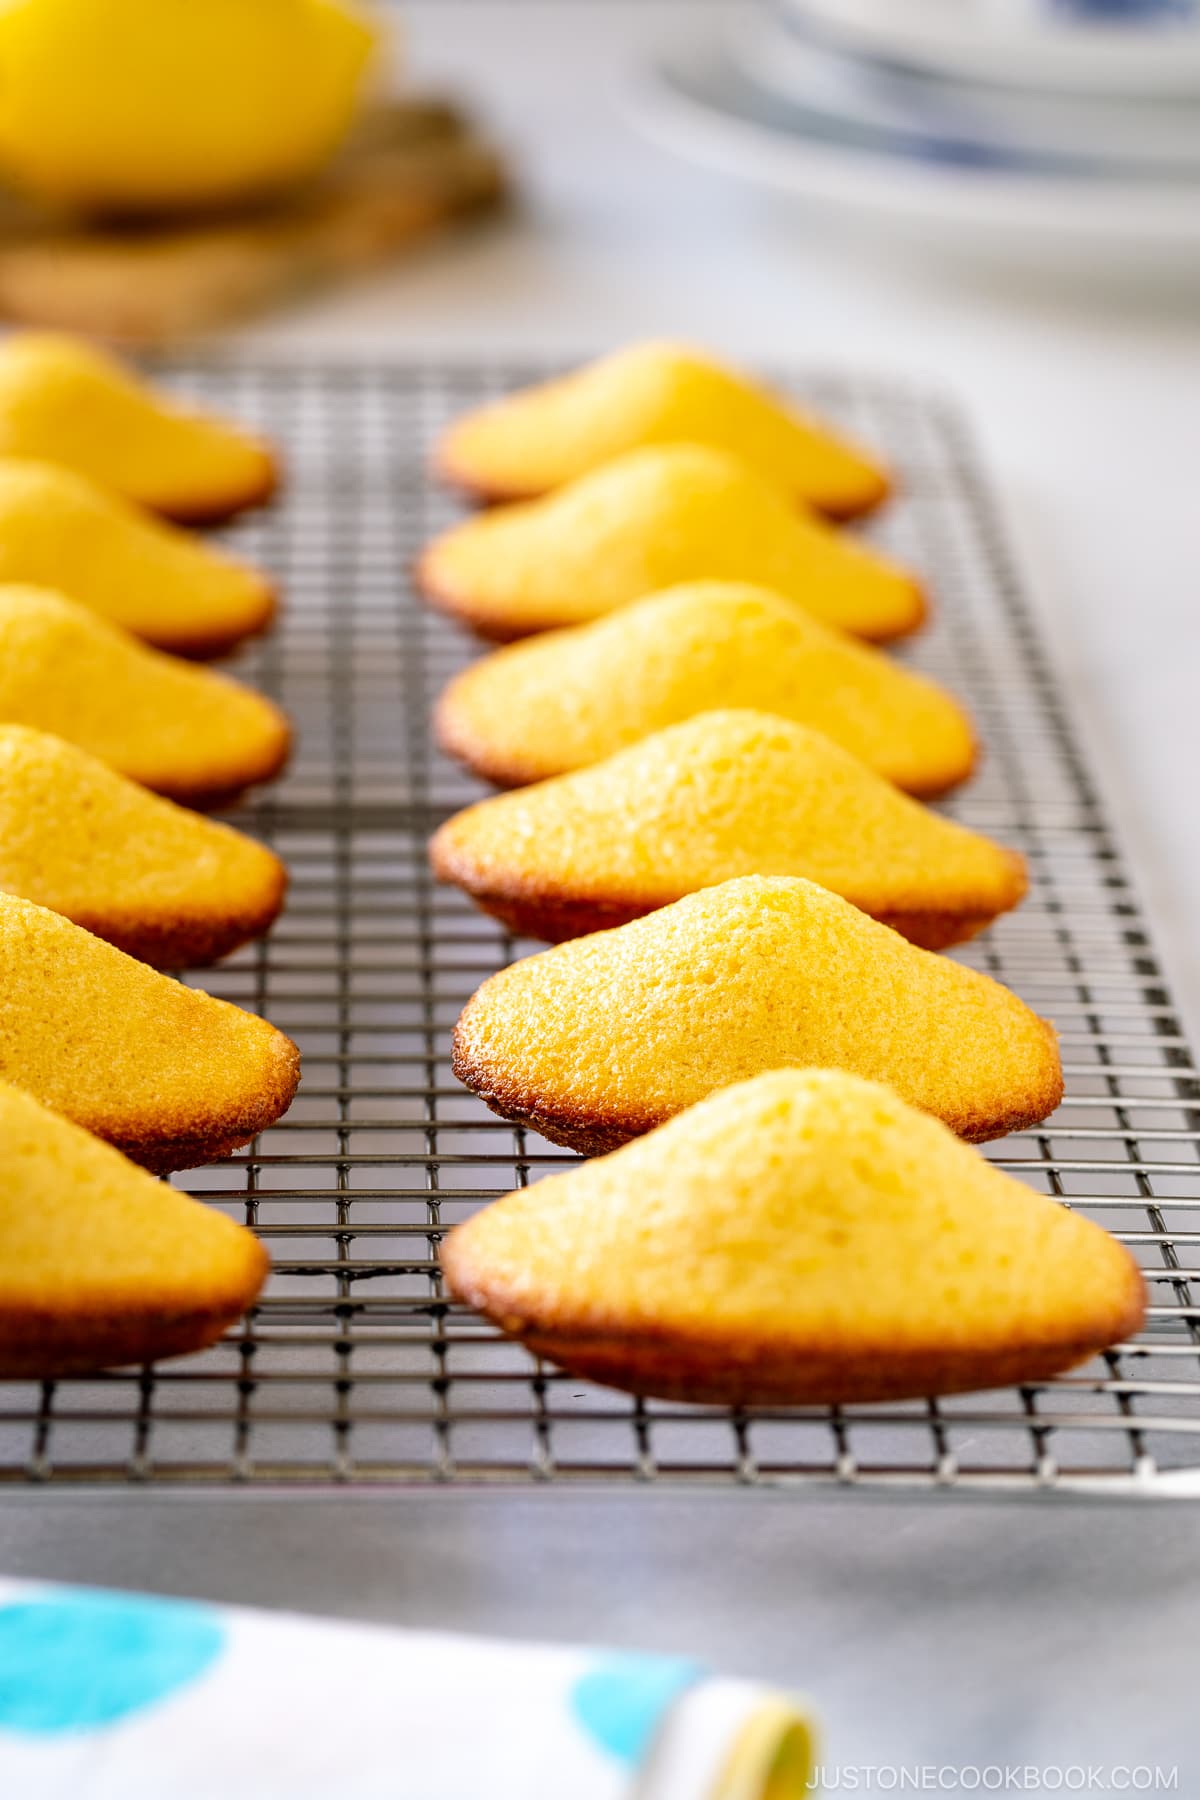
How to Achieve the Signature Hump
The hump (or bump) on top of madeleines is the signature of the authentic madeleine pastry. After reading many online recipes from bakers around the world, I learned 3 important tips that everyone was talking about.
- Chill the batter. Most madeleines recipes call for 1 hour to overnight chilling time, which is a wide range. So I tested using different times: One hour, two hours, and overnight. Two hours and overnight in the refrigerator gave a very good result, so I went with two hours for this recipe. To be precise, I used our second fridge that’s in our garage, and during these two hours, we kept the fridge door closed. If you use a fridge that opens frequently, the batter may not be as chilled as mine.
- Freeze the pans. Not everyone recommended this, but I needed to find out for myself. So I tested by chilling my pans in the refrigerator and in the freezer for two hours each. The ones in the freezer produced a more significant hump compared to the refrigerated pans. The frozen pan keeps the batter cold as long as possible while you fill the molds and bake the madeleines in the oven. I HIGHLY recommend creating the freezer space for your pans!
- Bake at a higher oven temperature for the first few minutes. Baking at a higher oven temperature (425ºF or 220ºC) makes a huge difference in the bump formation. The initial super-hot heat that hits the chilled butter is an absolute necessity. The baking time in this recipe works perfectly for my oven, but since everyone’s oven is slightly different, you may need to adjust the baking time (or possibly oven temperature).
To sum it up, the very cold batter and super-hot oven heat form the famous bump. Several online recipes refer to this as “thermal shock.” Following these three tips, I was completely amazed by the significant bump that was created in front of my eyes!
Side Note on Deep Golden Color
Here’s another observation I want to share. If you see madeleines with the nice signature hump, the back side (the “shell” shaped impressions) of the cakes is often a deep golden color. With the high heat in the oven, I realized that it’s impossible to keep the shell side a lighter shade. I personally don’t mind the deep gold look as it adds an additional layer of toasty flavor. However, if you prefer lighter golden madeleines, it might be impossible to achieve the bumps.

Other Important Tips to Remember
Tip 1: Make sure to use eggs that are at room temperature.
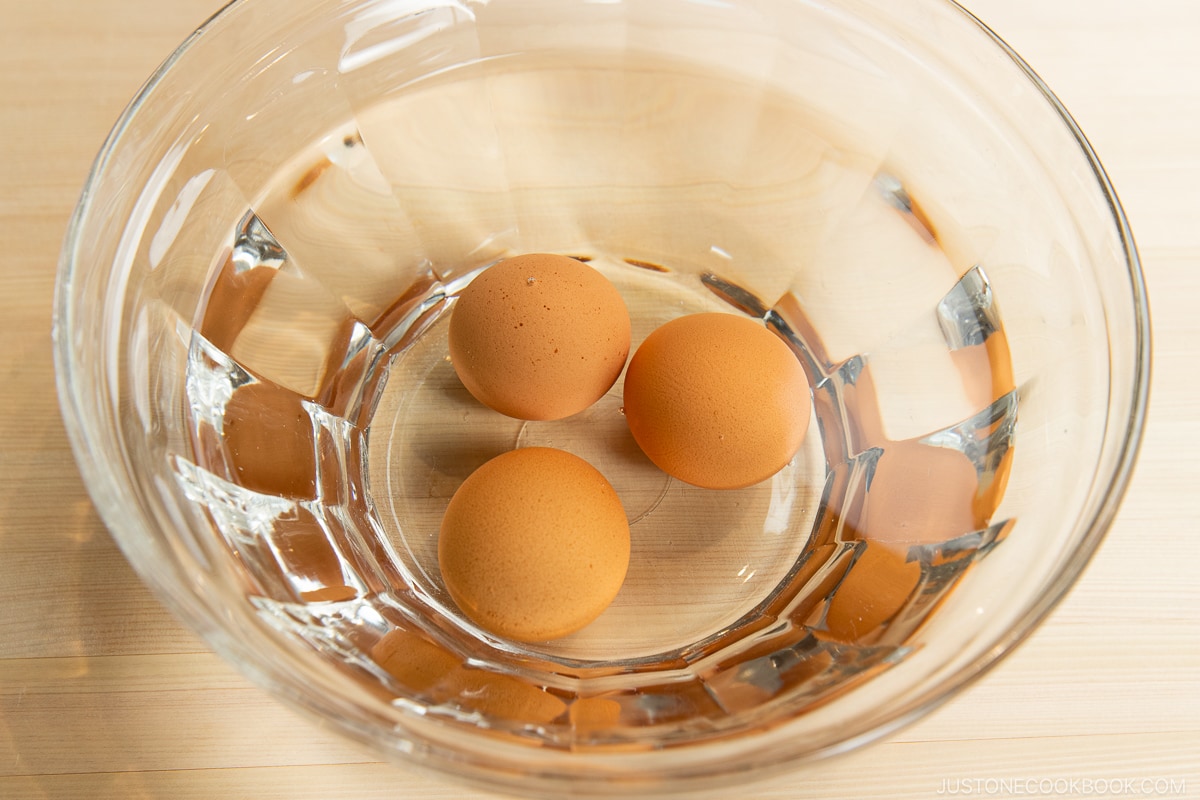
Cold eggs will cool the batter and make the fat seize up, resulting in a grainy texture. Therefore, it’s important to bring the eggs to room temperature.
If you are like me who is last minute and forgetful, the following trick is very handy to bring your eggs to room temperature and I use it all the time (it really works!):
Take out the eggs from the refrigerator. Fill a large bowl with very warm water (not hot or lukewarm). Submerge the cold eggs in the very warm water for 10 minutes. That’s it! You can measure the other ingredients while you wait for the eggs to come to room temperature.
Tip 2: Gradually add the melted butter.
Gradually add the cooled melted butter, a few tablespoons at a time, and incorporate the first addition of butter with the mixer on a low (stir) setting or by hand, before drizzling in the next addition. Do not overmix the batter or it will become tough. If you’re worried, it’s best to fold by hand using a silicone spatula.
Why can’t we add hot melted butter? The heat activates the baking powder, which means your madeleines will no longer swell while baking!
Tip 3: Use one rounded tablespoon of the batter per well.
Many recipes mentioned one tablespoon of batter (including my Matcha Madeleines and Cherry Blossom Madeleines), but I think one “rounded” tablespoon of batter works the best. A “heaping” tablespoon will overflow the well and produce flattened madeleines. A “level” tablespoon is not enough to create a nice bump.
Madeleines in Japan
It is said that madeleines were first made in the early Meiji period by craftsmen from Fugetsudo, the long-established Japanese confectionery store, who were learning how to make western sweets from a Western-style confectionery shop in the foreign settlement of Yokohama. At that time, there were no shell-shaped molds, so the batter was poured into circular chrysanthemum molds that were used for Japanese sweets.
It was only until the early Showa period when French confectionery became mainstream that madeleines—with the original shell-shapes and recipe—were officially introduced to the public. However, confectionery shops such as Fugetsudo, which has a long-standing tradition, still use the chrysanthemum molds of the time and sell them as madeleines today.
If you watch Netflix The Makanai: Cooking for the Maiko, a nine-episode series portraying the inner world of aspiring geisha (geiko), you probably saw the main two characters making the round mini cakes. Now you know what they are. They are Japanese-style madeleines!

In Japan, you can buy these chrysanthemum madeleine molds and paper liners.
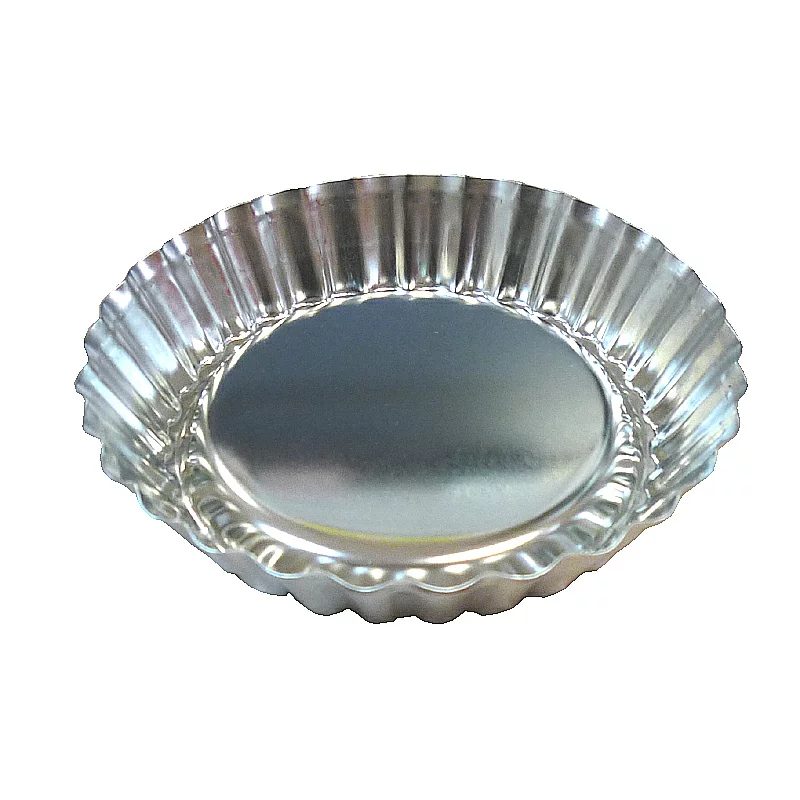
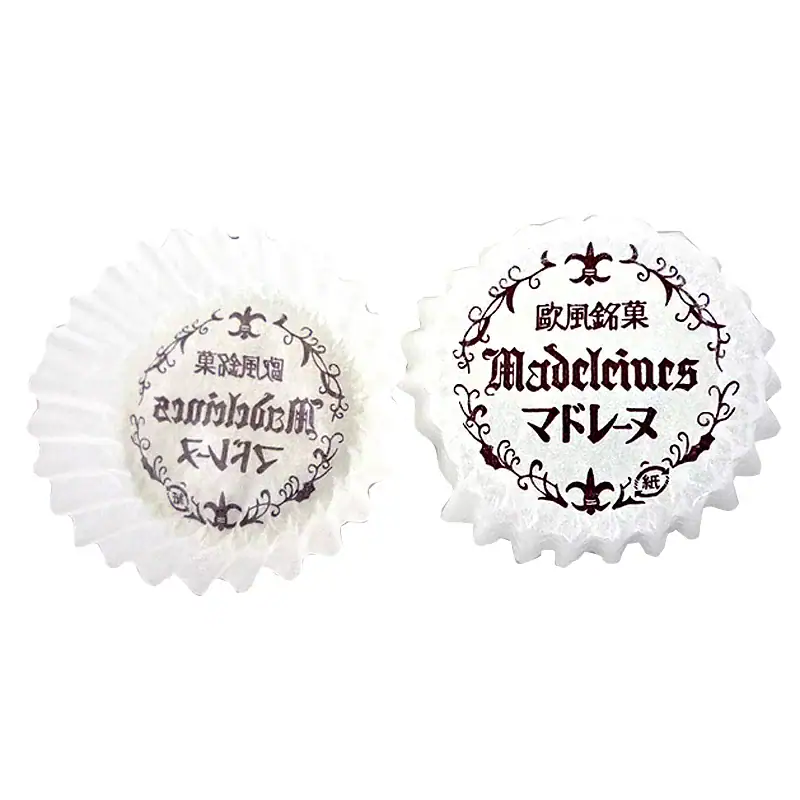
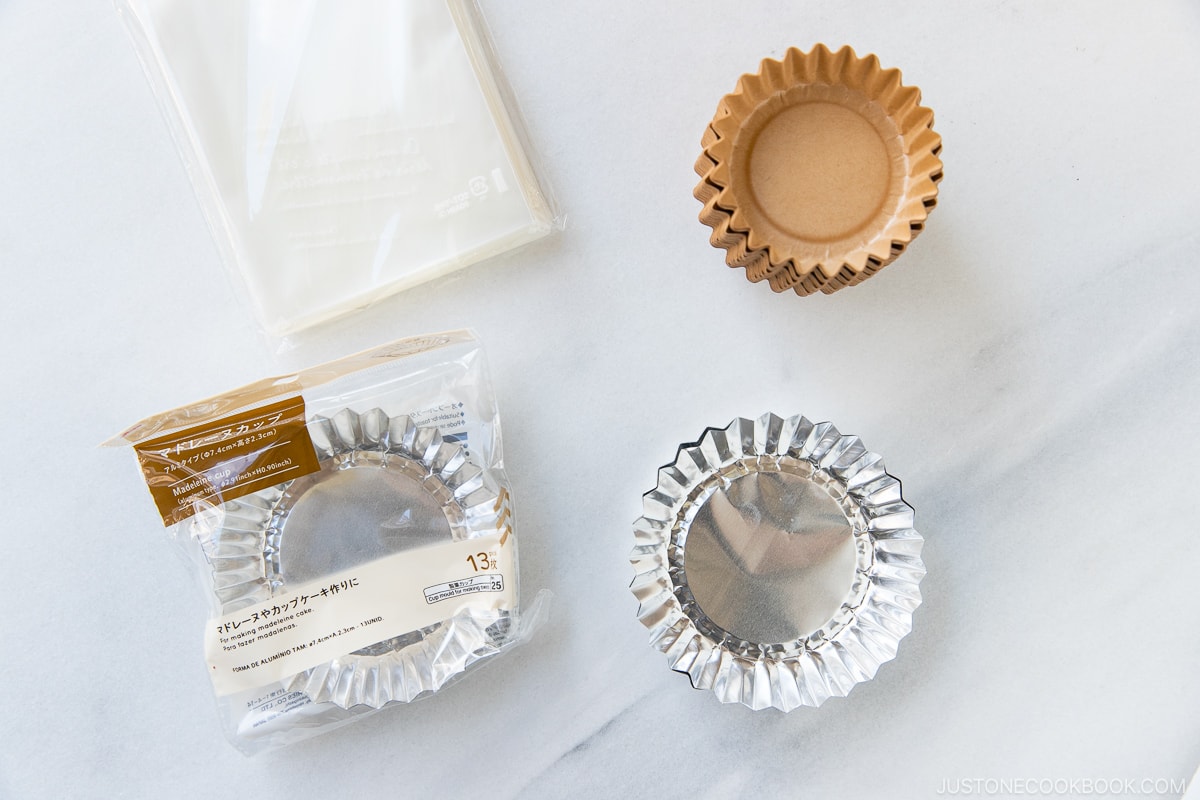
These plastic clear bags and disposable chrysanthemum cups (on the top of the picture) are from Amazon Japan. The aluminum chrysanthemum cups (on the bottom of the picture) are from Daiso in Cupertino.
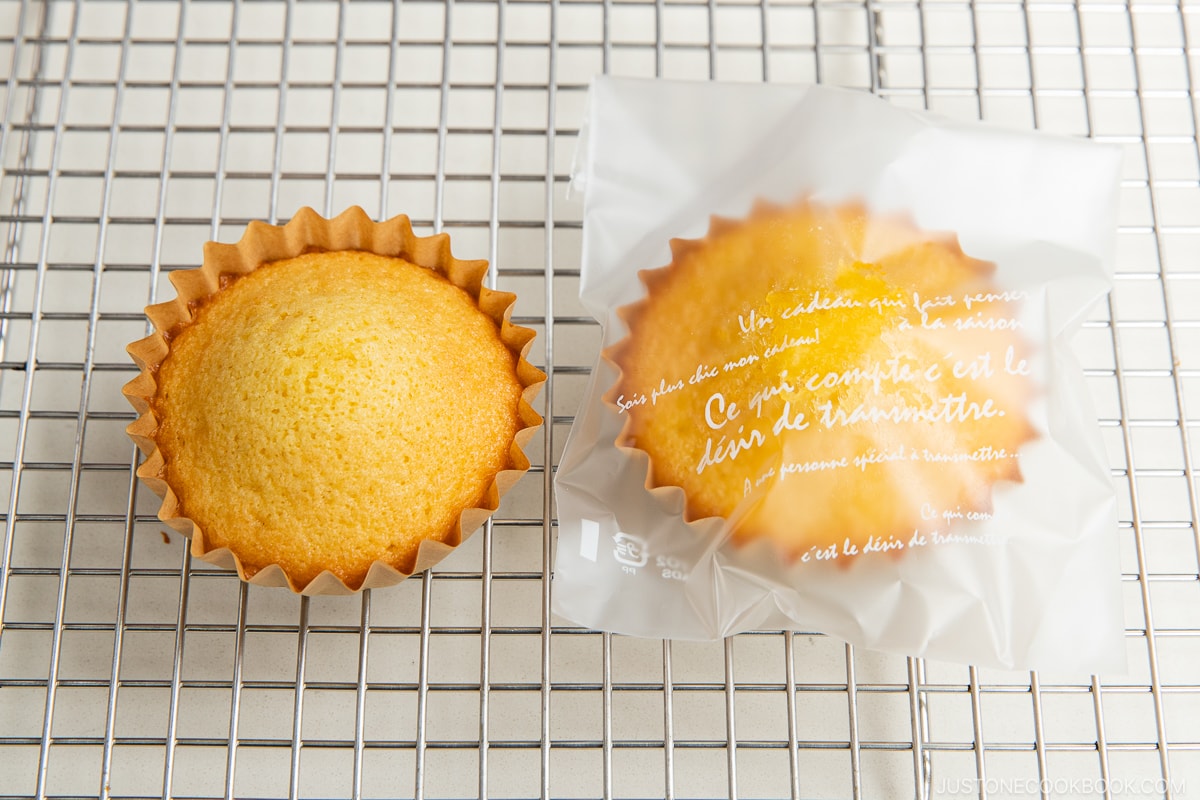
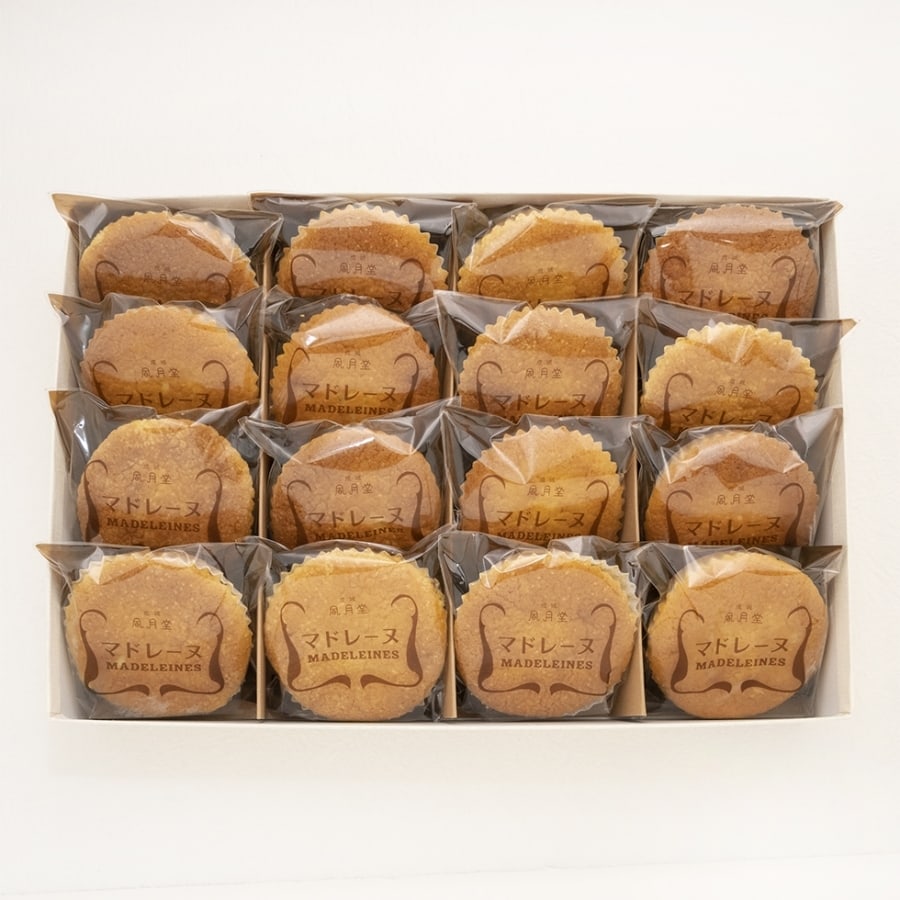
You can individually package the madeleines like this and give them as a gift.
I hope you enjoy making these moist and fluffy madeleines. These are great desserts and snacks to make ahead when you host a party as it takes only 10 minutes of baking time.

Wish to learn more about Japanese cooking? Sign up for our free newsletter to receive cooking tips & recipe updates! And stay in touch with me on Facebook, Pinterest, YouTube, and Instagram.

Madeleines
Video
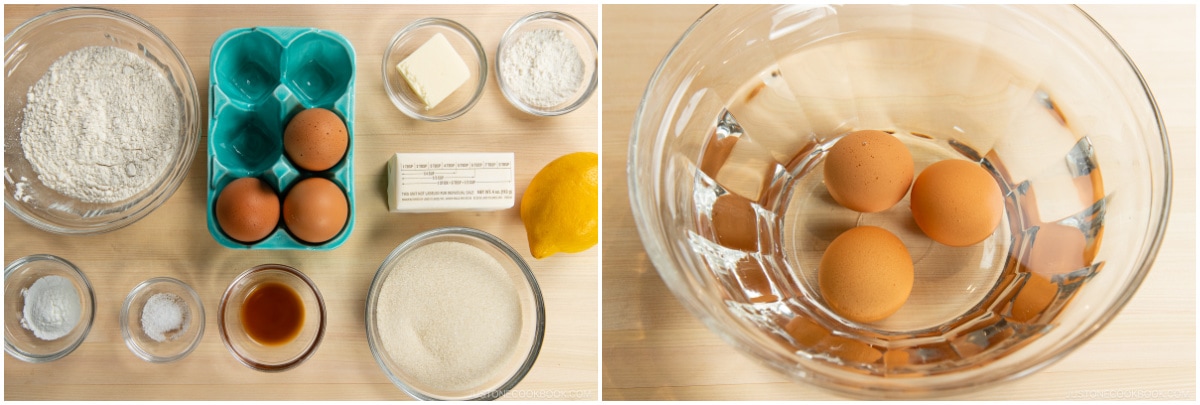
Ingredients
For the Batter
- ½ cup unsalted butter (½ cup equals 4 oz, 8 Tbsp, or 1 stick of butter)
- 3 large eggs (50 g each w/o shell) (at room temperature)
- ⅔ cup sugar
- ¼ tsp Diamond Crystal kosher salt
- 1 tsp pure vanilla extract
- 2 tsp lemon zest (one lemon yields 2–3 tsp of zest; in a pinch, you can use orange zest)
- 1 cup all-purpose flour (plain flour) (weigh your flour or use the “fluff and sprinkle“ method and level it off)
- 1 tsp baking powder
For the Pans
- 1 Tbsp unsalted butter (for greasing 2 pans)
- 1 Tbsp all-purpose flour (plain flour) (for dusting 2 pans)
For Serving
- ½ Tbsp confectioners’ sugar (optional, for dusting)
Instructions
Before You Start…
- Please note that this recipe requires at least 2 hours of chilling time. I highly encourage you to weigh your ingredients using a kitchen scale for this recipe. Click on the “Metric“ button at the top of the recipe to convert the ingredient measurements to metric. If you‘re using a cup measurement, please follow the “fluff and sprinkle“ method: Fluff your flour with a spoon, sprinkle the flour into your measuring cup, and level it off. Otherwise, you may scoop more flour than you need.
- Gather all the ingredients. You will need 2 12-well madeleine molds. Tip: If your eggs are not at room temperature yet, fill a bowl with very warm (not hot) tap water and submerge the eggs for 10 minutes.
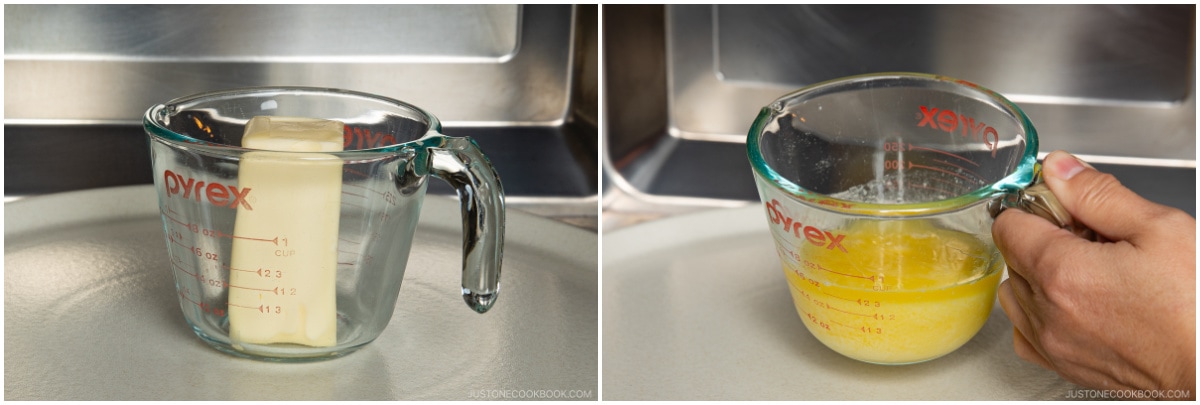
To Melt the Butter
- Put ½ cup unsalted butter in a measuring cup and microwave until almost melted. Then, let the residual heat finish melting the butter completely. Do not overcook it. For my 1100W microwave, it takes 1 minute to melt cold butter. If you‘re unsure, heat it incrementally to avoid overcooking. Alternatively, melt the butter in a small saucepan over medium-low heat. When it‘s almost melted, remove it from the heat and let the residual heat finish melting it completely. Let it cool completely before you add it to the batter. Tip: If the butter is still warm, you can prep the madeleine pans while you wait for the butter to cool.
To Make the Batter
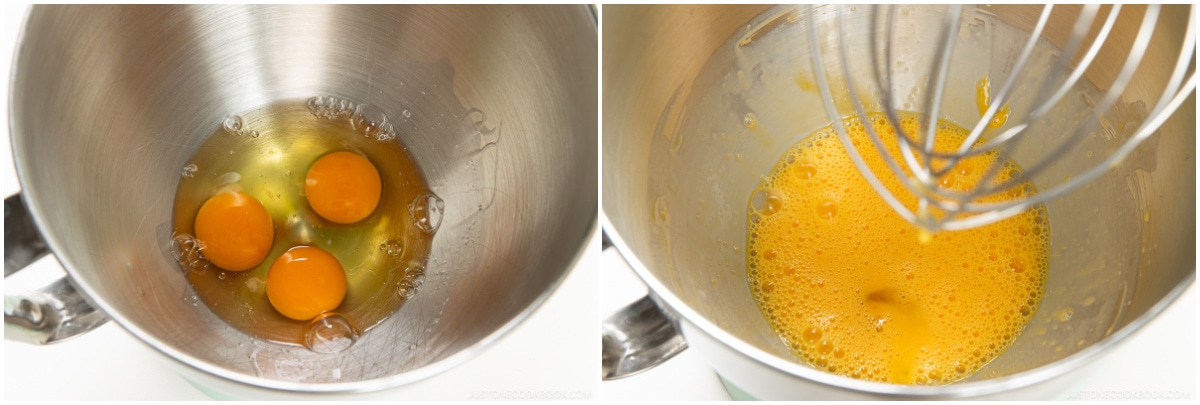
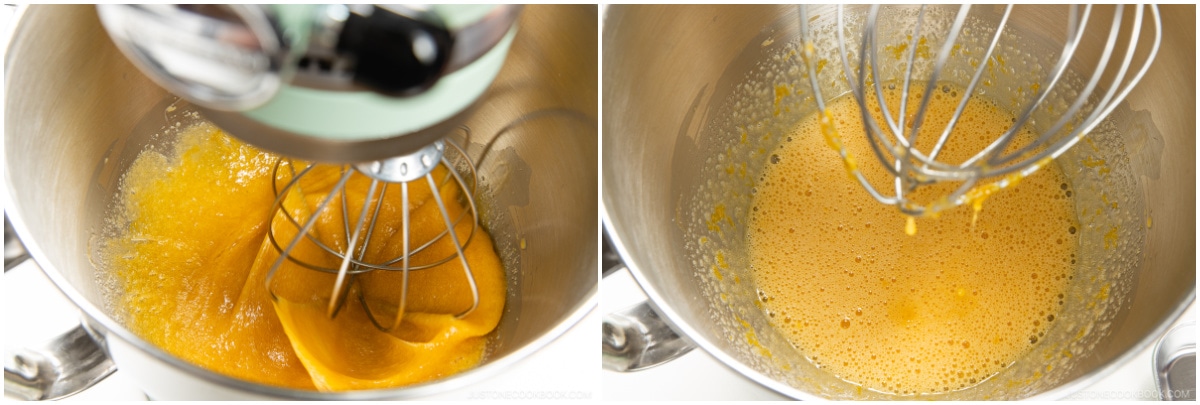
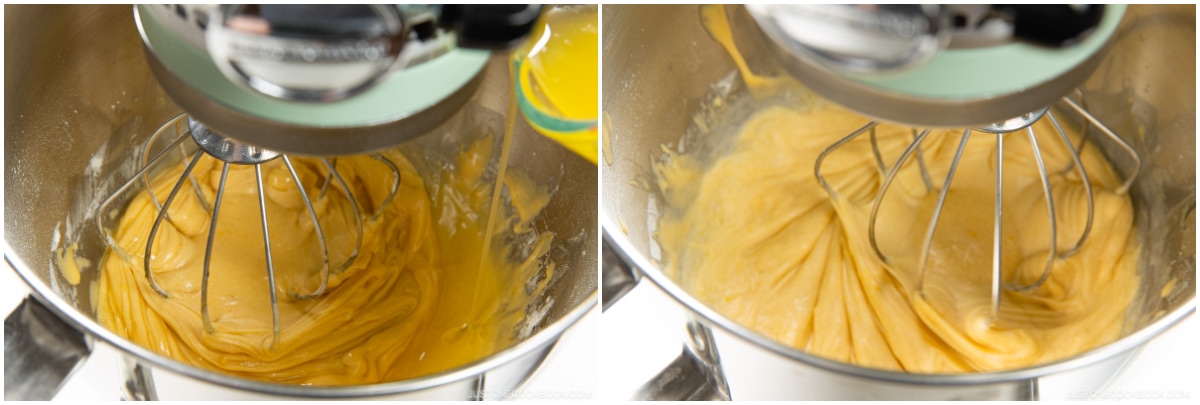
- In the bowl of an electric stand mixer (or a large bowl), whisk 3 large eggs (50 g each w/o shell) on medium speed until frothy, about 2 minutes.
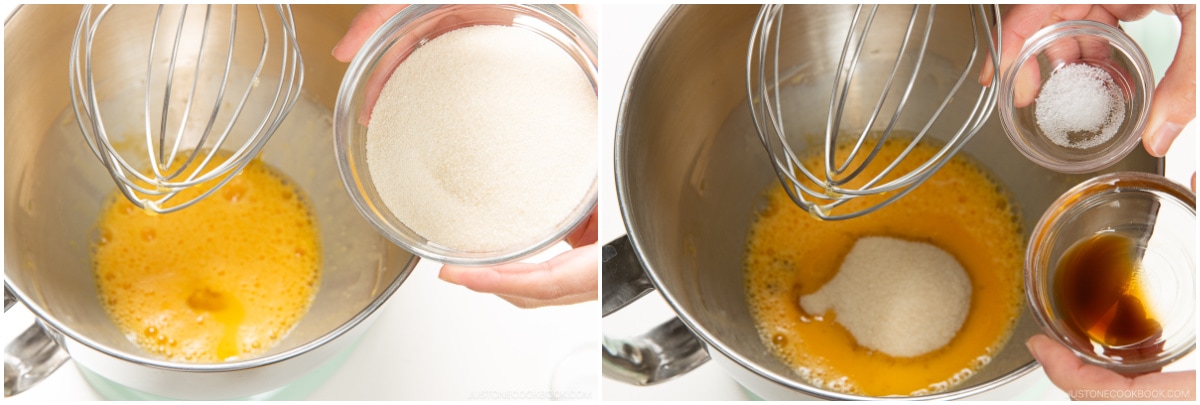
- Add ⅔ cup sugar, ¼ tsp Diamond Crystal kosher salt, and 1 tsp pure vanilla extract.
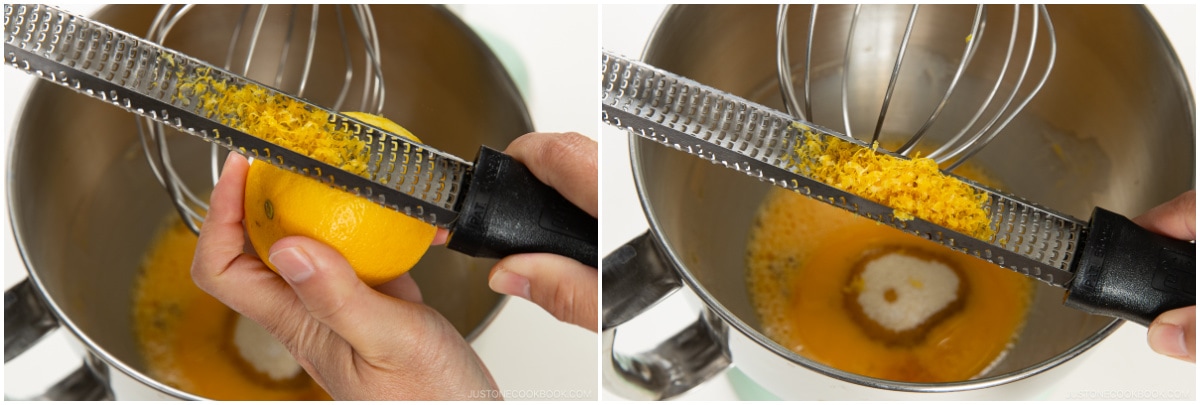
- Zest the lemon (I use this microplane zester), avoiding the white pith that tastes bitter. Measure 2 tsp lemon zest and add it to the batter. Tip: As you see in the picture, I like to hold the microplane above the lemon to zest it so I can see how much zest is in the microplane (versus holding the lemon over the microplane).
- Beat until light, slightly pale, and somewhat thickened, about 2–3 minutes.
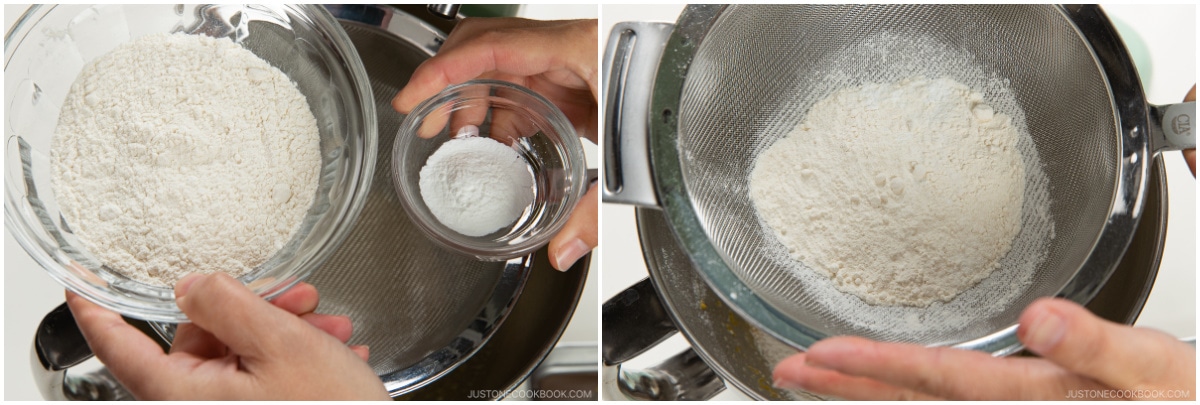
- Using a fine-mesh strainer, sift 1 cup all-purpose flour (plain flour) and 1 tsp baking powder into the bowl.
- With the mixer on low (Stir setting) or by hand, gently stir the dry ingredients into the egg mixture. Mix until it‘s mostly incorporated; you will continue to mix it when you add the melted butter next.
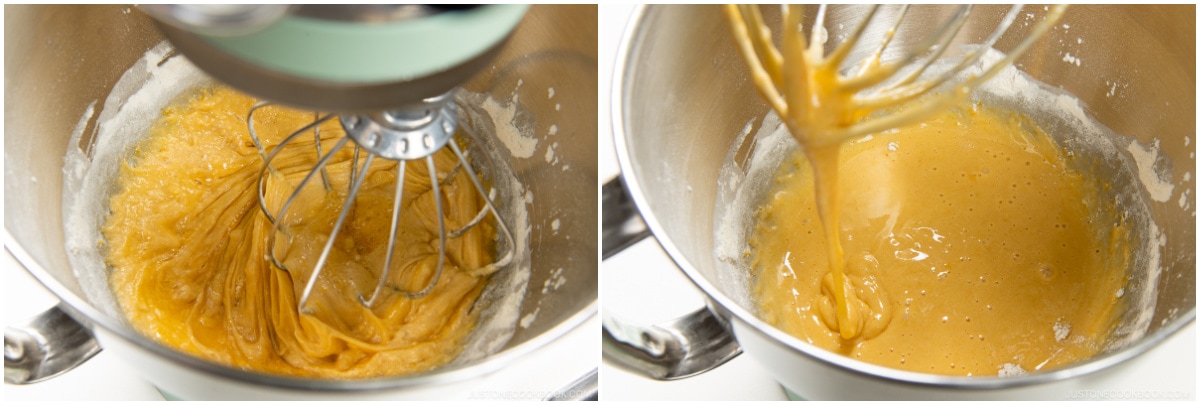
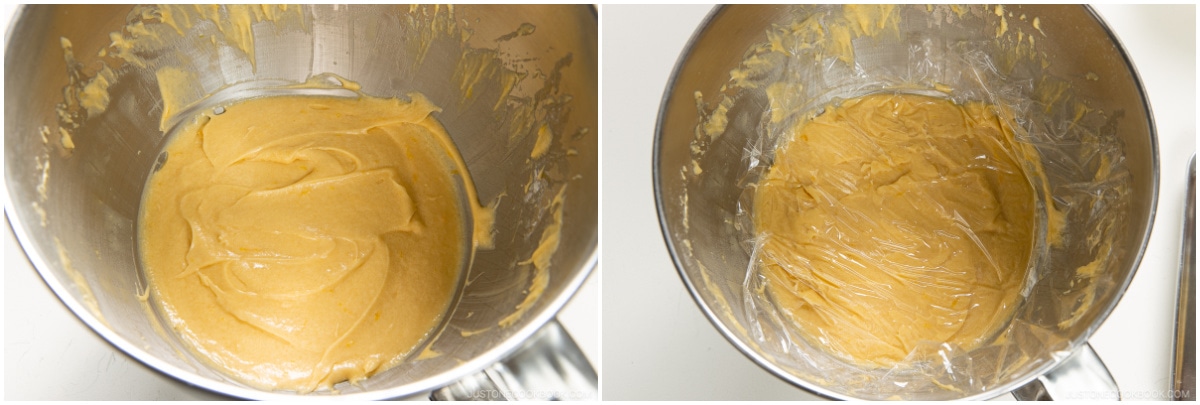
- Using a silicone spatula, scrape the bottom and sides of the bowl to mix the batter.
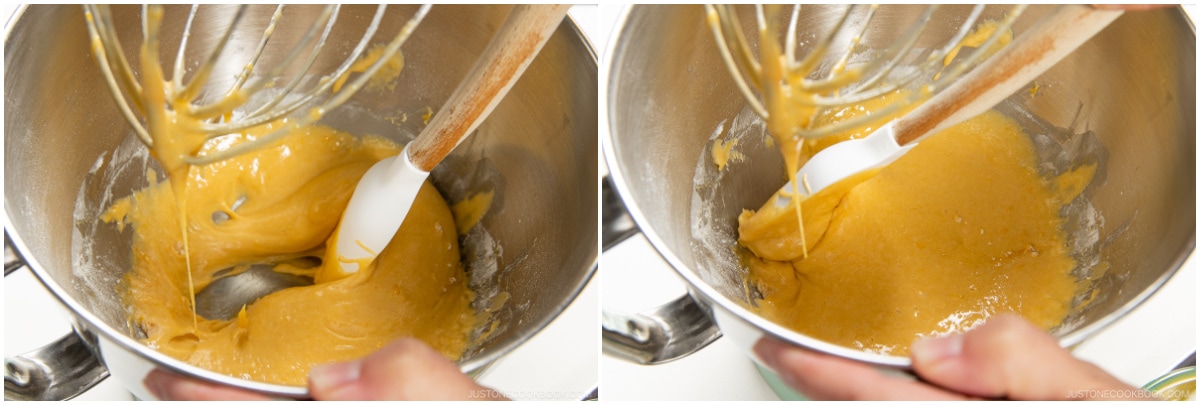
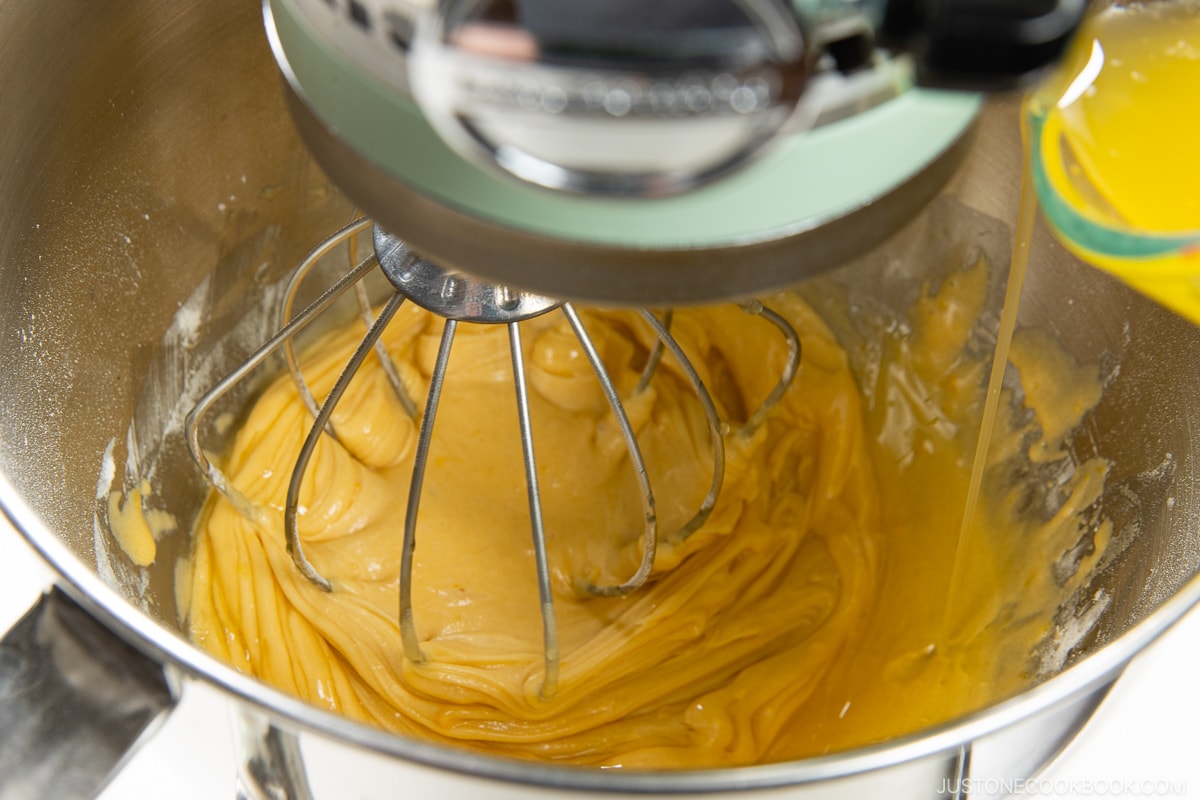
- Gradually add the cooled* melted butter, a few tablespoons at a time, and incorporate the first addition of butter with the mixer on low (Stir setting) or by hand, before drizzling in the next addition. Do not overmix the batter or it will become tough. If you‘re worried, it‘s best to fold by hand using the silicone spatula. * Tip: Why can‘t we add hot melted butter? The heat activates the baking powder, which means your madeleines will no longer swell while baking!
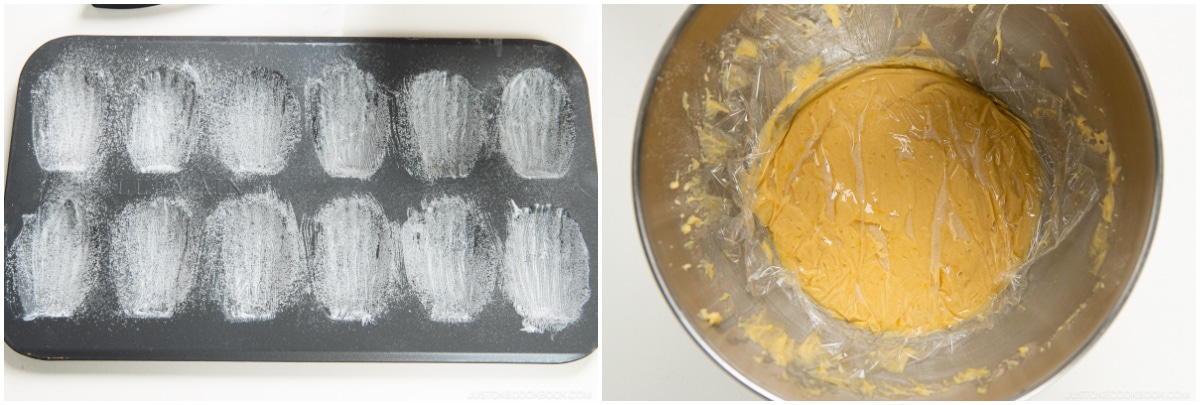
- Spread the batter evenly. Cover the batter with plastic, gently pressing it down against the surface of the batter to prevent a crust from forming. Chill in the refrigerator for 2 hours or overnight. Before you step away for 2 or more hours, make sure to prepare and chill the pans.
To Prepare the Pans
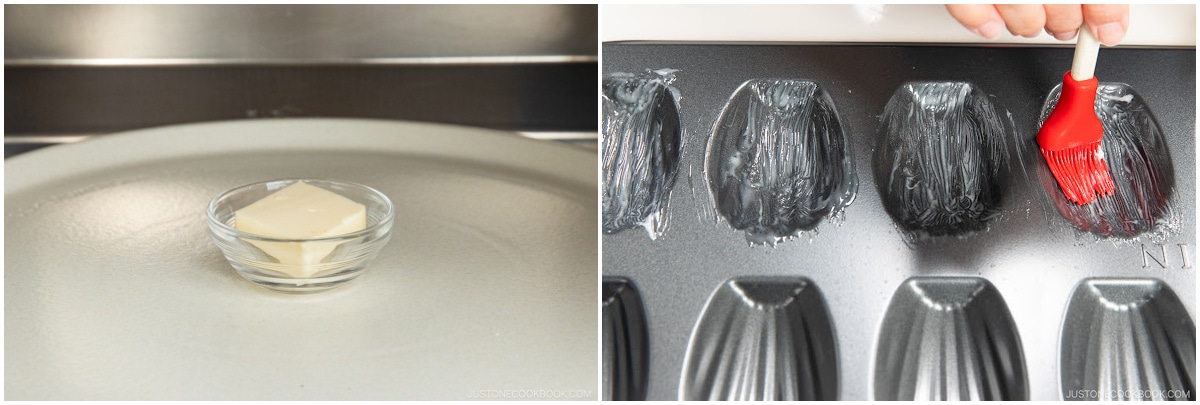
- Melt 1 Tbsp unsalted butter for the pans in a small bowl in the microwave. Using a pastry brush, lightly grease the wells of the pans with the melted butter.
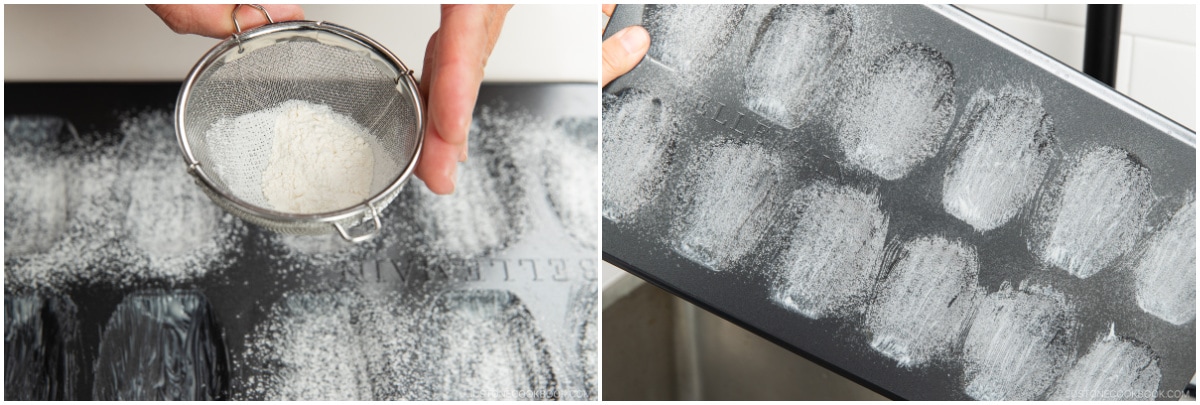
- Then, lightly dust the wells with 1 Tbsp all-purpose flour (plain flour) using a fine-mesh strainer. Tap the molds (over the sink) to remove the excess flour. Chill the madeleine molds in the freezer until ready to use. If you can‘t use the freezer, refrigerate them. Tip: Do not skip the flour. It helps create a nice clean “shell“ indentation.
To Bake the First Batch (2+ Hours Later)
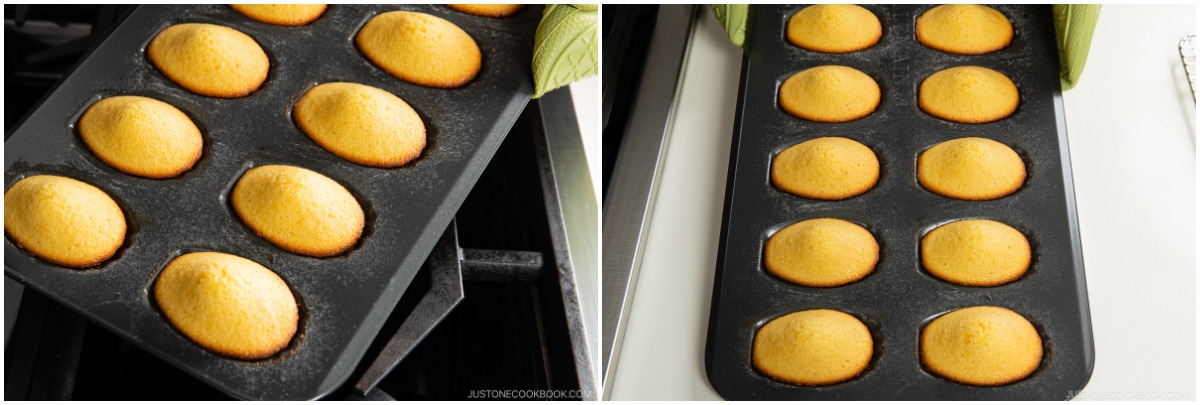
- Set the oven rack to the middle position and preheat the oven to 425°F (220ºC). For a convection oven, reduce the cooking temperature by 25ºF (15ºC). Once the oven indicates it has reached temperature, continue to preheat it well for an additional 5–10 minutes. Then, remove the batter from the refrigerator and just one of the pans from the freezer. You will fill and bake one pan of madeleines at a time. Tip: We work fast to keep the batter as cold as possible before putting the pan into the hot oven. This is the key to producing the characteristic hump on top of the madeleines.
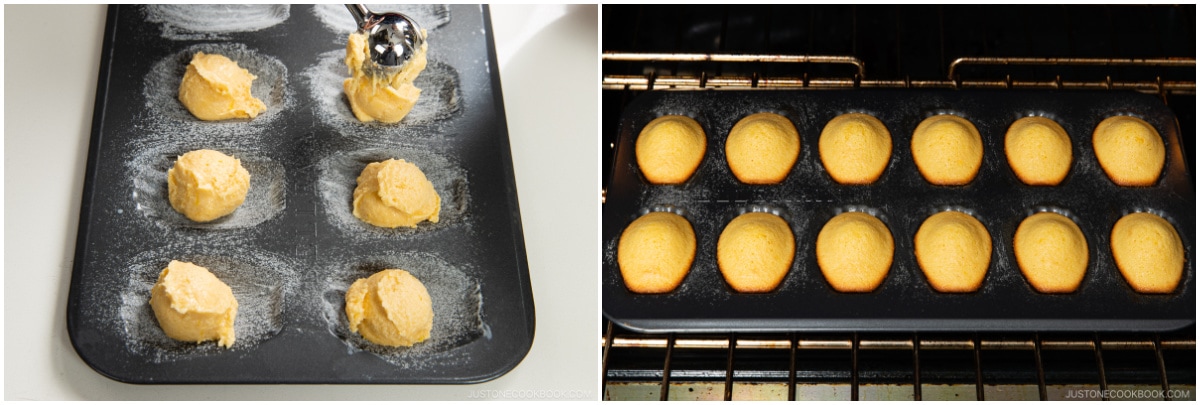
- Add 1 rounded Tbsp of cookie batter to each well of the madeleine pan. Aim for more than a level Tbsp but less than a heaped Tbsp. I used this OXO cookie scoop and found it easy to transfer the batter. You can also use a 1 Tbsp measuring spoon and scrape out the batter using a mini silicone spatula.

- You do not need to smooth out the lumps of chilled batter in the mold, as the heat of the oven will soften and spread the batter. Also, do not overfill the wells, or they will overflow while baking. Once you fill the wells of the first pan, cover the batter with plastic and put it back in the refrigerator.
- Bake at 425°F (220ºC) for 3 minutes.
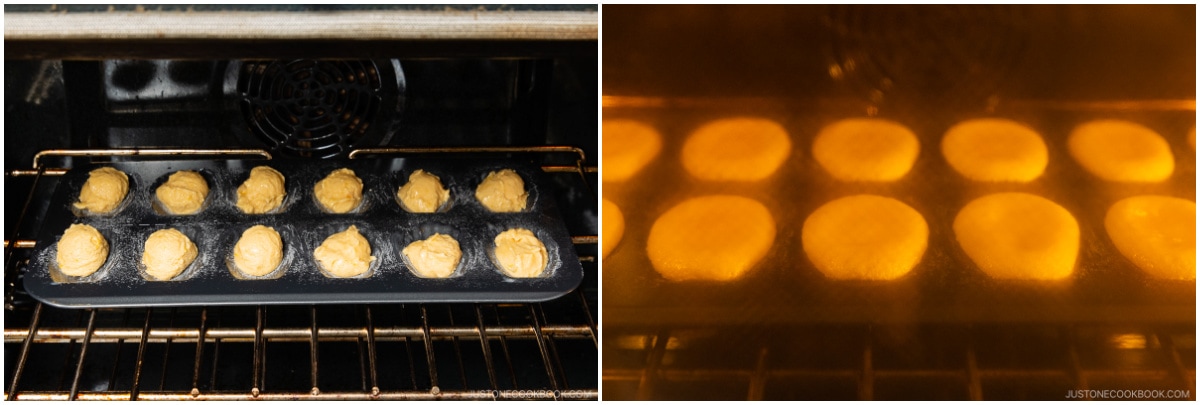
- Then, reduce the oven temperature to 375°F (190°C) and bake for 5 minutes, or until the edges of the madeleines look golden and the tops spring back when touched.
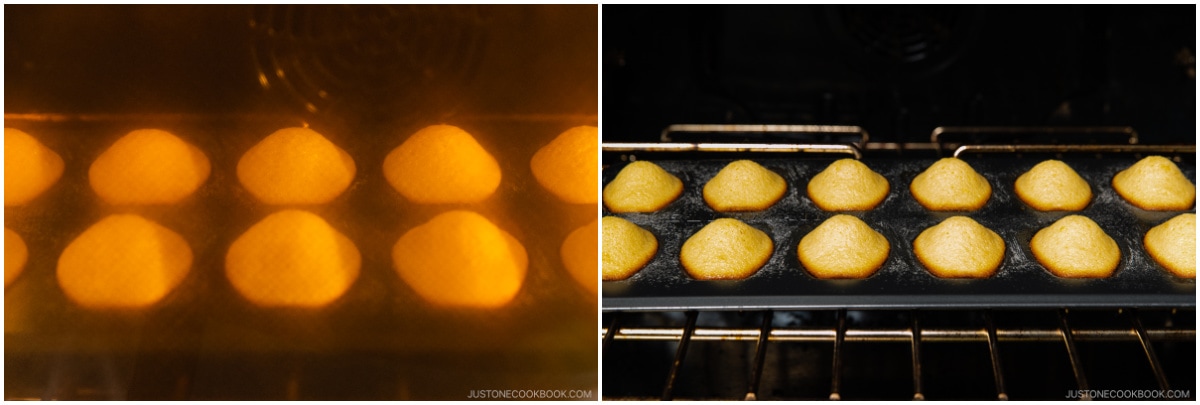
- Remove the pan from the oven and tap it on the countertop to loosen the madeleines from the pan. Let them cool in the pan for 2 minutes (and no more than that as the cakes will get dry).
- Using a fork or a small offset spatula, gently release the madeleines from the molds and transfer them onto a cooling rack.
To Repeat with the Second Pan
- Remove the batter from the refrigerator and the next pan from the freezer. Then, fill each mold of the second madeleine pan with one rounded tablespoon of the batter. Bake, then cool.
To Serve
- The madeleines are ready to serve when they are slightly warm or at room temperature. Dust the tops with ½ Tbsp confectioners’ sugar, if desired. If you are storing/freezing the madeleines, do not dust them with sugar until you are ready to serve.
To Store
- Madeleines get dry rather fast and are best eaten within a few hours after they come out of the oven. The nice crunch they have right after being baked will slowly fade away and the madeleines will become soft. To store them longer, let the madeleines cool COMPLETELY. Then, place them in an airtight container and enjoy them within 48 hours. You can also freeze them and they‘ll keep for 2 months. Defrost the madeleines at room temperature, then put them in the oven or toaster oven to reheat for a few minutes before dusting them with the confectioner’s sugar.


Hi Namiko san, thank you for testing out the chilling time in the fridge. The madeleines came out perfect, including the “famous hump.”
Hello Reshmi! Aww. We are so happy to hear your Madeleines came out perfectly!
Thank you for trying Nami’s recipe and for your kind feedback!
I always want to bake Madeleines, finally I bought 2 pans. It was a success, light and just the right sweetness. My husband is in 7th heaven. Thank you for the recipe.
Hello, Wendy! Thank you very much for your 5-star review! We were happy to hear that your first Madeleines were a success!
Thank you for trying Nami’s recipe!
I always enjoy your blogs.
Hi Esbe, Thank you so much for your kind words!🥰
Nami and all of us at JOC are so happy to hear that you enjoy the blogs.
Thank you for your love and support!
These are spongy and rich with a slight crunch. They are not too sweet—just right. I have one madeleine pan and baked the second batch the next morning (with pan in the freezer overnight). They turned out great. I used my Vollrath size 60 disher and it worked well. I took mine out of the oven a minute early because I didn’t want them too browned, but next time I’ll try just 30 seconds early. Can’t wait to try this recipe with orange zest next time. Thank you!
Hi Kumi! Aww.🥰 Thank you so much for trying Nami’s recipe and sharing Madeleine’s photo! This is excellent!
We are so happy you enjoyed the rich flavor and texture. Happy Baking! ❤️
Thank you! By the next day, the madeleines lost their crunch. So, I put them in a convection toaster oven for 3-4 minutes to dry them out, and they crisped up nicely! Delicious
Hello, Kumi! Thank you for mentioning it! Yes! We all agree that it tastes fantastic after a few minutes in the oven! We have made a note of it! 🤗
I can’t wait to make these, they look so delicious I ordered my pans which will be here in a couple of days. I must commend you on your excellent instructions and added notes on measurements and weights. I really appreciate your attention to the fine details as this is usually what I do before baking. I atty to double check measurements and weights of all ingredients.
Thank you again for sharing and I will certainly comment on outcome but I know they will be delicious
Hi Wanda! Thank you so much for reading Nami’s post and trying her recipe! Nami and all of us at JOC are so happy to hear that the detailed instructions and notes we shared were very helpful.
We hope you enjoy making Madeleines with your new pans soon! 😊