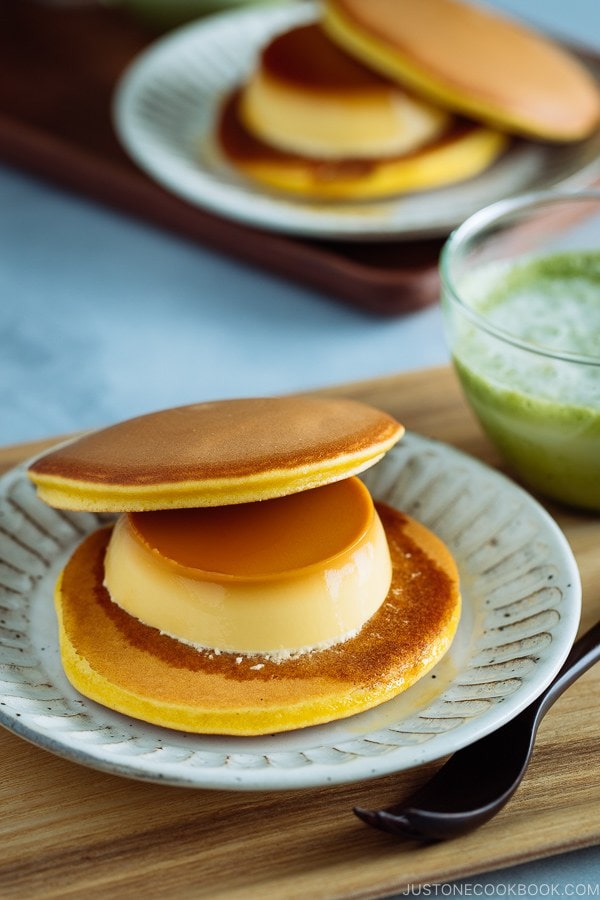
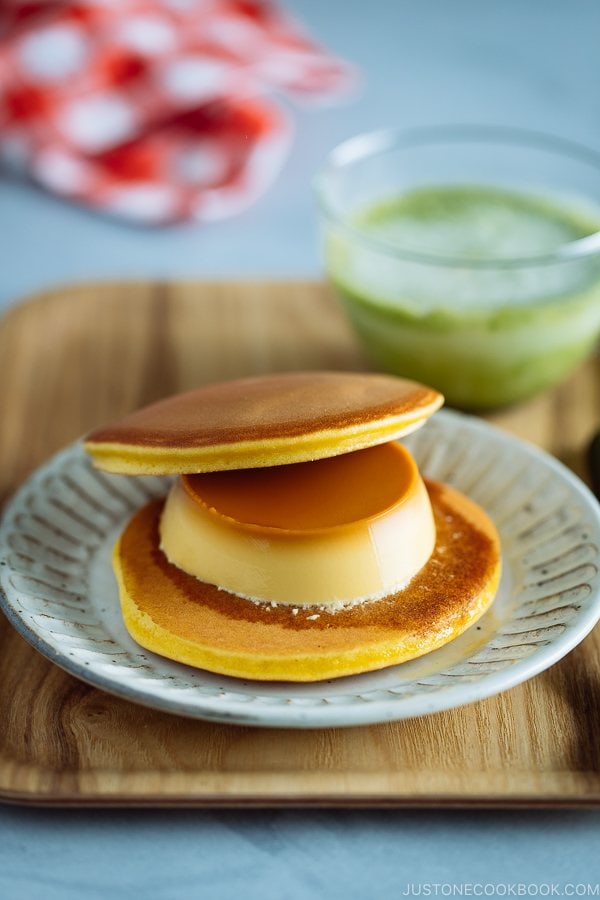
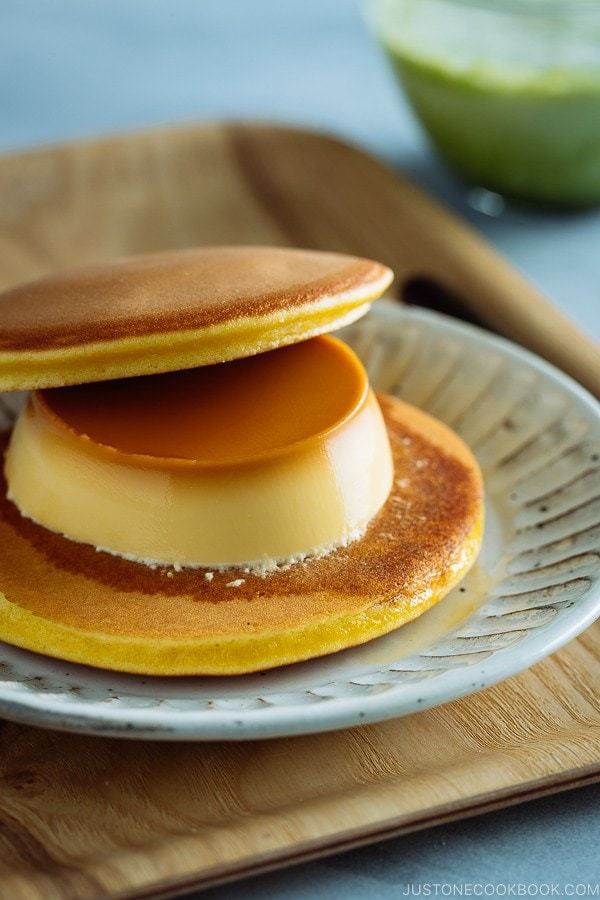
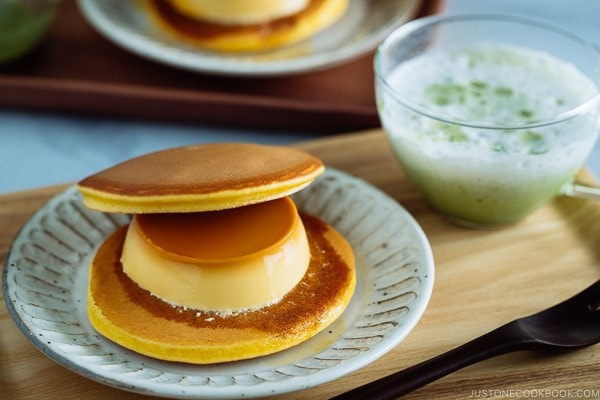
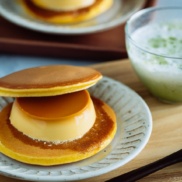
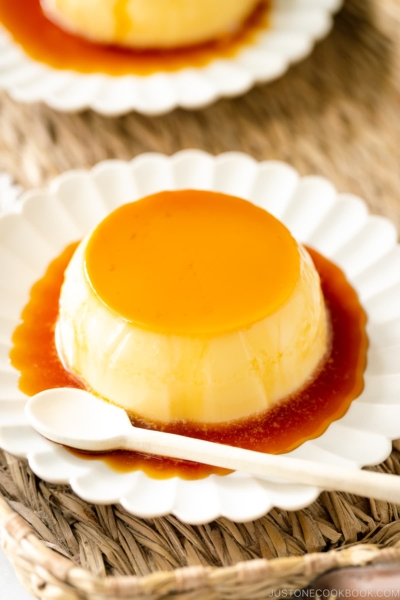
When Japanese custard pudding (purin) is sandwiched between two sweet pancakes (dorayaki), you get Purin Dora! With the rich buttery caramel running down the creamy and fluffy pancake, this is the ultimate Japanese sweet!
When we arrived in Yufuin, a popular hot spring resort near Beppu (another much larger and more developed hot spring resort in Kyushu), we had no idea what we would encounter in this little resort town. Soon after we started walking on the main street, we realized we were in a food paradise. From Korokke (croquettes) to green tea pudding, there were endless savory and sweet food options in shops lining both sides of the street.
There were plenty of good eats, but there was one special sweet that kept us coming back for more – Purin Dora (ぷりんどら) or Dorayaki with Purin (Japanese custard pudding). So today I’m sharing the re-creation of this dessert masterpiece.
Watch How to Make Purin Dora
Watch “Purin Dora” video on YouTube
What is Purin Dora?
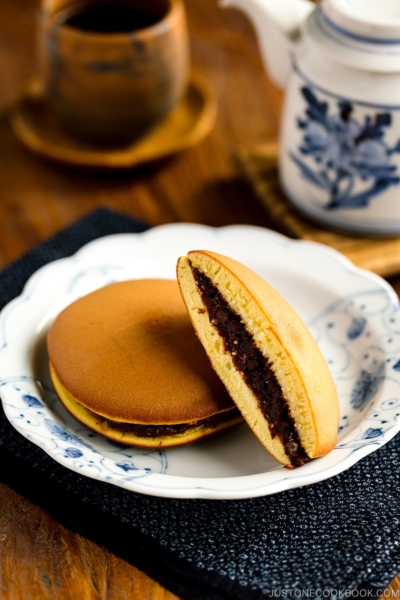
Purin Dora is a delicious treat which combines Purin (Japanese custard pudding/no-bake Creme Caramel) and Dorayaki (red bean filling pancakes). It was first created by Kikuya (お菓子の菊家), a confectionery store established in 1956 in Oita Prefecture.
The original Purin Dora consists of maple syrup flavored pancakes sandwiching the Japanese custard pudding. The rich buttery caramel from the custard pudding gives a nice accent to the creamy and sweet pudding. The original version has a small amount of custard cream (pastry cream) on top and bottom of the custard pudding.
Initially, I was thinking about adding fresh whipped cream or my homemade custard cream inside the pancake, but after tasting my version of Purin Dora, I concluded that it’s not necessary. It’s already sweet as it is, and custard pudding is milky and rich from the eggs, milk, and heavy cream. The slight salty bitterness from the caramel balances out the sweetness of pancakes and custard really well.
Biting into the soft custardy filling and the fluffy pancakes all together is such an unforgettable experience!
Making Purin Dora at Home
Frankly speaking, making this dessert at home involve 2 days or one stretching day with a break in between. Okay, before you turn away, I want to assure you that despite the length of time, the purin dora-making affair is not at all complicated. The process involves two parts:
The first part is to make Purin (Custard Pudding). Basically, it’ll be my NO BAKE Creme Caramel with less liquid, so the Purin is firmer and works better for Purin Dora.
The second part is to make Dorayaki. It’s just like making pancakes, the only difference is we have to cook on a much lower heat because the honey in the pancake batter can burn easily. To get that characteristic golden brown surface on dorayaki, you need to practice patience and be extra gentle. Don’t worry, I’ll show you some tips on the step by step recipes below.
Helpful Notes for Making Purin Dora
Making Purin
- Purin is made with gelatin, and I highly recommend using this gelatin sheet.
- To counter the sweetness, I like my caramel to be a have a stronger bitter note (and darker) so the flavor is much more balanced.
- I use 4-oz ramekins to make my purin. I bought mine from Daiso (a Japanese dollar store) over 10 years ago.
Making Dorayaki
- Most importantly, you want to be familiar with the working of your stove and frying pan, and then use a timer to assist you on when to flip the pancakes.
- To make equal size pancakes, pre-measure the batter (I use a 1/4-cup measuring cup).
- It’s not necessary, but I recommend using this small offset spatula. It is REALLY helpful when you want to insert the spatula between batter and frying pan around the edges without making any scratches.
- And if you do use the offset spatula, make sure to keep the spatula clean with a damp towel so the dorayaki surface will be nice and smooth.
Assemble Purin Dora
- Purin might be hard to pop out of the ramekin. Run the toothpick around the edges and tilt to allow air around the edges.
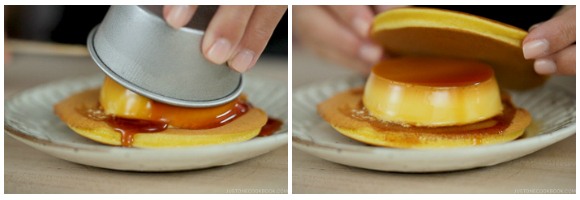
- If you don’t want all the caramel sauce to come out, you can first pop the purin out and drain the caramel on a plate, then transfer the purin onto the dorayaki. I don’t mind at all if the caramel sauce is all over my dorayaki. See the pictures of my purin dora for proof!
Enjoy Purin Dora
This dessert is definitely not one of those quick and easy recipes, but Yufuin is also not an easy place for many of us to get to. If you have tried Purin Dora in Yufuin, or if you have tasted my Purin Dora once, I know you would keep making this again and again. The surprising pair of spongy pancake and smooth silky custard drowned in caramel sauce offers you an absolute euphoric sensation. Mr. JOC was in heaven when I was testing the recipe several times.
Hope you enjoy this ultimate combination of Japanese and western dessert!
Don’t want to miss a recipe? Sign up for the FREE Just One Cookbook newsletter delivered to your inbox! And stay in touch with me on Facebook, Google+, Pinterest, and Instagram for all the latest updates.
Purin Dora
Video
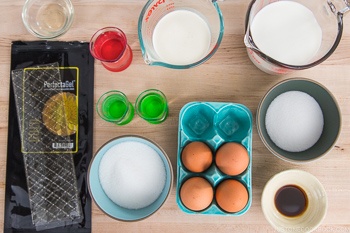
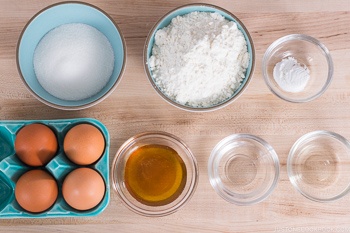
Ingredients
For Purin - Caramel Sauce (makes 8 purin)
- ⅔ cup sugar
- 2 Tbsp water
- 2 Tbsp boiling water
For Purin – Custard (makes 8 purin)
- 4 sheets gelatin sheets (1 Tbsp; 10 g, 0.35 oz)
- ¼ cup water
- 4 large egg yolks (with leftover egg whites, try my coconut macaroons recipe!)
- ⅓ cup sugar (⅓ cup + 1 Tbsp to be precise)
- 1¼ cup whole milk (divided)
- ½ cup heavy (whipping) cream
- 2 tsp pure vanilla extract
For Dorayaki (makes 12 pancakes – 6 dorayaki)
- 4 large eggs (50 g each w/o shell)
- ⅔ cup sugar
- 2 Tbsp honey
- 1⅓ cup all-purpose flour (plain flour) (if you use a measuring cup, fluff your flour with a spoon, sprinkle it into your measuring cup, and use a knife to level it off. Otherwise, your flour ends up with more than 160 g.)
- 1 tsp baking powder
- 2 Tbsp water (Please adjust, between 1 to 2 Tbsp)
- 1 tsp neutral oil (for cooking)
Instructions
Day 1 – Making Purin
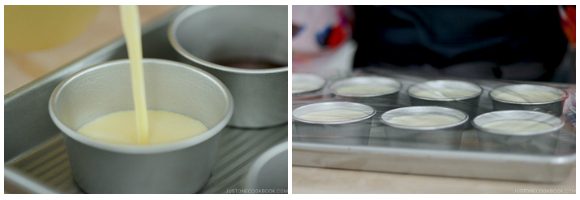
- Gather all the ingredients. You will also need eight 4-oz (120-ml) ramekins.
1: To Make Caramel Sauce:
- Prepare boiling water (you will only need 2 Tbsp) and a cold damp towel (for Step 4).
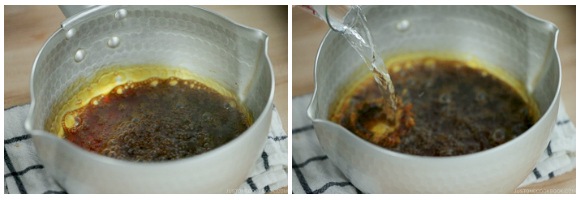
- In a small saucepan, combine ⅔ cup (140 g) sugar and 2 Tbsp water over medium heat. Stir a few times and let the sugar dissolved.
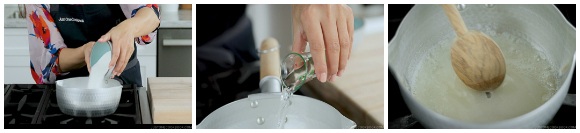
- Once the mixture comes to a boil, about 4 minutes, lower the heat to simmer. Gently swirl and tilt the pot around the heat (don't stir it) to distribute the color evenly until it becomes amber (like darker honey), about 6 minutes.
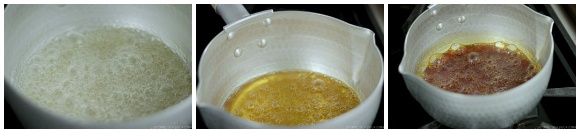
- Once it reaches the desired amber color, immediately remove the pot from heat to a cold damp towel and add 2 Tbsp boiling water. It will create a huge splash so please be careful. You can shield yourself with a lid or wear oven mitts to protect your hands. Stir the saucepan to mix together. This will slightly thin out the caramel sauce and ensure it doesn’t become too thick in the ramekins.
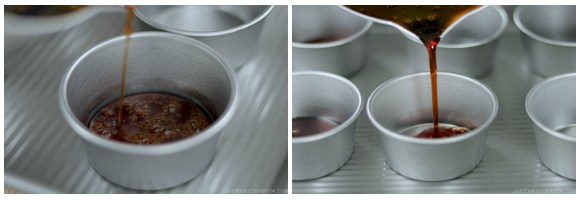
- [Optional] Briefly dip the ramekins in hot water to warm up and shake off excess water. This will prevent the caramel from solidifying.
- While caramel is still hot, evenly distribute the caramel among the 8 ramekins. Set aside and let the caramel thicken naturally (which is why the caramel will not mix with the custard mixture later).
2: To Make Custard
- In a small heat-resistant bowl, cut 4 gelatin sheets* into thin ½ inch (1.3 cm) strips. Add ¼ cup (60 ml) water to the bowl and set aside for 5-6 minutes until the gelatin “blooms” (expands). Make sure the bowl is larger than the opening of the saucepan you'll be using in Step 3 below.
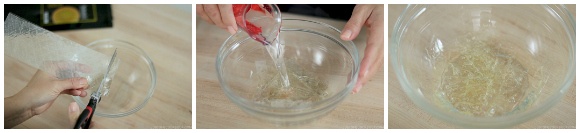
- In a saucepan bring 1 inch (2.5 cm) of water to simmer and place the bowl of gelatin mixture over the saucepan. Steam will immediately warm up the glass bowl and start dissolving the gelatin. Turn off the heat and set aside. If somehow you end up taking a longer time to do the following process and the gelatin has set into a solid, you will need to melt it back into a liquid with double boiler again.
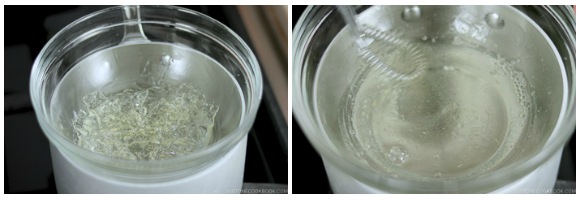
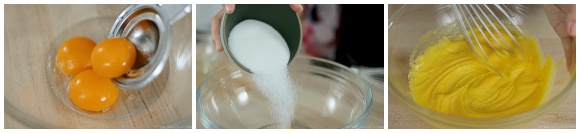
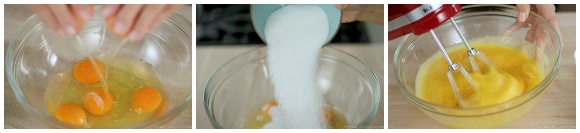
- In a large mixing bowl, whisk together 4 egg yolks and ⅓ cup + 1 Tbsp (80 g) sugar until pale and creamy.
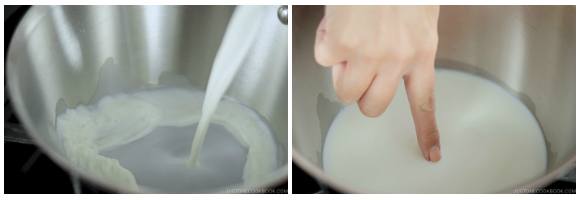
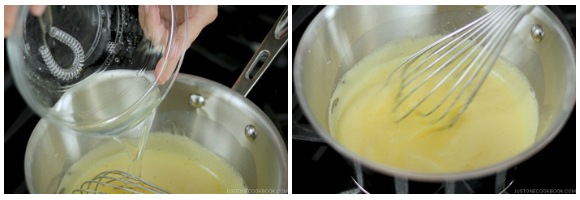
- In a medium saucepan, heat ⅔ cup (150 ml) milk over medium heat until the milk is warm to the touch. We’ll be using the other half of milk later on.
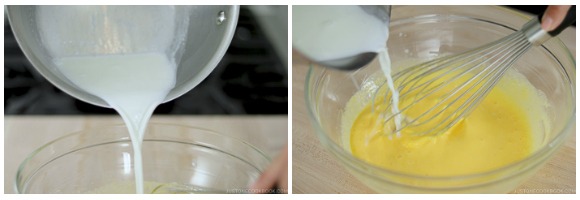
- Slowly add in the warm milk, whisking constantly (tempering the egg mixture).
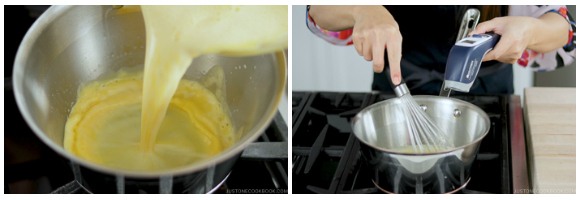
- Pour the mixture back into the saucepan. Cook over medium-low heat, stirring constantly, until the mixture coats a spoon with a thin film, or small bubbles start to form at the edges of the saucepan, or reaches 160ºF (71ºC). Keep an eye on the pot ALL THE TIME; otherwise the mixture will burn on the bottom.
- Add in the gelatin mixture (from Step 2 above) and mix well. Remove from the heat.
- Strain the mixture through a fine sieve into a clean bowl. Stir in the rest of the milk (⅔ cup, 150 ml).
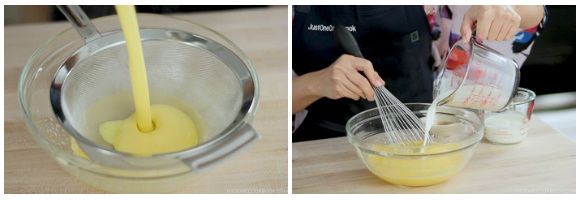
- Add ½ cup (120 ml) heavy whipping cream and 2 tsp vanilla. We’re adding them at the end to help the mixture cool down faster.
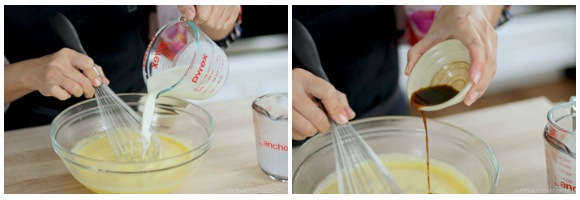
- Whisk all together. Transfer the mixture into a large cup with a pout (optional).
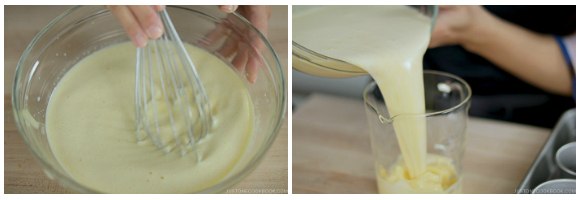
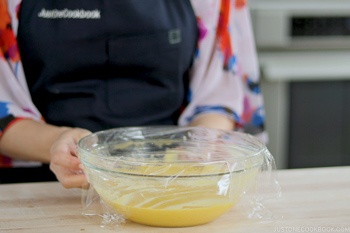
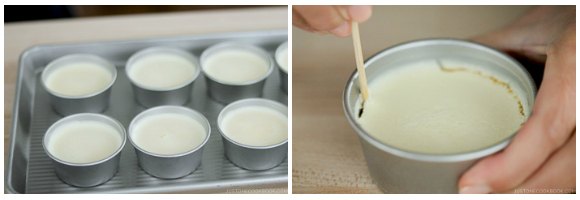
- Divide the custard into the 8 ramekins. Cover with plastic wrap and chill in the fridge overnight or up to 3 days. The caramel on the bottom will become thinner after the moisture from the custard transfers to the caramel.
Day 2 – Making Dorayaki
- Gather all the ingredients.
- In a large bowl, combine 4 eggs, ⅔ cup (140 g) sugar, and 2 Tbsp honey and whisk well until the mixture becomes fluffy.
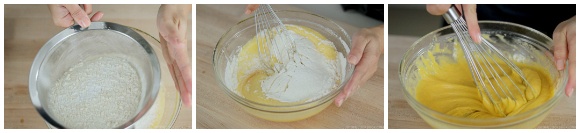
- Sift 1 ⅓ cup (160 g) all-purpose flour and 1 tsp baking powder into the bowl and mix all together.
- Keep in the fridge to rest for 15 minutes.
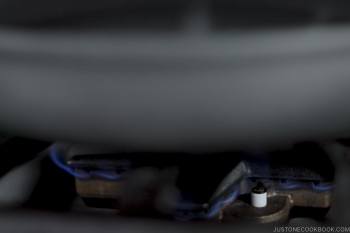
- About 5 minutes before taking out the batter from the fridge, start heating a large non-stick frying pan over low heat. It's best to take your time and heat the pan slowly so there will be no hot spots. I keep the heat setting to the lowest for 5 minutes.
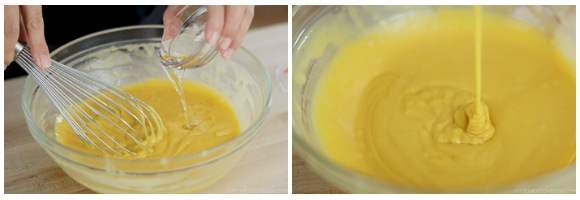
- Take out the batter from the refrigerator. The batter should be slightly smoother now. Stir in 2 Tbsp* of water and whisk to combine until the batter reaches the ribbon stage (When you lift the whisk over the mixture, the batter falls slowly forming thick ribbons which hold their shape atop the batter). *Depends on the size of eggs and how accurate your flour measurement is, the water amount may vary, so start adding 1 Tbsp first, then slowly add more if needed.
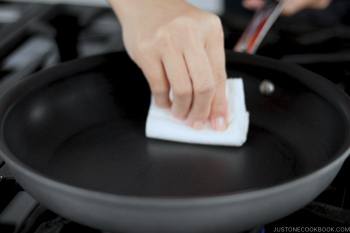
- Dip a paper towel in 1 tsp vegetable oil and coat the bottom of the pan with the oil. Then wipe off the oil completely (that's the key for evenly golden brown dorayaki surface).
- With a ladle or a small measuring cup (I use a 4 Tbsp measuring cup), pour 3 Tbsp of the batter from 3" (8 cm) above the pan to create 3" (8 cm) diameter pancakes. Set timer for 90 seconds (with my gas stove "low setting" and frying pan).
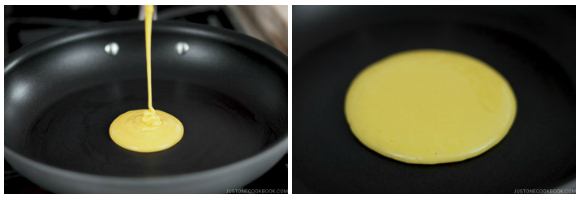
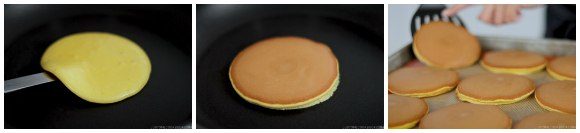
- Using an offset spatula, release the edges of the pancake, and then switch to a larger spatula and flip. Cook the other side for 30 seconds and then transfer to a baking sheet lined with parchment paper or silicone baking mat. You do not need to oil the pan again. Continue making pancakes; you can make about 12 3-inch (8-cm) pancakes total.
Final Step – Assembly
- To serve, run a small sharp knife around the edge of each ramekin to loosen the custard.
- Place a pancake on your serving plate and invert the custard onto the center of the pancake. If it doesn’t release right away, gently shake the ramekin a few times or insert a knife/toothpick around the edges to release the custard. Place another pancake on top to sandwich the purin. Enjoy!
To Store
- You can keep the purin and dorayaki separately. Store them in the refrigerator for up to 2-3 days.


i cant find egg white recipes
Hi mscar! Thanks for catching the error – upon re-organizing my tags, I had to remove egg white tag, so I no longer have it anymore. I edited the recipe note with my macaroon recipe:
https://www.justonecookbook.com/coconut-macaroons/
Thank you once again!
You are right, Nami, 札幌布丁烧 is caramel custard pudding with a layer of cheesecake from Sapporo.
Thanks Letty! I really need to try the exact one to see how it’s like… Planning to go to Hokkaido someday soon (it’s one of my favorite place to visit!), and I’ll remember to try and taste it!
Hi Nami, would it be possible to show us how to make 札幌布丁烧 ? Thank you for sharing all your awesome recipes.
Hi Letty! Is that Sapporo… cheesecake? I’ll use Google translate. 🙂
Hi Nami! This looks sooo yummy! You said to “completely remove the oil” after oiling but how do you do that? WIth a paper towel? or do you use water? thanks!
Hi Mimi! Yes, just wipe off with paper towel – so you don’t see any oil on the pan (but thinly greased so don’t worry). The streaks of oil will not make evenly browned pancake, so you have to remove them completely.