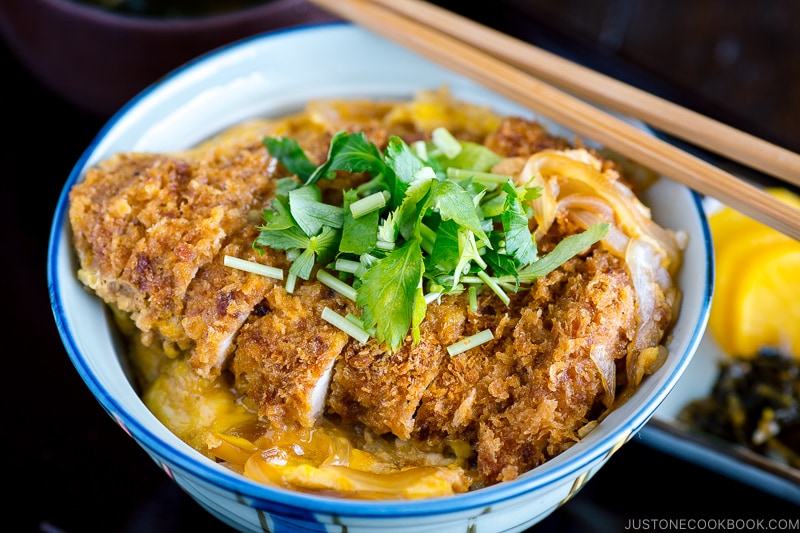
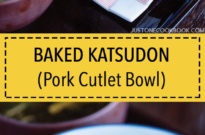
With a crispy pork cutlet and runny egg simmered in a savory broth and served on a bed of hot steamed rice, this Baked Katsudon (Pork Cutlet Rice Bowl) is pure comfort. Follow my tips for baked tonkatsu that is juicy and extra crunchy—and just as good as deep-fried.
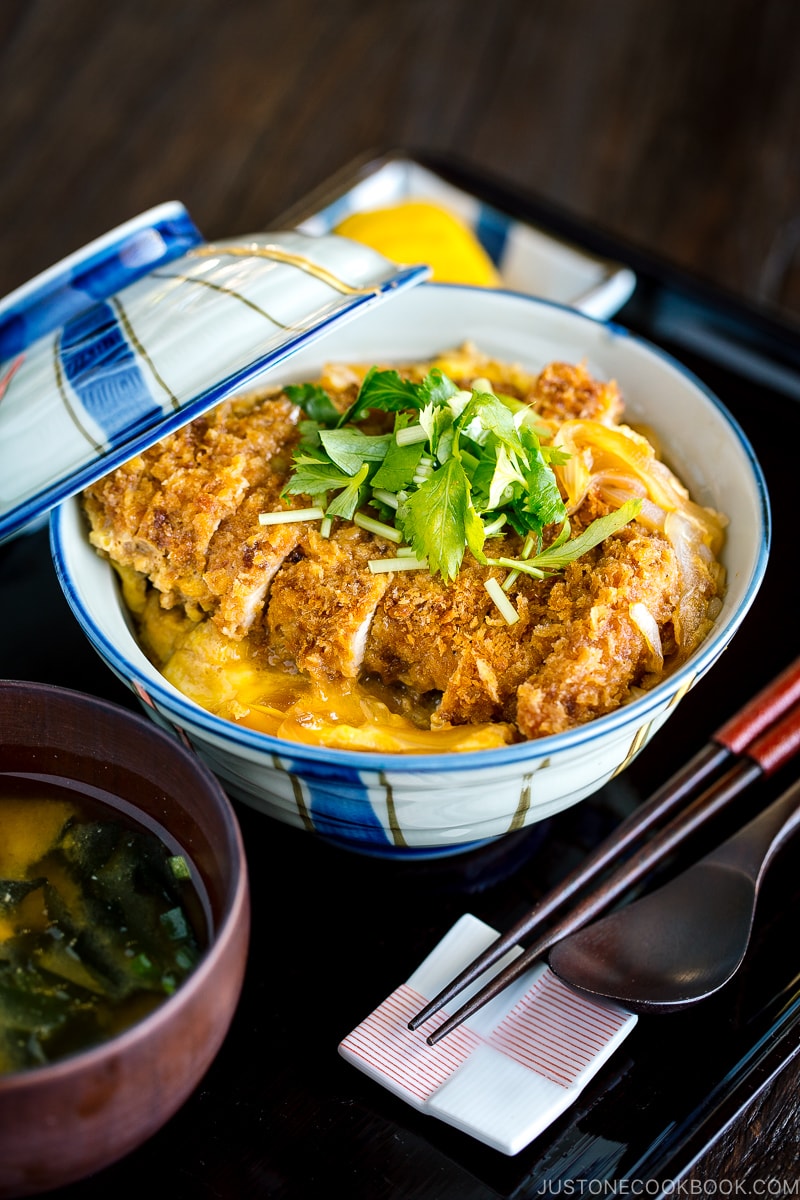
Are you a fan of Japanese deep-fried pork cutlet tonkatsu? Then don’t miss out on this simple and delicious tonkatsu rice bowl called Katsudon (カツ丼). A true soul food of Japan, katsudon is said to warm the coldest of hearts. With irresistibly juicy cutlet and creamy eggs simmered in a savory sauce and poured over steamed rice, katsudon is nothing but pure comfort.
The cutlets typically get their crunchy texture from deep-frying, but my baked tonkatsu is juicy and extra crunchy—and just as good as the deep-fried version. Today, we’re going to take the mess-free route and make Baked Katsudon (揚げないカツ丼). Follow my simple tips to achieve the same golden katsu for your rice bowl.
Ingredients You’ll Need
- panko (Japanese breadcrumbs) – about 1 cup panko
- neutral oil
- boneless pork loin chops – ½ inch thick; for vegan/vegetarian, use tofu or other plant-based meat
- kosher salt – I use Diamond Crystal brand
- freshly ground black pepper
- all-purpose flour (plain flour)
- large egg
For the Sauce
- dashi (Japanese soup stock) – about 1 cup dashi; use standard Awase Dashi, dashi packet or powder, or Vegan Dashi
- sake
- mirin (Japanese sweet rice wine)
- soy sauce
- sugar
For the Katsudon
- onion
- large eggs
- cooked Japanese short-grain rice
- mitsuba (Japanese parsley) – optional; or use chopped green onion/scallion
- shichimi togarashi (Japanese seven spice) – optional
How To Make Baked Katsudon
- Toast the panko in oil in a frying pan over medium heat until golden brown. Cool in a shallow dish.
- Trim and tenderize the meat. Make several slits on the pork’s connective tissue with a knife. Mold the pounded meat back into its original shape.
- Bread the pork pieces in flour (pat to dust off the excess flour), beaten egg, and toasted panko.
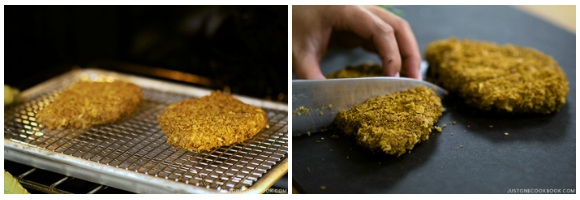
- Bake the pork cutlets on a wire rack over a baking sheet. Cut into pieces.
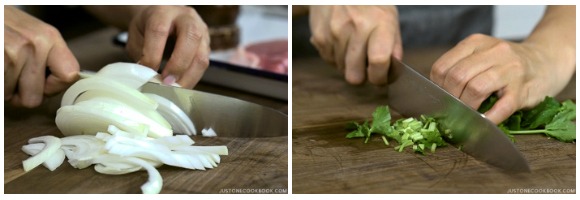
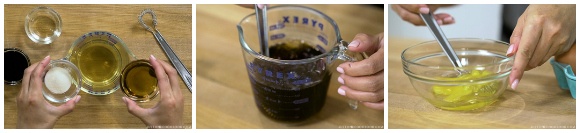
- Prepare the katsudon ingredients. Slice the onion and chop the mitsuba. Combine the sauce ingredients in a liquid measuring cup. In a small bowl, beat an egg.
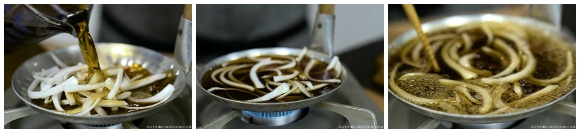
- To a pan, add onion slices and broth to cover them and bring to a boil. Lower the heat and simmer until translucent, about 4–5 mins.
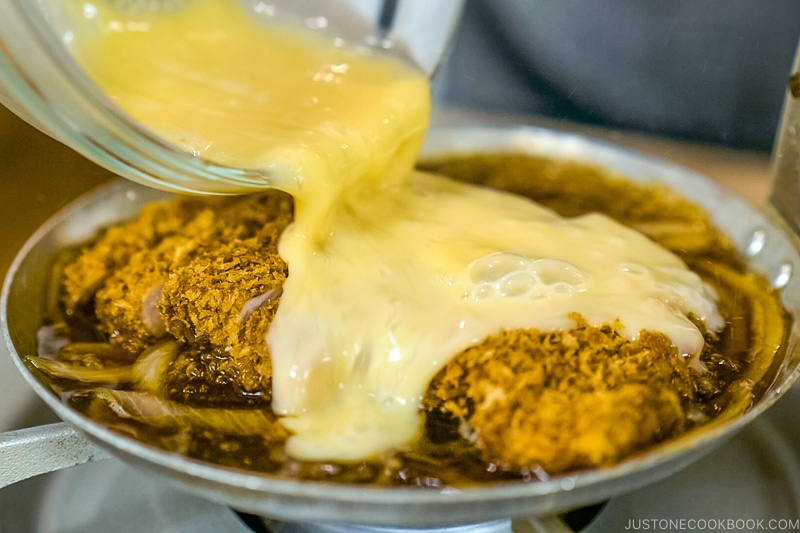
- Add the sliced tonkatsu cutlet on top of the onions and broth and increase the heat to medium high. Drizzle the beaten egg over the top. Turn off the heat when the egg is almost set but still runny.
- Slide the cooked tonkatsu and egg over hot steamed rice in a donburi bowl.
Keep the leftovers in an airtight container and store them in the refrigerator. To reheat, bake in the oven until warm.
3 Secrets to Make Delicious Baked Katsudon
1. Pre-toast the panko breadcrumbs
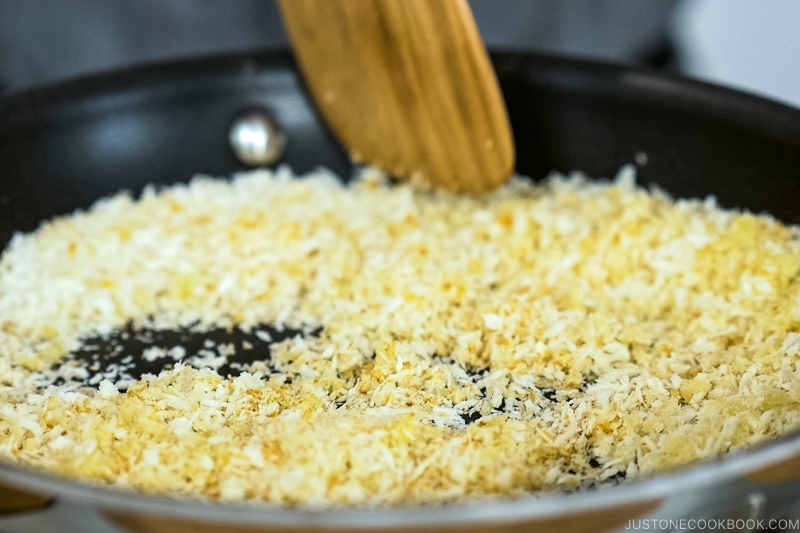
Before breading the pork cutlets, pre-toast the panko in a frying pan until nicely brown. Since we’re not deep frying the cutlets, this step is the golden trick in achieving a beautiful crust and crunchy texture for the baked tonkatsu. I use the same technique for my Baked Tonkatsu or Baked Chicken Katsu recipes.
2. Make one serving at a time
When making donburi dishes like Katsudon and Oyakodon, we make one serving at a time using a special oyakodon pan (親子丼鍋). This way, you can keep the balance of ingredients and distribute them evenly. It also makes it easier to transfer the cooked protein over to the rice as the size of the cooking pan is similar to a donburi bowl.
In this recipe, I used my mom’s oyakodon pan that I found in her kitchen last summer. I brought it home with me and I’m happy that I could use it in this recipe.
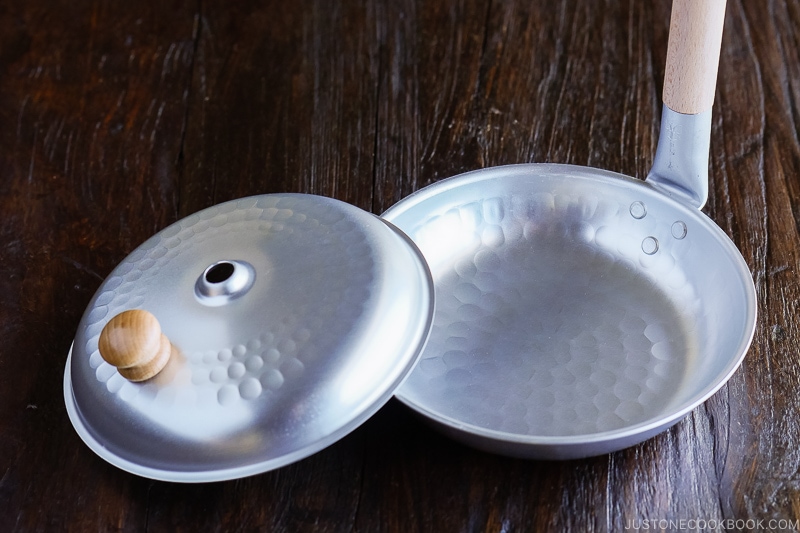
However, my mom’s pan is smaller and shallower than what we can get these days. So I got a brand new oyakodon pan with a lid (picture above). Alternatively, you can use a 5–6 inch pan instead.
3. Use good dashi
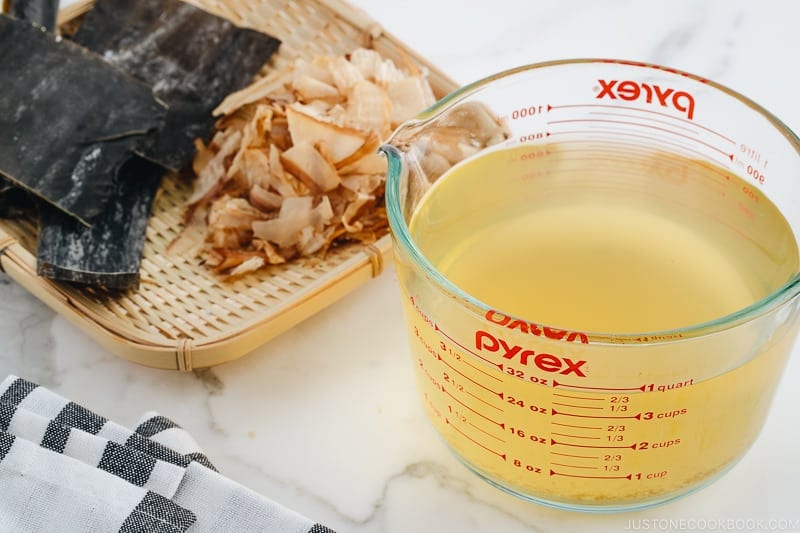
When you make katsudon sauce, it’s important to use good dashi. I highly recommend making your own dashi, but if you’re too busy, you can use a dashi packet. It still tastes better than dashi made with dashi powder. For vegan/vegetarian, use Vegan Dashi.
Donburi – The Ultimate Comfort Food
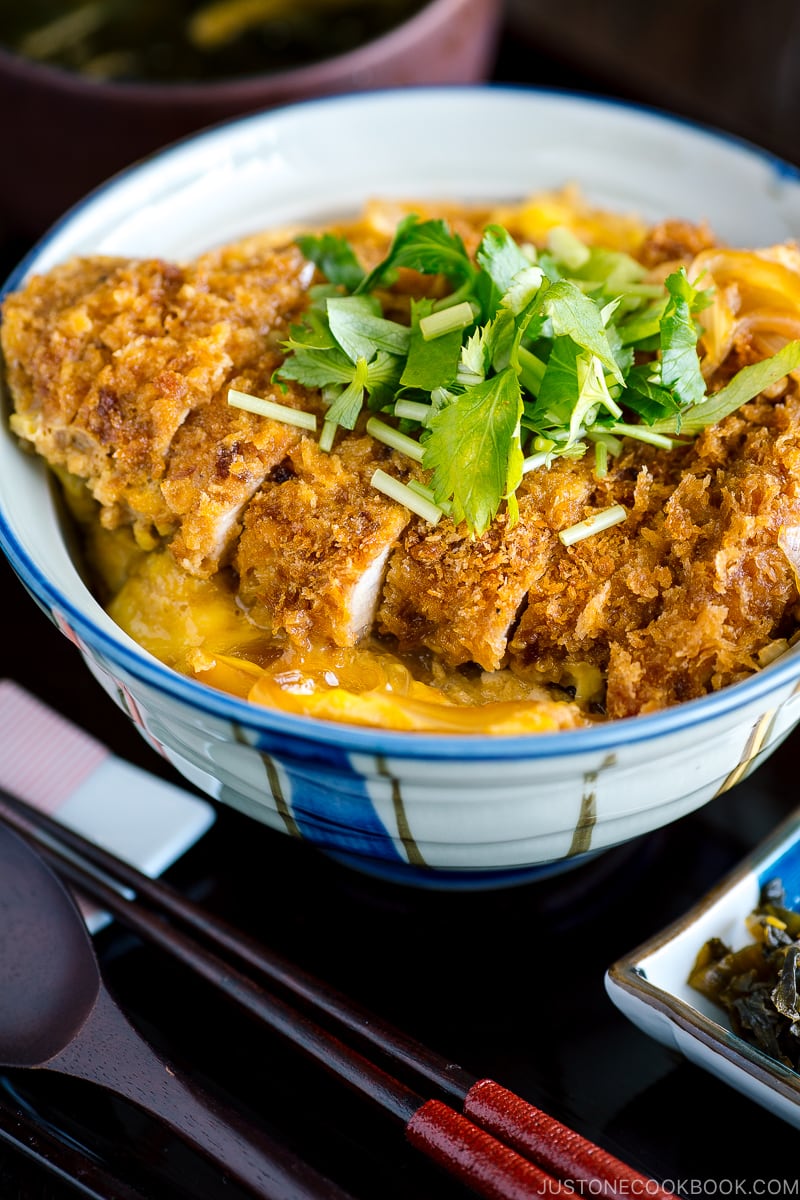
If a rice bowl is your type of dinner, you will enjoy this Baked Katsudon as much as I do. The contrast of juicy panko-crusted pork, sautéed onion, soft eggs, fluffy steamed rice, and a flavorful sauce, all come together to deliver a bowl of deliciousness.
For more mouthwatering Japanese fried foods in baked versions, try out my Baked Croquettes and Baked Chicken Katsu recipes!
More Delicious Donburi Rice Bowl Recipes You’ll Love
Wish to learn more about Japanese cooking? Sign up for our free newsletter to receive cooking tips & recipe updates! And stay in touch with me on Facebook, Pinterest, YouTube, and Instagram.

Baked Katsudon (Japanese Crispy Baked Cutlet Rice Bowl)
Video
Ingredients
For the Baked Tonkatsu
- 1 cup panko (Japanese breadcrumbs)
- 1 Tbsp neutral oil
- 2 pieces boneless pork loin chops (½-inch thick) (4 oz, 113 g each; for vegan/vegetarian, use tofu or other plant-based meat substitutes)
- 1 tsp Diamond Crystal kosher salt
- freshly ground black pepper
- 1 Tbsp all-purpose flour (plain flour) (or more, if needed)
- 1 large egg (50 g each w/o shell)
For the Katsudon
- ½ onion (divided; ¼ onion per serving)
- 2 large eggs (50 g each w/o shell) (divided; 1 egg per serving; for vegan/vegetarian, use egg substitute such as JUST Egg)
- 2 servings cooked Japanese short-grain rice (typically 1⅔ cups (250 g) per donburi serving)
For the Sauce
- 1 cup dashi (Japanese soup stock) (I use a standard Awase Dashi made with kombu and katsuobushi; for vegan/vegetarian, make Vegan Dashi)
- 2 Tbsp sake
- 2 Tbsp mirin
- 2 Tbsp soy sauce
- 2 tsp sugar
For Serving
- 4 sprigs mitsuba (Japanese parsley) (optional; or use chopped green onion/scallion)
- shichimi togarashi (Japanese seven spice) (optional)
Instructions
Before You Start…
- For the steamed rice, please note that 1½ cups (300 g, 2 rice cooker cups) of uncooked Japanese short-grain rice yield 4⅓ cups (660 g) of cooked rice, enough for 2 donburi servings (3⅓ cups, 500 g). See how to cook short-grain rice with a rice cooker, pot over the stove, Instant Pot, or donabe.
- Gather all the ingredients. Adjust the oven rack to the middle position and preheat the oven to 400ºF (200ºC). For a convection oven, reduce the cooking temperature by 25ºF (15ºC). Prepare a rimmed baking sheet with an oven-safe wire rack or line it with parchment paper. I prefer to use a wire rack as it allows hot air to circulate around the cutlets and prevents the panko underneath from getting crushed.
To Toast the Panko
- Combine 1 cup panko (Japanese breadcrumbs) and 1 Tbsp neutral oil in a frying pan. Toast the panko over medium heat, stirring frequently, until golden brown. Transfer the toasted panko into a shallow dish and allow to cool.

To Prepare the Pork
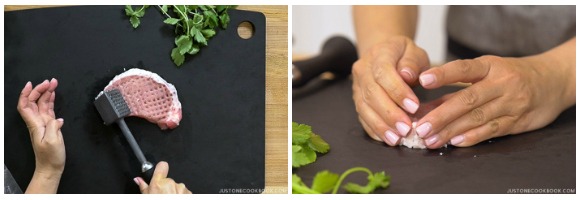
- Cut off the extra fat from 2 pieces boneless pork loin chops (½-inch thick). Make several slits on the connective tissue between the meat and remaining fat. Tip: Red meat and fat have different elasticities, and they will shrink and expand at different rates when they are cooked. Making a few slits will allow the tonkatsu to stay nice and flat and prevent the cutlets from curling up.

- To tenderize the meat, pound both sides of the cutlets with a meat pounder; if you don’t have one, then use the back of the knife. Mold the flattened meat back into the original shape with your hands.
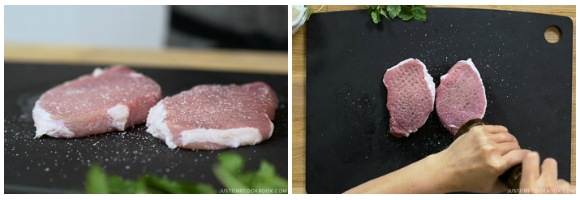
- Sprinkle the cutlets with 1 tsp Diamond Crystal kosher salt and freshly ground black pepper.
- Dredge the pork pieces in 1 Tbsp all-purpose flour (plain flour) to coat completely. Pat off the excess flour.
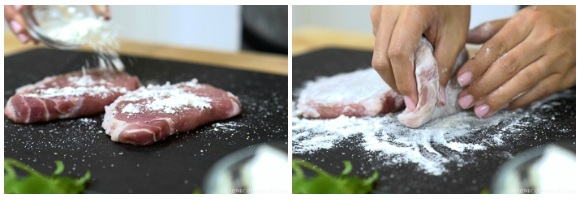
- Next, beat 1 large egg (50 g each w/o shell) in a bowl. Then, dip the pork into the beaten egg and coat with the toasted panko. Press on the panko flakes to make sure they adhere to the pork.

To Bake
- Place the pork cutlets on the wire rack or parchment paper on the prepared baking sheet. Bake at 400ºF (200ºC) until the pork is no longer pink inside, about 20 minutes.
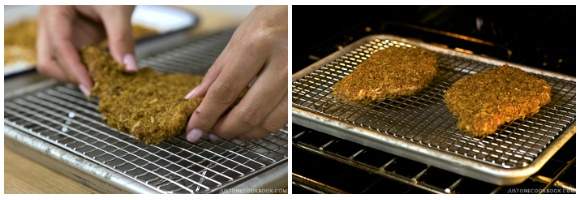
- Remove the tonkatsu from the oven and cut into 1-inch (2.5-cm) pieces (so you can eat them with chopsticks). Press the knife directly down into the cutlets, instead of sawing back and forth. This way, the panko crust will stay on the meat. Set aside for now.
To Prepare the Katsudon Ingredients
- Cut ½ onion into thin slices and divide into 2 portions. Chop 4 sprigs mitsuba (Japanese parsley) (optional) into small pieces.
- Combine the sauce ingredients in a liquid measuring cup or bowl: 1 cup dashi (Japanese soup stock), 2 Tbsp sake, 2 Tbsp mirin, 2 Tbsp soy sauce, and 2 tsp sugar. This amount could be more than you need, depending on the frying pan size you use. You can store the extra in a mason jar in the refrigerator for up to a week. In a separate small bowl, beat one of the 2 large eggs (50 g each w/o shell).
Why Use an Oyakodon Pan?
- In the following step-by-step instructions, I will show you how to make Katsudon using a traditional single-serving oyakodon pan. The oyakodon pan is similar in size to a donburi bowl; therefore, the food cooks in the right size and shape to slide easily onto the steamed rice in the bowl. You can make two servings at once in one large frying pan and carefully divide it, but each portion won't be a round shape that fits perfectly into the donburi bowl.
To Make the Katsudon
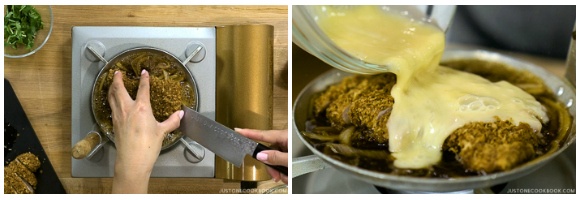
- For each serving, put 1 portion of the onion slices into the pan and pour ½–¾ cup (120–180 ml) of the sauce on top to cover them. Adjust the amount of sauce based on your frying pan size. Bring the sauce and onions to a boil. Lower the heat to medium and cook the onion slices until translucent, about 4–5 minutes.
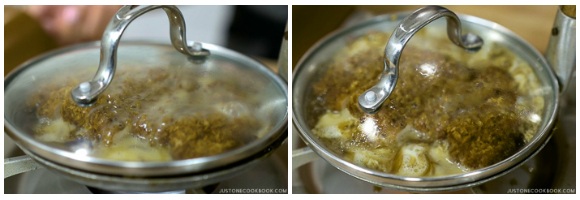
- Carefully place one baked and sliced tonkatsu cutlet on top of the onions in the sauce and turn the heat to medium high. Then, slowly drizzle the beaten egg, evenly distributing it over the tonkatsu and broth. Cover the pan with the lid.
- When the egg is half cooked, about 30 seconds, turn off the heat. The egg should be almost set but still runny.
To Serve
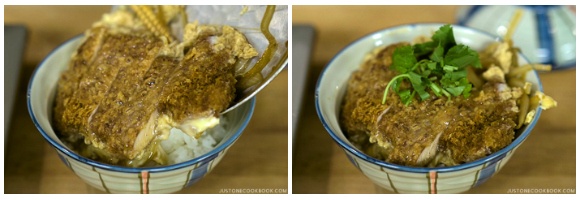
- From the 2 servings cooked Japanese short-grain rice, add 1 serving of hot steamed rice into a donburi bowl. Slide the cooked tonkatsu and egg mixture, including the sauce, on top. Continue cooking and plating the second serving. Sprinkle the chopped mitsuba on top, and serve with shichimi togarashi (Japanese seven spice) on the side.
To Store
- You can keep the leftovers in an airtight container and store them in the refrigerator for up to 3–4 days. You also can freeze the baked and cooled cutlets separately in an airtight container or freezer bag for up to a month. To reheat, bake it at 375ºF (190ºC) on a wire rack until the inside is warm.
Nutrition
Editor’s Note: The post was originally published on July 26, 2017. It’s been edited and republished in May 2020.


Made this the other night, it is a simple recipe that has an explosion of flavor. I make it often, my family loves katsudon
Hi Shirley! We are so happy to hear you enjoyed Nami’s recipe!
Thank you so much for trying her recipe!
I piggy-backed off of my mom’s cooking. She made pork schnitzel for my parent’s dinner, with traditional mushroom gravy. So, I highjacked my piece and made Katsudon. Fantastic recipe – thank you!
Hi Elizabeth! We are glad to hear you enjoyed Katsudon!
Thank you very much for trying Nami’s recipe and for your kind feedback.
does it matter if you cook this in just a regular pan? if not, is there any alternative?
Hi Toma, Yes, you can cook this in a regular pan instead of Oyakodon Pan.
Use a smaller size pan so that the Katsu and egg will easily fit over the rice bowl.
Or you can make two servings at once in one large frying pan and carefully divide it.
We hope this helps!
thank you, that’s really helpful:) I’m excited to try it
You are welcome, toma! We hope you enjoy the Katsudon!
Love JOC! Being GF, I made this tonight by simply browning the pork and by-passing both my gluten free panko and my temperamental oven. For a smaller portion of rice, I halved the sauce ingredients. It rivaled what I loved when I lived in Japan!
Hi Cindy! We are so happy to hear you enjoyed the Katsudon!
Thank you very much for trying JOC recipes and sharing your cooking experience with us! 🥰
I love this recipe. I always put Shio Koji with pork in a zip lock for an hour and it makes a huge difference to the meat. This is my go to when I’m tired, it’s that easy and quick. My 12 year old boy loves it!!
Hi David! Shio Koji That is a great addition to the recipe!
We are glad to hear your son enjoyed the Baked Katsudon. Thank you very much for sharing your cooking tip.
I tried the last step where you put the baked pork inside the sauce, but the egg covered pork ended up being too soggy, is there an explanation for why this might happen?
Hi JACK! Thank you very much for trying this recipe!
The Tonkatsu (pork) absorbed the moisture/liquid from the sauce when you place it in the pan with egg, and it will get soggy.
If you like to enjoy the crunchy texture of the Tonkatsu, we recommend skipping the Tonkatsu at steps 2 and 3 in “To Make Katsudon” and place the Tonkatsu at the end when you serve over the rice. We hope this helps!
Hi there – just came across your lovely site. My hubs loves Japanese food and this year I plan to improve my Japanese cuisine cooking. Will probably start with this recipe!
Hi, The Sudden Cook! Awesome!
Thank you very much for visiting the JOC site. We hope you enjoy many recipes!